



Contents: Removal ↓ Installation ↓
Specialized workshops of TOYOTA companies use sealant No.102 to seal the boat sump (ET Nr. 0882c00080). You can use another sealant with similar properties.
Note: Do not apply too much sealant, especially in the area of the oil holes. Within a quarter of an hour after applying the sealant, the units must be connected. If this time is exceeded, the sealant must be removed and reapplied.
Removal
Disconnect the ground cable from the battery.
Note: This will erase the computer memory, including the fault record and radio receiver code. Before disconnecting the battery, please read the instructions in the section "Removing and installing the battery".**
Place the car on a lift.
Drain the engine oil.
Engine with a working volume of 1.3 l from 8/84 and 1.6 l: Disconnect the inlet pipe exhaust system. Lower the exhaust system and hang it on a wire to the body.
If there is an oil radiator, disconnect the oil hose from it.
Remove the oil pan mounting bolts and nuts.
Knock out the sealant between the cylinder block and the oil pan.
Specialized TOYOTA workshops use a special tool for this purpose, SST 09032-00100. An old knife can also be used for this purpose, with which the sealant is knocked out of the gap between the cylinder block and the oil pan with a hammer.
Caution: When removing the oil pan, be careful not to damage the mating surfaces of the oil pan and cylinder block.
Remove the oil pan.
Installation
Carefully clean the mating surfaces of the oil pan and cylinder block from any remaining old sealant using a triangular scraper and razor.
Thoroughly wipe the cylinder block, crankshaft drive pulley and oil pump. The oil pan sealant may be damaged by leaking oil.
Wipe and dry the mating surfaces of the oil pan and cylinder block with a solvent, which can be alcohol or acetone.
Caution: Do not use solvents that damage painted surfaces.
Engine with a working volume of 1.3 l up to 7/84 of production
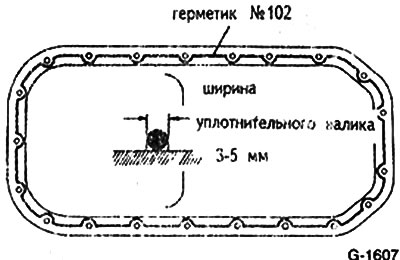
Apply silicone based sealant as shown in the picture.
Tighten the bolts and nuts to 6 Nm.
Engine with a working volume of 1.3 l with 8/84 tolerance
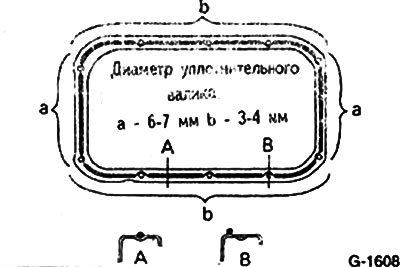
Apply silicone-based sealant as shown in Fig. Sealing bead diameter: a - 6-7 mm, b - 3-4 mm.
Tighten the bolts and nuts to 8 Nm.
Engine capacity 1.6 l (4A-F, 4A-FE, 4A-GE, 4A-GEL)
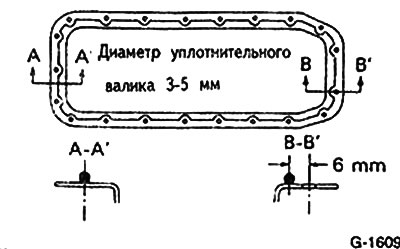
Apply silicone based sealant as shown in the picture.
Tighten the bolts and nuts to 5 Nm.
1.8L Diesel
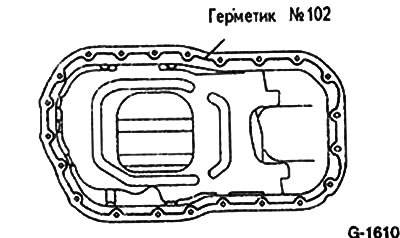
Apply silicone based sealant as shown in the picture.
Tighten the bolts and nuts to 8 Nm.
Install the exhaust system in place.
Remove the car from the lift.
Add engine oil.
Connect the ground (-) cable to the battery.
Set the time on the clock, if available, and enter the radio receiver security code.
Take a test drive, check the oil level and the tightness of the oil pan.
Tighten bolted connections if necessary.