




Share information:
Vehicle owner's manual Toyota Corolla 5 (E80)

Two keys for your car
The master key fits any car lock. The second key cannot open the trunk lid. Since the doors and trunk lid can be locked without a key, always carry a duplicate master key in case the key is inadvertently left inside the...
The master key fits any car lock. The second key cannot open the trunk lid. Since the doors and trunk lid can be locked without a key, always carry a duplicate master key in case the key is inadvertently left inside the...

Door lock — opening and locking with a key
To lock, turn the key forward; to open, turn the key backward (see picture).
To lock, turn the key forward; to open, turn the key backward (see picture).

Locking the door from inside the car
After closing the door, press the lock button. After this, the door cannot be opened from the outside or from the inside using the door handles. Remember to close and lock the doors before you start driving, especially...
After closing the door, press the lock button. After this, the door cannot be opened from the outside or from the inside using the door handles. Remember to close and lock the doors before you start driving, especially...

Locking the door from the outside without a key
Press the door lock button. Then close the door with the outer day handle raised. When locking the rear doors, there is no need to lift the outside door handle. When locking, make sure that your keys do not remain...
Press the door lock button. Then close the door with the outer day handle raised. When locking the rear doors, there is no need to lift the outside door handle. When locking, make sure that your keys do not remain...

Child safety lock for rear door lock
To lock the rear door so that it cannot be opened from the inside, move the child safety lever down and close the door. After this, the door can only be opened from the outside. The child safety lock is recommended for...
To lock the rear door so that it cannot be opened from the inside, move the child safety lever down and close the door. After this, the door can only be opened from the outside. The child safety lock is recommended for...

Front Seat — Front Seat Relocation
Pull the locking lever upwards. Then move the seat with light pressure of your body to the desired position and release the lever to its previous position. After installation, try moving the seat back and forth to...
Pull the locking lever upwards. Then move the seat with light pressure of your body to the desired position and release the lever to its previous position. After installation, try moving the seat back and forth to...

Setting the seat back angle
Lean forward and pull the locking lever. Then lean your torso back to the desired backrest angle and release the lever. If desired, the backrest can be set to a resting position. Level it when the lever is raised up and...
Lean forward and pull the locking lever. Then lean your torso back to the desired backrest angle and release the lever. If desired, the backrest can be set to a resting position. Level it when the lever is raised up and...

Setting the angle of the seat surface
To adjust the seat height, pull out the adjustment lever and move it up or down.
To adjust the seat height, pull out the adjustment lever and move it up or down.

Installing the hip support
To change the position of the thigh rest, pull the lever forward and release it. There are four possible installation positions. After reaching the fourth position, installation occurs in the reverse order.
To change the position of the thigh rest, pull the lever forward and release it. There are four possible installation positions. After reaching the fourth position, installation occurs in the reverse order.

Headrests (with vertical adjustment)
To raise, pull the headrest up. To lower, press the headrest down while simultaneously pressing the release button. Adjust the headrest so that its top edge matches the top edge of the occupant's ears, then secure it in...
To raise, pull the headrest up. To lower, press the headrest down while simultaneously pressing the release button. Adjust the headrest so that its top edge matches the top edge of the occupant's ears, then secure it in...

Headrests (with vertical and horizontal adjustment)
To raise, pull the headrest up. To lower, push the headrest down while pressing the locking button. To move the headrest forward, pull it by the upper edge. There are six fixed installation positions. Further pulling...
To raise, pull the headrest up. To lower, push the headrest down while pressing the locking button. To move the headrest forward, pull it by the upper edge. There are six fixed installation positions. Further pulling...

Seat belts (three-point)
To fasten, pull the belt out of the retractor mechanism and insert the tongue into the buckle. When the tongue is fixed in the lock, you will hear a click. Make sure that the lock is securely fastened and the belt is...
To fasten, pull the belt out of the retractor mechanism and insert the tongue into the buckle. When the tongue is fixed in the lock, you will hear a click. Make sure that the lock is securely fastened and the belt is...

Seat belts (two-point)
To fasten the belt, insert the tongue into the buckle (fig. 10170-09). When the tongue is fixed in the lock, you will hear a click. Make sure that the lock is securely fastened and the belt is not twisted. If the belt...
To fasten the belt, insert the tongue into the buckle (fig. 10170-09). When the tongue is fixed in the lock, you will hear a click. Make sure that the lock is securely fastened and the belt is not twisted. If the belt...

Ignition switch with steering wheel lock (petrol engines)
"START" — the starter is turned on. Before starting the engine, set the automatic transmission lever to the "P" or "N" position, or with a manual transmission, set it to neutral and depress the clutch pedal. Release the...
"START" — the starter is turned on. Before starting the engine, set the automatic transmission lever to the "P" or "N" position, or with a manual transmission, set it to neutral and depress the clutch pedal. Release the...

Ignition switch with steering wheel lock (diesel engines)
"ON" — serves to turn on the glow plugs and preheat the engine before it is started. After the engine is started, the key returns to this position, and all electrical consumers are ready for operation. When the key is...
"ON" — serves to turn on the glow plugs and preheat the engine before it is started. After the engine is started, the key returns to this position, and all electrical consumers are ready for operation. When the key is...

Combined switch for high beam, low beam and direction indicators
To turn on the light, turn the button on the end of the lever. To turn on the high beam, push the lever forward. To turn on the low beam, pull it back. To flash the headlights, pull the lever further. When the high beam...
To turn on the light, turn the button on the end of the lever. To turn on the high beam, push the lever forward. To turn on the low beam, pull it back. To flash the headlights, pull the lever further. When the high beam...

Setting the steering wheel height
To change the height of the steering wheel, press down on the locking lever, set the steering wheel to the desired height and return the lever to its original position. Once the steering wheel is installed, try moving...
To change the height of the steering wheel, press down on the locking lever, set the steering wheel to the desired height and return the lever to its original position. Once the steering wheel is installed, try moving...

Hazard warning switch
To turn on the hazard warning lights, press the switch down. All direction indicators flash. The engine can be on or off. The hazard warning lights can be turned on without the ignition key. Turn on your hazard warning...
To turn on the hazard warning lights, press the switch down. All direction indicators flash. The engine can be on or off. The hazard warning lights can be turned on without the ignition key. Turn on your hazard warning...

Windscreen wiper and washer switch (intermittent version)
To turn on the windshield wipers, pull the lever down. To operate the washers, press the button on the end of the lever. If the selector lever is in the "INT" position, the windshield wiper operates in intermittent...
To turn on the windshield wipers, pull the lever down. To operate the washers, press the button on the end of the lever. If the selector lever is in the "INT" position, the windshield wiper operates in intermittent...

Option without intermittent operation mode
For a single cleaning, press the switch lever to the "MIST" position and immediately release. If the lever is released, it returns to the "OFF" position. If it is held in the "MIST" position, the wiper operates...
For a single cleaning, press the switch lever to the "MIST" position and immediately release. If the lever is released, it returns to the "OFF" position. If it is held in the "MIST" position, the wiper operates...

Rear Window Wiper and Washer Switch
To turn on the rear window wiper and washer, press the button. If the windshield washer does not work, check if there is fluid in the washer reservoir. Instructions for filling the reservoir are provided in the Manual.
To turn on the rear window wiper and washer, press the button. If the windshield washer does not work, check if there is fluid in the washer reservoir. Instructions for filling the reservoir are provided in the Manual.

Headlight cleaner
To spray the headlight with washer fluid, turn the light switch to the first or second click and press the windshield washer button twice (see picture). Check the fluid level in the transparent headlight washer fluid...
To spray the headlight with washer fluid, turn the light switch to the first or second click and press the windshield washer button twice (see picture). Check the fluid level in the transparent headlight washer fluid...
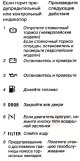
Warning and control indicators
1. Brake system indicator light This indicator has the following functions: Parking brake indicator light. If the indicator lights up, check whether the parking (manual) brake is fully released. The indicator should go...
1. Brake system indicator light This indicator has the following functions: Parking brake indicator light. If the indicator lights up, check whether the parking (manual) brake is fully released. The indicator should go...

Fuel gauge (vehicles without tachometer)
The fuel gauge operates when the ignition is on and shows the approximate amount of fuel remaining in the tank. It is recommended that the fuel tank be kept at least a quarter full at all times. The pointer moves when...
The fuel gauge operates when the ignition is on and shows the approximate amount of fuel remaining in the tank. It is recommended that the fuel tank be kept at least a quarter full at all times. The pointer moves when...

Fuel gauge (vehicles with tachometer)
The fuel gauge operates when the ignition is on and shows the approximate amount of fuel remaining in the tank. It is recommended that the fuel tank be kept at least a quarter full at all times. This indicator does not...
The fuel gauge operates when the ignition is on and shows the approximate amount of fuel remaining in the tank. It is recommended that the fuel tank be kept at least a quarter full at all times. This indicator does not...

Remote coolant thermometer
If the needle is in the red area or above, stop the vehicle and let the engine cool down. The thermometer shows the engine coolant temperature when the ignition is on. The engine operating temperature varies depending...
If the needle is in the red area or above, stop the vehicle and let the engine cool down. The thermometer shows the engine coolant temperature when the ignition is on. The engine operating temperature varies depending...

Trip meter and day meter
The trip meter shows how many kilometers the car has traveled since it was first driven. The daily meter can be reset to show the mileage of each trip. To reset the daily meter, press and release the reset button. The...
The trip meter shows how many kilometers the car has traveled since it was first driven. The daily meter can be reset to show the mileage of each trip. To reset the daily meter, press and release the reset button. The...

Tachometer on the dashboard
The tachometer shows the engine speed (the corresponding number multiplied by a thousand corresponds to the current crankshaft speed in revolutions per minute). Pay attention to the tachometer while driving to ensure...
The tachometer shows the engine speed (the corresponding number multiplied by a thousand corresponds to the current crankshaft speed in revolutions per minute). Pay attention to the tachometer while driving to ensure...

Fuel-efficient driving control device
The control device signals you about the fuel consumption mode by changing its color. In order to achieve the best fuel consumption, try to keep the indicator green. Yellow-brown color indicates excessive fuel...
The control device signals you about the fuel consumption mode by changing its color. In order to achieve the best fuel consumption, try to keep the indicator green. Yellow-brown color indicates excessive fuel...

Clock in the car interior
The digital clock shows the current time when the ignition key is in the "ACC" or "ON" position. When the headlights are on, the brightness of the hour indicator decreases. Setting the time a) To set the hours, press...
The digital clock shows the current time when the ignition key is in the "ACC" or "ON" position. When the headlights are on, the brightness of the hour indicator decreases. Setting the time a) To set the hours, press...

Instrument cluster dimmer
To set the desired level of instrument panel illumination, rotate the control knob.
To set the desired level of instrument panel illumination, rotate the control knob.

Rear window defroster switch
To turn on the electric rear window heating, press the switch. Thin heating elements on the inside of the rear window will quickly provide good visibility. The rear window heating only functions when the engine is...
To turn on the electric rear window heating, press the switch. Thin heating elements on the inside of the rear window will quickly provide good visibility. The rear window heating only functions when the engine is...

Rear fog light switch
To turn on the rear fog lights, press the switch. They turn on when the headlights are on.
To turn on the rear fog lights, press the switch. They turn on when the headlights are on.

Cigarette lighter and ashtray
To use the cigarette lighter, press it all the way down. When it warms up, the cigarette lighter will automatically jump out to its original position and will be ready for use. With the engine stopped, turn the ignition...
To use the cigarette lighter, press it all the way down. When it warms up, the cigarette lighter will automatically jump out to its original position and will be ready for use. With the engine stopped, turn the ignition...

Driver's seat heating
To turn on the driver's seat heating, press the switch towards "Hi" (high temperature) or towards "LO" (low temperature). Turn on the seat heating only when the engine is running.
To turn on the driver's seat heating, press the switch towards "Hi" (high temperature) or towards "LO" (low temperature). Turn on the seat heating only when the engine is running.

Control of the heating and ventilation device
The four controls are very easy to operate: The air flow regulator allows you to choose between the flow of fresh air from outside and the circulation of air inside the cabin. The air separation regulator serves to...
The four controls are very easy to operate: The air flow regulator allows you to choose between the flow of fresh air from outside and the circulation of air inside the cabin. The air separation regulator serves to...

Heating, ventilation and air conditioning control
Air conditioner switch This is the only visible switch that is added to the heating and ventilation system if: Your car has air conditioning. To use the air conditioner in economy mode, press the "ECON" button all the...
Air conditioner switch This is the only visible switch that is added to the heating and ventilation system if: Your car has air conditioning. To use the air conditioner in economy mode, press the "ECON" button all the...

Ventilation system control
The three controls are very easy to operate: The air separation regulator serves to direct the air in the desired direction (into the instrument panel ventilation grilles or onto the windshield). The air flow regulator...
The three controls are very easy to operate: The air separation regulator serves to direct the air in the desired direction (into the instrument panel ventilation grilles or onto the windshield). The air flow regulator...

Control of ventilation and air conditioning systems
Thermostat regulator This is the only visible control that is added to the ventilation system if your vehicle is equipped with air conditioning. The thermostat regulator is used to turn the air conditioner on and off...
Thermostat regulator This is the only visible control that is added to the ventilation system if your vehicle is equipped with air conditioning. The thermostat regulator is used to turn the air conditioner on and off...

Radio receiver control
If the ignition key is in the "ON" or "ACC" position, you can use the radio. However, if the engine is not running, the ignition key must be in the "ACC" position. Set the antenna length for best reception. Usually in...
If the ignition key is in the "ON" or "ACC" position, you can use the radio. However, if the engine is not running, the ignition key must be in the "ACC" position. Set the antenna length for best reception. Usually in...

Cassette player
Auto-reverse performance: To play a cassette, simply insert it into the slot until it is fully inserted. The cassette player automatically switches on and the radio switches off. At the end of the tape, the direction of...
Auto-reverse performance: To play a cassette, simply insert it into the slot until it is fully inserted. The cassette player automatically switches on and the radio switches off. At the end of the tape, the direction of...

Parking (hand) brake
Tightening: Pull up on the handle. To release: Pull the handle up slightly, press the button with your thumb and push the lever down. Before leaving the vehicle, apply the parking brake securely. To achieve greater...
Tightening: Pull up on the handle. To release: Pull the handle up slightly, press the button with your thumb and push the lever down. Before leaving the vehicle, apply the parking brake securely. To achieve greater...

Air damper pull button
When starting a cold engine, pull out the choke knob. This creates an enriched fuel-air mixture, which allows the engine to be started easily. Never forget to return this button to its original position once the engine...
When starting a cold engine, pull out the choke knob. This creates an enriched fuel-air mixture, which allows the engine to be started easily. Never forget to return this button to its original position once the engine...

Glove box
To open the glove compartment latch, pull the lever. To reduce possible damage in the event of an accident or sudden braking, keep the glove compartment lid closed while driving.
To open the glove compartment latch, pull the lever. To reduce possible damage in the event of an accident or sudden braking, keep the glove compartment lid closed while driving.

Adjustable external mirror from inside
The adjustment lever is used to adjust the rearview mirror. If ice prevents adjustment, do not force the mirror or scrape ice off the mirror. Use an aerosol de-icer to release the adjustment lever.
The adjustment lever is used to adjust the rearview mirror. If ice prevents adjustment, do not force the mirror or scrape ice off the mirror. Use an aerosol de-icer to release the adjustment lever.

Interior mirror with dimming (protective screen)
To avoid being blinded by the headlights of oncoming vehicles while driving at night, pull the lever of the interior dimming mirror back. Before setting the mirror to the best viewing position, push the lever forward...
To avoid being blinded by the headlights of oncoming vehicles while driving at night, pull the lever of the interior dimming mirror back. Before setting the mirror to the best viewing position, push the lever forward...

Ceiling lighting
The ceiling light switch has three positions: "ON" : When the doors are open or closed, the lights that are not influenced by other switches are on. "DOOR" : the lights are on when the doors are open. "OFF" : even with...
The ceiling light switch has three positions: "ON" : When the doors are open or closed, the lights that are not influenced by other switches are on. "DOOR" : the lights are on when the doors are open. "OFF" : even with...


Luggage compartment lighting
To illuminate the luggage compartment, open the trunk lid and press the switch. When the trunk is closed, the light turns off.
To illuminate the luggage compartment, open the trunk lid and press the switch. When the trunk is closed, the light turns off.

Electric sliding sunroof
To open the sunroof, press the switch toward "OPEN" with the ignition on. To close, press the locking button forward and then press the switch toward "CLOSE". The sunroof moves when the switch is held down and stops...
To open the sunroof, press the switch toward "OPEN" with the ignition on. To close, press the locking button forward and then press the switch toward "CLOSE". The sunroof moves when the switch is held down and stops...

Folding rear seat
Unlock the seat back and fold it down. Secure the locking lever if you have moved the seat back slightly forward. If desired, each seat back can be folded down separately. After the seat back is in the vertical...
Unlock the seat back and fold it down. Secure the locking lever if you have moved the seat back slightly forward. If desired, each seat back can be folded down separately. After the seat back is in the vertical...


Trunk lid (non-European models)
To open the trunk lid, insert the key and turn it clockwise. To close, lower the lid and press it down. After closing the trunk lid, check by pulling it up that the lid is properly locked. Keep the trunk lid closed...
To open the trunk lid, insert the key and turn it clockwise. To close, lower the lid and press it down. After closing the trunk lid, check by pulling it up that the lid is properly locked. Keep the trunk lid closed...

Trunk lid (European models)
To open the trunk lid, turn the handle clockwise until it stops. If the lid is locked, insert the key and unlock the handle. To close, lower the lid and press it down. After closing the trunk lid, check that the lid is...
To open the trunk lid, turn the handle clockwise until it stops. If the lid is locked, insert the key and unlock the handle. To close, lower the lid and press it down. After closing the trunk lid, check that the lid is...


Rear door (non-European models)
To open the rear door, insert the key and turn it clockwise. When the back cover is half lifted, it will open further by itself. To close, lower the lid and press it down. After closing the tailgate, check that it is...
To open the rear door, insert the key and turn it clockwise. When the back cover is half lifted, it will open further by itself. To close, lower the lid and press it down. After closing the tailgate, check that it is...

Rear door (European models)
To open the rear door, turn the handle clockwise until it stops. If the rear door is locked, insert the key and unlock the handle. To close, lower the tailgate and push it down. After closing the tailgate, check that it...
To open the rear door, turn the handle clockwise until it stops. If the rear door is locked, insert the key and unlock the handle. To close, lower the tailgate and push it down. After closing the tailgate, check that it...

Trunk Cover
Attach the cord to the tailgate. When the tailgate is raised, the cargo cover flips up, allowing easy access to the cargo area. Remove the cover from the clips to gain additional cargo space. To avoid injury during...
Attach the cord to the tailgate. When the tailgate is raised, the cargo cover flips up, allowing easy access to the cargo area. Remove the cover from the clips to gain additional cargo space. To avoid injury during...


Fuel tank cap
To open, unlock the fuel tank door with the key, turn the threaded tank cap counterclockwise and remove it. If you hear a slight hissing sound when removing the cap, this is normal. When closing the threaded cap, make...
To open, unlock the fuel tank door with the key, turn the threaded tank cap counterclockwise and remove it. If you hear a slight hissing sound when removing the cap, this is normal. When closing the threaded cap, make...

Unlocking the hood
Pull the hood release lever under the instrument panel, which will lift the hood slightly. Stand in front of the car. Push up the additional locking lever and lift the hood. After lifting the hood, insert the end of the...
Pull the hood release lever under the instrument panel, which will lift the hood slightly. Stand in front of the car. Push up the additional locking lever and lift the hood. After lifting the hood, insert the end of the...
Protecting your car from corrosion
The latest technology was used to create your Toyota to reduce the impact of corrosion on your car parts and provide you with the best quality. The rest is up to you. Proper car care can ensure long-term protection...
The latest technology was used to create your Toyota to reduce the impact of corrosion on your car parts and provide you with the best quality. The rest is up to you. Proper car care can ensure long-term protection...
Car wash and waxing
Wash your car in the shade so that the body does not get too hot. Use liquid car wash products and rinse them off thoroughly. Dirt can cause minor scratches, and chemicals in dust or airborne particles can degrade the...
Wash your car in the shade so that the body does not get too hot. Use liquid car wash products and rinse them off thoroughly. Dirt can cause minor scratches, and chemicals in dust or airborne particles can degrade the...
Cleaning the car interior
Vinyl chair covers can be cleaned with mild soap or neutral detergent and water. First, remove the dirt with a vacuum cleaner. Then apply the soapy solution to the vinyl covers with a cloth or sponge. Leave it for a...
Vinyl chair covers can be cleaned with mild soap or neutral detergent and water. First, remove the dirt with a vacuum cleaner. Then apply the soapy solution to the vinyl covers with a cloth or sponge. Leave it for a...
This section is available on: russian, bulgarian, belarusian, ukrainian, serbian, croatian, romanian, polish, slovak, hungarian
Similar sections for other Toyota models
➥ User manual Toyota 4Runner N120 (1989-1995)
➥ User manual Toyota RAV 4 XA10 (1994-2000)
➥ User manual Toyota Camry XV10 (1991-1996)
➥ User manual Toyota Corona T190 (1992-1997)
➥ User manual Toyota Carina T190 (1992-1996)
➥ User manual Toyota Duet (1998-2004)
Link in different formats to this article
TEXTHTMLBB Code
- General information
- User manual
- Start of movement
- Faults en route
- Maintenance
- Power unit
- Engine repair
- Lubrication system
- Cooling system
- Ignition system
- Supply system
- Fuel supply (carburetor)
- Fuel supply (injector)
- Diesel engine
- Exhaust system
- Transmission
- Clutch
- Manual gearbox
- Automatic gearbox
- Chassis, running gear
- Front suspension
- Rear suspension
- Steering
- Brake system
- Wheels and tires
- Body and interior
- Exterior (external elements)
- Interior (internal elements)
- Interior heating
- Electrical equipment
- Equipment and devices
- Power devices
- Lighting system
- Glass cleaners and washers
- General information
- User manual
- Power unit
- Petrol engines 1ZZ, 3ZZ
- Diesel engines 1СD-FTV
- Cooling system
- Lubrication system
- Fuel system
- Control system
- Exhaust system
- Transmission
- Clutch and drive shafts
- Mechanical gearbox
- Chassis, running gear
- Car suspension
- Steering
- Brake system
- Body and interior
- Exterior (external elements)
- Electrical equipment
- Power devices
- Electrical circuits