



Share information:
Front and rear suspension Corolla Verso 3 (AR10)


Front suspension — design description
Fig. 4.2. Front suspension components Thanks to the optimal arrangement of components, the front suspension provides a smooth and comfortable ride, excellent handling and cross-country ability. Maintenance...
Fig. 4.2. Front suspension components Thanks to the optimal arrangement of components, the front suspension provides a smooth and comfortable ride, excellent handling and cross-country ability. Maintenance...

Rear suspension — design description
Fig. 4.6. Rear suspension components Thanks to the optimal arrangement of components, optimization of wheel alignment during compression and rebound, and the use of geometry that prevents the rear of the car from...
Fig. 4.6. Rear suspension components Thanks to the optimal arrangement of components, optimization of wheel alignment during compression and rebound, and the use of geometry that prevents the rear of the car from...

Checking the height of the tread pattern
The lower the tread depth, the greater the risk of tire slippage. The effectiveness of tires for driving on snow is significantly reduced if the tread wears to a height of less than 4 mm. Fig. 4.11. Checking the height...
The lower the tread depth, the greater the risk of tire slippage. The effectiveness of tires for driving on snow is significantly reduced if the tread wears to a height of less than 4 mm. Fig. 4.11. Checking the height...

Tire replacement
When replacing tires, use only tires of the same size and design as those originally installed, and with the same or greater load-carrying capacity. Using a tire of any other size or type may seriously affect handling,...
When replacing tires, use only tires of the same size and design as those originally installed, and with the same or greater load-carrying capacity. Using a tire of any other size or type may seriously affect handling,...
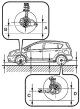
Adjusting the front wheel alignment angles
Measuring the height of some points of the car chassis Fig. 4.14. Measuring the height of some points of the vehicle chassis The height of some points of the car chassis: Except for N1 configuration Configuration N1...
Measuring the height of some points of the car chassis Fig. 4.14. Measuring the height of some points of the vehicle chassis The height of some points of the car chassis: Except for N1 configuration Configuration N1...

Removal, checking and installation the front suspension shock absorber
Removal Remove the front wheel. Fig. 4.23. Unscrewing the anti-roll bar strut mounting nut Unscrew the anti-roll bar mounting nut (Fig. 4.23). Caution: If the ball joint axle rotates with the nut, use a hex wrench (6mm)...
Removal Remove the front wheel. Fig. 4.23. Unscrewing the anti-roll bar strut mounting nut Unscrew the anti-roll bar mounting nut (Fig. 4.23). Caution: If the ball joint axle rotates with the nut, use a hex wrench (6mm)...

Replacing the lower left control arm of the front suspension No. 1
Remove the front wheel. Remove the lower left engine shield. Disconnecting the lower left control arm No.1 of the front suspension Remove the bolt and unscrew the 2 nuts. Fig. 4.32. Fastening of the lower left arm No.1...
Remove the front wheel. Remove the lower left engine shield. Disconnecting the lower left control arm No.1 of the front suspension Remove the bolt and unscrew the 2 nuts. Fig. 4.32. Fastening of the lower left arm No.1...

Rear Suspension Inspection Procedures
Measure the height of some points on the vehicle's chassis. Note: Before checking the rear wheel alignment angles, adjust the vehicle chassis height to the specified values. Checking wheel alignment Fig. 4.34. Rear...
Measure the height of some points on the vehicle's chassis. Note: Before checking the rear wheel alignment angles, adjust the vehicle chassis height to the specified values. Checking wheel alignment Fig. 4.34. Rear...

Removal, checking and installation the rear suspension shock absorber
Removal the rear shock absorber with a coil spring Fig. 4.35. Installing a wooden block Raise the rear axle beam with a jack. To avoid damaging the rear axle beam, place a wooden block between the jack and the beam...
Removal the rear shock absorber with a coil spring Fig. 4.35. Installing a wooden block Raise the rear axle beam with a jack. To avoid damaging the rear axle beam, place a wooden block between the jack and the beam...
This section is available on: russian, bulgarian, belarusian, ukrainian, serbian, croatian, romanian, polish, slovak, hungarian
Similar sections for other Toyota models
➥ Car suspension Toyota Dyna Y50/Y60 (1984-1995)
➥ Car suspension Toyota Cruiser 60/80 (1980-1997, petrol)
➥ Car suspension Toyota Carina T190 (1992-1996)
➥ Car suspension Toyota 4Runner N120 (1989-1995)
➥ Car suspension Toyota RAV 4 XA10 (1994-2000)
➥ Suspension and axle shafts Toyota Camry XV20 (1996-2001)
Link in different formats to this article
TEXTHTMLBB Code
- General information
- User manual
- Start of movement
- Faults en route
- Maintenance
- Power unit
- Engine repair
- Lubrication system
- Cooling system
- Ignition system
- Supply system
- Fuel supply (carburetor)
- Fuel supply (injector)
- Diesel engine
- Exhaust system
- Transmission
- Clutch
- Manual gearbox
- Automatic gearbox
- Chassis, running gear
- Front suspension
- Rear suspension
- Steering
- Brake system
- Wheels and tires
- Body and interior
- Exterior (external elements)
- Interior (internal elements)
- Interior heating
- Electrical equipment
- Equipment and devices
- Power devices
- Lighting system
- Glass cleaners and washers
- General information
- User manual
- Power unit
- Petrol engines 1ZZ, 3ZZ
- Diesel engines 1СD-FTV
- Cooling system
- Lubrication system
- Fuel system
- Control system
- Exhaust system
- Transmission
- Clutch and drive shafts
- Mechanical gearbox
- Chassis, running gear
- Car suspension
- Steering
- Brake system
- Body and interior
- Exterior (external elements)
- Electrical equipment
- Power devices
- Electrical circuits