
Warning! The car models covered in this manual are equipped with an additional security system (SRS). Before doing any work near the airbag unit, steering column or instrument panel, turn off the SRS to avoid injury if it is accidentally deployed (see Onboard electrical equipment). SRS circuit wiring is easily identified by the yellow color of the insulation.
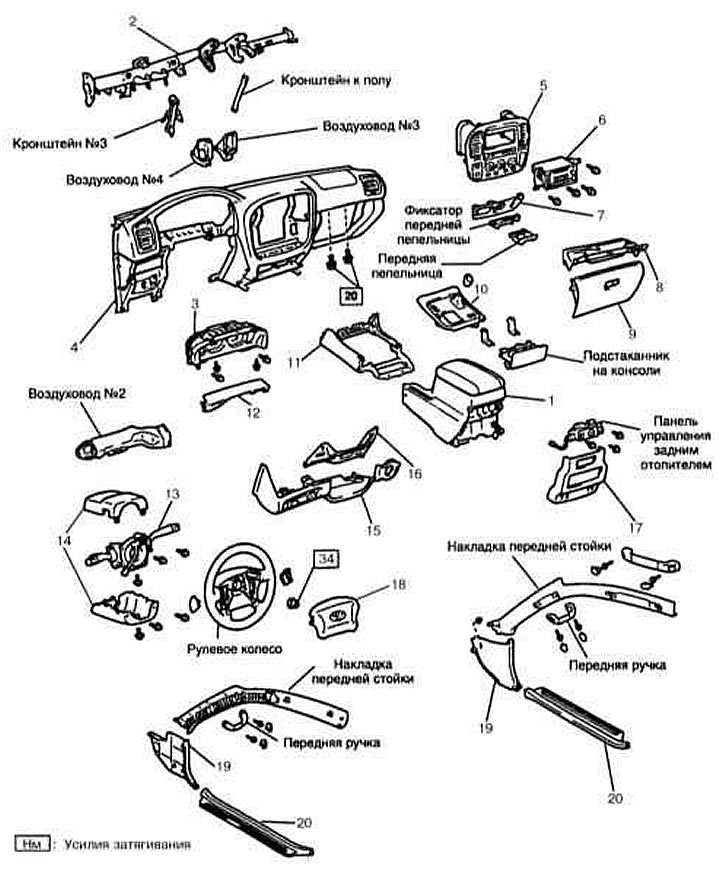
Dashboard design
1. Disconnect the negative cable from the battery.
Attention! If the stereo system installed in the car is equipped with a security code, before disconnecting the battery, make sure that you have the correct combination to activate the audio system!
2. Disable airbags (see Onboard electrical equipment).
3. Remove the steering wheel (see chapter Suspension and steering).
4. Remove the steering column cover (see Section Removal and installation of a casing of a steering column).
5. Paste the protective film over the front pillars (refer to illustration above), this will protect them when removed.
6. Remove the handles for opening the hood and the fuel filler flap.
7. Remove the fuse block cover.
8. Give fixture of the bottom central cover and remove it.
9. Disconnect air duct #2.
10. Give fixture of the DLC socket No. 3 and the block of safety locks.
11. Remove bottom panel #1.
12. Remove an overlay of a combination of devices and remove a combination of devices.
13. Remove the bottom overlay of the central section of finishing of the panel of devices together with hours.
14. After wrapping the screwdriver with electrical tape, unhook the 2 latches and remove the cup holder.
15. Remove the ashtray.
16. Give fixture the central section of finishing of the panel of devices with the control panel of a heater and disconnect conducting.
17. Turn out screws of fastening of the panel of management of a back heater.
18. Remove the radio, glove box cover, loudspeaker panel and loudspeaker, front and rear sections of the center console.
19. Turn away 5 screws and 9 bolts of fastening of the main section of the panel of devices.
20. Remove the reinforcement rod, bracket and main section of the instrument panel.
21. Installation is carried out in the reverse order.