Share information:

Vehicle Maintenance Toyota Land Cruiser 70

Service Intervals
If you mainly operate your Toyota vehicle under one or more of the following special conditions, then more frequent maintenance is required for certain items in the maintenance plan. 1. Road conditions. A) Operation on...
If you mainly operate your Toyota vehicle under one or more of the following special conditions, then more frequent maintenance is required for certain items in the maintenance plan. 1. Road conditions. A) Operation on...
Oil Handling Precautions
1. Prolonged and often repeated contact with mineral oil causes the natural fat layer to be removed from the skin and results in dryness, irritation and dermatitis. In addition, the motor oils used contain potentially...
1. Prolonged and often repeated contact with mineral oil causes the natural fat layer to be removed from the skin and results in dryness, irritation and dermatitis. In addition, the motor oils used contain potentially...

Checking the engine oil level
1. Park the vehicle on a level, level surface. After turning off the engine, wait a few minutes for the oil to drain into the canister. 2. Remove the oil dipstick (yellow color) and wipe it off with a rag. 3. Reinstall...
1. Park the vehicle on a level, level surface. After turning off the engine, wait a few minutes for the oil to drain into the canister. 2. Remove the oil dipstick (yellow color) and wipe it off with a rag. 3. Reinstall...

Maintenance Interval Table
Note: P - check and / or adjustment; 3 - replacement; C - lubricant; M3 - tightening to the regulated moment. 1. Replace every 100,000 km. 2. After running 80,000 km (or 48 months) check every 20,000 km (or 12 months)....
Note: P - check and / or adjustment; 3 - replacement; C - lubricant; M3 - tightening to the regulated moment. 1. Replace every 100,000 km. 2. After running 80,000 km (or 48 months) check every 20,000 km (or 12 months)....

Engine oil selection
1. Use oil with an API classification of at least CD. 2. Viscosity (SAE) select according to the temperature range chart corresponding to the operating conditions of the car until the next oil change.
1. Use oil with an API classification of at least CD. 2. Viscosity (SAE) select according to the temperature range chart corresponding to the operating conditions of the car until the next oil change.

Engine oil change
1. Park the vehicle on a level, level surface. 2. Warm up the engine for several minutes to normal operating temperature, then turn off the engine. 3. Remove the engine oil filler cap. 4. Unscrew the drain plug on the...
1. Park the vehicle on a level, level surface. 2. Warm up the engine for several minutes to normal operating temperature, then turn off the engine. 3. Remove the engine oil filler cap. 4. Unscrew the drain plug on the...

Oil filter replacement
Attention: when operating in severe conditions, replace every 5000 km (or 3 months.). 1. Using a special wrench, loosen the oil filter (rotate counterclockwise). 2. Unscrew the filter by hand and remove it, holding the...
Attention: when operating in severe conditions, replace every 5000 km (or 3 months.). 1. Using a special wrench, loosen the oil filter (rotate counterclockwise). 2. Unscrew the filter by hand and remove it, holding the...

Checking and replacing the air filter
1. Open the fastening latches, remove the cover and dust deflector. 2. Unscrew the wing nut and remove the filter element from the housing. 3. Visually check the contamination, integrity and oiliness of the filter...
1. Open the fastening latches, remove the cover and dust deflector. 2. Unscrew the wing nut and remove the filter element from the housing. 3. Visually check the contamination, integrity and oiliness of the filter...

Checking the engine coolant level
1. Check the coolant level in the expansion tank when the engine is cold. Note: The coolant level in the tank will change with engine temperature. 2. The coolant level must be between the TULL marks" And "LOW". If the...
1. Check the coolant level in the expansion tank when the engine is cold. Note: The coolant level in the tank will change with engine temperature. 2. The coolant level must be between the TULL marks" And "LOW". If the...

Engine Coolant Replacement
1. Park the vehicle on a level, level surface. 2. Turn away a cover of a bulk mouth of a radiator and a stopper of a broad tank. Caution: To avoid burns, do not remove the cover when the engine is hot. 3. Turn off the...
1. Park the vehicle on a level, level surface. 2. Turn away a cover of a bulk mouth of a radiator and a stopper of a broad tank. Caution: To avoid burns, do not remove the cover when the engine is hot. 3. Turn off the...

Checking the oil level in a manual transmission
1. Park the vehicle on a level, level surface. 2. Remove the fill plug. Make sure the oil level in the gearbox housing is under the cut of the filler plug. Add oil to the crankcase if necessary. Attention: be careful,...
1. Park the vehicle on a level, level surface. 2. Remove the fill plug. Make sure the oil level in the gearbox housing is under the cut of the filler plug. Add oil to the crankcase if necessary. Attention: be careful,...

Checking the oil level in the transfer case
1. Park the vehicle on a level, level surface. 2. Remove the fill plug. Make sure the oil level in the transfer case is under the cut of the filler plug. Add oil to the crankcase if necessary. Attention: be careful,...
1. Park the vehicle on a level, level surface. 2. Remove the fill plug. Make sure the oil level in the transfer case is under the cut of the filler plug. Add oil to the crankcase if necessary. Attention: be careful,...

Checking the oil level in the crankcases of axle gearboxes
1. Park the vehicle on a level, level surface. 2. Remove the fill plug. Make sure the oil level in the crankcase is under the cut of the filler plug. Add oil to the crankcase if necessary. Attention: be careful,...
1. Park the vehicle on a level, level surface. 2. Remove the fill plug. Make sure the oil level in the crankcase is under the cut of the filler plug. Add oil to the crankcase if necessary. Attention: be careful,...
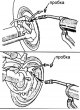
Lubrication of steering knuckles
Loosen the screw plug and inject lithium and molybdenum disulphide grease into the steering knuckle as shown.
Loosen the screw plug and inject lithium and molybdenum disulphide grease into the steering knuckle as shown.

Lubrication of cardan shafts
Attention: in severe operating conditions, especially on roads sprinkled with salt, lubricate the cardan shafts every 5000 km. 1. Lubrication points. 2. Lubricate the spider bearings with lithium base grease through the...
Attention: in severe operating conditions, especially on roads sprinkled with salt, lubricate the cardan shafts every 5000 km. 1. Lubrication points. 2. Lubricate the spider bearings with lithium base grease through the...

Check of level of working liquid of the hydraulic booster of a steering
1. Park the vehicle on a level, level surface. 2. With the engine stopped, check the fluid level in the reservoir. Add if necessary. Attention: if the working fluid is heated (60-80°C), then measure the level on a scale...
1. Park the vehicle on a level, level surface. 2. With the engine stopped, check the fluid level in the reservoir. Add if necessary. Attention: if the working fluid is heated (60-80°C), then measure the level on a scale...

Brake lining wear indicators
Pads for disc brakes are equipped with wear indicators in such a way that when driving, when the thickness of the pads is minimal, the wear indicator touches the brake disc and the brakes make an unpleasant sound...
Pads for disc brakes are equipped with wear indicators in such a way that when driving, when the thickness of the pads is minimal, the wear indicator touches the brake disc and the brakes make an unpleasant sound...

Checking the fluid level of the brake system and clutch
1. The level of the working fluid must be between the marks "MAX" And "MIN" about 10 mm (brake system) or 5 mm (clutch) below the maximum level. 2. If the level is below the mark "MIN", then add the same type of fluid...
1. The level of the working fluid must be between the marks "MAX" And "MIN" about 10 mm (brake system) or 5 mm (clutch) below the maximum level. 2. If the level is below the mark "MIN", then add the same type of fluid...

Tire pressure and condition check
1. Check tires regularly for damage. Check tire pressure every two weeks or at least once a month. Don't forget to check the spare tire pressure. Note: The lower the tread height, the greater the risk of tire slip. The...
1. Check tires regularly for damage. Check tire pressure every two weeks or at least once a month. Don't forget to check the spare tire pressure. Note: The lower the tread height, the greater the risk of tire slip. The...
Tire change
1. When replacing tires, use only tires of the same size and design as originally installed, and with the same or greater load capacity. The use of any other size or type of tire can seriously affect handling, comfort,...
1. When replacing tires, use only tires of the same size and design as originally installed, and with the same or greater load capacity. The use of any other size or type of tire can seriously affect handling, comfort,...
Replacing wheel discs
1. Due attention should be paid to the replacement of wheel disks. Make sure to install discs with the same load capacity, diameter, rim width and offset. 2. Incorrect wheel and tire selection can adversely affect...
1. Due attention should be paid to the replacement of wheel disks. Make sure to install discs with the same load capacity, diameter, rim width and offset. 2. Incorrect wheel and tire selection can adversely affect...

Checking the condition of the battery
1. Safety precautions when working with a rechargeable battery. A) The battery emits flammable and explosive gas: Be careful when working with tools that can cause sparks from the battery. Do not smoke or light matches...
1. Safety precautions when working with a rechargeable battery. A) The battery emits flammable and explosive gas: Be careful when working with tools that can cause sparks from the battery. Do not smoke or light matches...

Checking and replacing fuses
Note: If the headlights or other electrical components do not work, then check the fuses. If any of the fuses are blown, they must be replaced. 1. Turn off the ignition. 2. The fuse box cover shows the circuit name for...
Note: If the headlights or other electrical components do not work, then check the fuses. If any of the fuses are blown, they must be replaced. 1. Turn off the ignition. 2. The fuse box cover shows the circuit name for...

Checking fusible links
1. If the headlights or other electrical components do not work and the fuses are OK, then check the fuses. If some inserts are burned out, they must be replaced. 2. Fusible links are rated to melt before all electrical...
1. If the headlights or other electrical components do not work and the fuses are OK, then check the fuses. If some inserts are burned out, they must be replaced. 2. Fusible links are rated to melt before all electrical...

Vehicle identification
1. Vehicle identification number "A" stamped on the outer surface on the right side in front of the frame. This number is also stamped on the plate indicating the manufacturer "IN". 2. The engine serial number is...
1. Vehicle identification number "A" stamped on the outer surface on the right side in front of the frame. This number is also stamped on the plate indicating the manufacturer "IN". 2. The engine serial number is...

Wheel replacement
1. If you need to change a wheel on the road, then gradually slow down and drive the car to a safe place. 2. Stop the vehicle on level ground with firm ground. 3. Stop the engine and turn on the hazard warning lights....
1. If you need to change a wheel on the road, then gradually slow down and drive the car to a safe place. 2. Stop the vehicle on level ground with firm ground. 3. Stop the engine and turn on the hazard warning lights....
This section is available on: russian, bulgarian, belarusian, ukrainian, serbian, croatian, romanian, polish, slovak, hungarian
Similar sections for other Toyota models
➥ General information: Maintenance Toyota Camry XV10 (1991-1996)
➥ General information: Maintenance Toyota Corolla E80 (1983-1990)
➥ General information: Maintenance Toyota Corona T190 (1992-1997)
➥ General information: Maintenance Toyota Carina T190 (1992-1996)
➥ General information: Maintenance Toyota Highlander 1 (2000-2007, petrol)
➥ General information: Maintenance Toyota 4Runner N120 (1989-1995)
➥ General information: Maintenance Toyota RAV 4 XA10 (1994-2000)
➥ General information: Maintenance Toyota Duet (1998-2004)
Link in different formats to this article
TEXTHTMLBB Code
- General information
- Introduction to the guide
- Controls and instruments
- Maintenance
- Power unit
- Petrol engines
- Diesel engines
- Cooling and heating
- Power and exhaust systems
- Engine electrical equipment
- Engine management systems
- Transmission
- Automatic gearbox
- Transmission line
- Chassis, running gear
- Brake system
- Car suspension
- Steering
- Body and interior
- Exterior (external elements)
- Interior (internal elements)
- Doors, locks and windows
- Electrical equipment
- Equipment and devices
- Electrical circuits
- General information
- User manual
- Maintenance
- Power unit
- Petrol engines 2F and 3F-E
- Petrol engines 1FZ-FE
- Engine overhaul
- Engine electrical equipment
- Cooling and heating
- Fuel system (carburetor)
- Fuel system (injector)
- Toxicity reduction system
- Transmission
- Car gearbox
- Clutch
- Transfer case
- Drive shafts and axles
- Chassis, running gear
- Brake system
- Car suspension
- Steering
- Body and interior
- Exterior and interior
- Doors, locks and windows
- Electrical equipment
- Equipment and devices
- Electrical circuits
- General information
- User manual
- Maintenance
- Power unit
- Engine adjustment
- Engine repair
- Fuel system
- Control system
- Turbocharging system
- Cooling and lubrication system
- Charge and start system
- Transmission
- Clutch
- Mechanical gearbox
- Automatic gearbox
- Transfer case
- Chassis, running gear
- Car suspension
- Brake system
- Steering
- Body and interior
- Body elements
- Heating and air conditioning
- Electrical equipment
- Equipment and devices
- Electrical circuits