



Share information:
Gasoline car engines Toyota Land Cruiser 100
The 4.7L V-8 (2UZ-FE) petrol engine (V8) has been installed in Toyota Land Cruiser vehicles since 1998. Each cylinder head is equipped with two overhead camshafts (DOHC design). There are four valves per cylinder (2 intake and two exhaust) for a total of 32 valves.
Descriptions of most of the procedures discussed are based on the assumption that the power unit remains in its regular place in the vehicle's engine compartment. In view of the above, if the engine has already been removed and installed on a workbench or mounting stand, many of the described steps should be omitted.

Petrol and Diesel Engine Specifications
Engine maintenance procedures that do not require removing the engine from the vehicle General parameters Characteristic Meaning Engine designation 8-cylinder (V8) gasoline engine 4.7 l 2UZ-FE 6-cylinder (R6)...
Engine maintenance procedures that do not require removing the engine from the vehicle General parameters Characteristic Meaning Engine designation 8-cylinder (V8) gasoline engine 4.7 l 2UZ-FE 6-cylinder (R6)...
List of repair procedures without removing the engine from the car
Clean the engine compartment and the outside surfaces of the power unit using one of a wide range of special solvents. This treatment will prevent dirt from getting inside the engine. If necessary, depending on the...
Clean the engine compartment and the outside surfaces of the power unit using one of a wide range of special solvents. This treatment will prevent dirt from getting inside the engine. If necessary, depending on the...

Bringing the piston of the first cylinder to the top dead center (TDC) position
Top dead center (TDC) is the highest point of the piston stroke in its cylinder. Strictly speaking, in 4-stroke engines, during the rotation of the crankshaft, this position is reached by each of the pistons twice: once...
Top dead center (TDC) is the highest point of the piston stroke in its cylinder. Strictly speaking, in 4-stroke engines, during the rotation of the crankshaft, this position is reached by each of the pistons twice: once...
Checking oil pressure
A drop in oil pressure can be considered a sign that the engine needs a refurbishment. The oil pressure warning lamp is not a diagnostic device that monitors the condition of the lubrication system, but only informs the...
A drop in oil pressure can be considered a sign that the engine needs a refurbishment. The oil pressure warning lamp is not a diagnostic device that monitors the condition of the lubrication system, but only informs the...
Checking the compression pressure in the cylinders
The results of the cylinder compression test allow you to determine the overall condition of the upper engine components (pistons, piston rings, valves, cylinder head gaskets, etc.) and qualitatively assess the degree...
The results of the cylinder compression test allow you to determine the overall condition of the upper engine components (pistons, piston rings, valves, cylinder head gaskets, etc.) and qualitatively assess the degree...
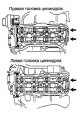
Removal and installation cylinder head covers
Removal 1. Disconnect the negative cable from the battery. Warning! If the car stereo system is equipped with a security code, make sure you have the correct combination to activate the audio system before disconnecting...
Removal 1. Disconnect the negative cable from the battery. Warning! If the car stereo system is equipped with a security code, make sure you have the correct combination to activate the audio system before disconnecting...

Removal and installation the intake manifold
Attention! Proceed with the procedure only after the power unit has completely cooled down. The two halves of the intake manifold and its components The 2UZ-FE engines are equipped with an intake manifold consisting of...
Attention! Proceed with the procedure only after the power unit has completely cooled down. The two halves of the intake manifold and its components The 2UZ-FE engines are equipped with an intake manifold consisting of...

Removal and installation of exhaust manifolds
Attention! Proceed with the procedure only after the power unit has completely cooled down. Note: Exhaust gaskets must not be reused. Toyota also requires replacement of the mounting nuts with new ones. Removal 1....
Attention! Proceed with the procedure only after the power unit has completely cooled down. Note: Exhaust gaskets must not be reused. Toyota also requires replacement of the mounting nuts with new ones. Removal 1....

Removal, checking and installation the timing belt and timing drive gears
Removal Attention! Accurate adherence to valve timing is very important, but for DOHC engines it is extremely important. Incorrect installation of the phases can seriously damage the engine. Be careful when installing...
Removal Attention! Accurate adherence to valve timing is very important, but for DOHC engines it is extremely important. Incorrect installation of the phases can seriously damage the engine. Be careful when installing...

Replacing the front crankshaft/camshaft oil seal
1. Remove the timing belt and crankshaft/camshaft sprocket(s) (see section Removal, condition check and installation of the timing belt and timing drive gears ). Note: The front crankshaft oil seal is mounted in the oil...
1. Remove the timing belt and crankshaft/camshaft sprocket(s) (see section Removal, condition check and installation of the timing belt and timing drive gears ). Note: The front crankshaft oil seal is mounted in the oil...

Replacing the rear crankshaft oil seal
1. Remove the gearbox (see chapter Gearshift box ). 2. Remove the drive disk. 3. The old seal can be removed without first dismantling the holder by prying it off with a screwdriver (refer to the accompanying...
1. Remove the gearbox (see chapter Gearshift box ). 2. Remove the drive disk. 3. The old seal can be removed without first dismantling the holder by prying it off with a screwdriver (refer to the accompanying...

Removal and installation camshafts and valve lifters
Note: Before you start the procedure, prepare two 6*10mm bolts with a length of 16-20mm. Valve train components 1 — Right cylinder head cover; 2 - Left cylinder head cover; 3 - Spark plug niche guide tube sealing ring;...
Note: Before you start the procedure, prepare two 6*10mm bolts with a length of 16-20mm. Valve train components 1 — Right cylinder head cover; 2 - Left cylinder head cover; 3 - Spark plug niche guide tube sealing ring;...
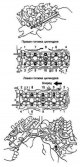
Removal and installation cylinder heads
Caution! Wait until the engine has completely cooled down before starting work. Removal 1. Disconnect the negative cable from the battery. Warning! If the car stereo system is equipped with a security code, make sure...
Caution! Wait until the engine has completely cooled down before starting work. Removal 1. Disconnect the negative cable from the battery. Warning! If the car stereo system is equipped with a security code, make sure...
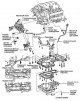
Removal and installation the engine oil pan
Note: On all-wheel drive vehicles, the drive shafts and front differential assembly must first be removed - it is usually easier to remove the engine. Removal Oil pan and oil pump installation details 1. The...
Note: On all-wheel drive vehicles, the drive shafts and front differential assembly must first be removed - it is usually easier to remove the engine. Removal Oil pan and oil pump installation details 1. The...

Removal, inspection and installation of the oil pump
Removal Oil pump assembly components 1. Remove the engine from the vehicle and place it on a suitable stand. 2. Remove the timing belt, its idler rollers and the crankshaft pulley (see section Removal, condition check...
Removal Oil pump assembly components 1. Remove the engine from the vehicle and place it on a suitable stand. 2. Remove the timing belt, its idler rollers and the crankshaft pulley (see section Removal, condition check...
Removal and installation the drive disk
Removal 1. Disconnect the negative cable from the battery. Warning! If the car stereo system is equipped with a security code, make sure you have the correct combination to activate the audio system before disconnecting...
Removal 1. Disconnect the negative cable from the battery. Warning! If the car stereo system is equipped with a security code, make sure you have the correct combination to activate the audio system before disconnecting...

Checking the condition and replacing engine mounts
Powertrain suspension mounts rarely require attention, but damaged mounts should be replaced without delay to avoid increased stress and premature wear of transmission line components. Examination 1. To check, it is...
Powertrain suspension mounts rarely require attention, but damaged mounts should be replaced without delay to avoid increased stress and premature wear of transmission line components. Examination 1. To check, it is...
This section is available on: russian, bulgarian, belarusian, ukrainian, serbian, croatian, romanian, polish, slovak, hungarian
Similar sections for other Toyota models
➥ Gasoline engines Toyota Carina T170 (1988-1992)
➥ Petrol engines 1ZZ, 3ZZ Toyota Corolla Verso 3 (2004-2009)
➥ Petrol engines (since 2001) Toyota RAV 4 XA20 (2000-2005)
Link in different formats to this article
TEXTHTMLBB Code
- General information
- Introduction to the guide
- Controls and instruments
- Maintenance
- Power unit
- Petrol engines
- Diesel engines
- Cooling and heating
- Power and exhaust systems
- Engine electrical equipment
- Engine management systems
- Transmission
- Automatic gearbox
- Transmission line
- Chassis, running gear
- Brake system
- Car suspension
- Steering
- Body and interior
- Exterior (external elements)
- Interior (internal elements)
- Doors, locks and windows
- Electrical equipment
- Equipment and devices
- Electrical circuits
- General information
- User manual
- Maintenance
- Power unit
- Petrol engines 2F and 3F-E
- Petrol engines 1FZ-FE
- Engine overhaul
- Engine electrical equipment
- Cooling and heating
- Fuel system (carburetor)
- Fuel system (injector)
- Toxicity reduction system
- Transmission
- Car gearbox
- Clutch
- Transfer case
- Drive shafts and axles
- Chassis, running gear
- Brake system
- Car suspension
- Steering
- Body and interior
- Exterior and interior
- Doors, locks and windows
- Electrical equipment
- Equipment and devices
- Electrical circuits
- General information
- User manual
- Maintenance
- Power unit
- Engine adjustment
- Engine repair
- Fuel system
- Control system
- Turbocharging system
- Cooling and lubrication system
- Charge and start system
- Transmission
- Clutch
- Mechanical gearbox
- Automatic gearbox
- Transfer case
- Chassis, running gear
- Car suspension
- Brake system
- Steering
- Body and interior
- Body elements
- Heating and air conditioning
- Electrical equipment
- Equipment and devices
- Electrical circuits