Share information:

Vehicle Maintenance Toyota Land Cruiser 60/80

Maintenance — Introduction
This section provides information that the owner needs to maintain high vehicle performance, economy, driving safety and durability. The chapter indicates the terms of maintenance with a list of the necessary work, and...
This section provides information that the owner needs to maintain high vehicle performance, economy, driving safety and durability. The chapter indicates the terms of maintenance with a list of the necessary work, and...
Additional maintenance
In this manual, the term "Maintenance" refers to the totality of work performed, and not to a specific procedure. If, from the moment of purchasing a new car, you strictly follow the maintenance procedure, carry out...
In this manual, the term "Maintenance" refers to the totality of work performed, and not to a specific procedure. If, from the moment of purchasing a new car, you strictly follow the maintenance procedure, carry out...

Service Specifications
Recommended engine oil viscosity for various temperature ranges 1. Hot climate 2. Cold climate 3. Pay attention to this product label when purchasing Numbering of cylinders and direction of rotation of the distributor...
Recommended engine oil viscosity for various temperature ranges 1. Hot climate 2. Cold climate 3. Pay attention to this product label when purchasing Numbering of cylinders and direction of rotation of the distributor...

The location of the units in the engine compartment
Location of units in the engine compartment of the 2F engine 1. Ignition coil 2. Oil dipstick 3. Windshield washer reservoir 4. Ignition distributor 5. Air filter 6. Spark plugs 7. Brake booster 8. Manufacturer's...
Location of units in the engine compartment of the 2F engine 1. Ignition coil 2. Oil dipstick 3. Windshield washer reservoir 4. Ignition distributor 5. Air filter 6. Spark plugs 7. Brake booster 8. Manufacturer's...
Maintenance terms
Every 400 km, or weekly: checking the level of liquids; Check tire condition and tire pressure. Every 4800 km, or every 3 months: service every 400 km; checking the fluid level in the automatic transmission; checking...
Every 400 km, or weekly: checking the level of liquids; Check tire condition and tire pressure. Every 4800 km, or every 3 months: service every 400 km; checking the fluid level in the automatic transmission; checking...
Checking Fluid Levels — General
Liquids are used in lubrication, cooling, brake systems, etc., being an integral working component. Due to the gradual loss of fluid and/or contamination during driving, even during normal engine operation, the amount...
Liquids are used in lubrication, cooling, brake systems, etc., being an integral working component. Due to the gradual loss of fluid and/or contamination during driving, even during normal engine operation, the amount...

Engine oil level — check
Oil gauge dipstick (2F and 3F-E engines) Oil gauge dipstick (1) on engines 2F and 3F-E is located on the right side. Oil gauge dipstick (1ZF-FE engines) Oil gauge dipstick (indicated by an arrow) on 1ZF-FE engines it is...
Oil gauge dipstick (2F and 3F-E engines) Oil gauge dipstick (1) on engines 2F and 3F-E is located on the right side. Oil gauge dipstick (1ZF-FE engines) Oil gauge dipstick (indicated by an arrow) on 1ZF-FE engines it is...

Coolant — check
Expansion tank Expansion tank (indicated by an arrow) white, installed behind the radiator, connected by a hose to the base of the radiator filler cap. All vehicles covered in this manual have a closed pressurized,...
Expansion tank Expansion tank (indicated by an arrow) white, installed behind the radiator, connected by a hose to the base of the radiator filler cap. All vehicles covered in this manual have a closed pressurized,...

Windshield washer fluid — check
Washer reservoir Main tank (indicated by an arrow) for washing the windshield and headlights is mounted on the right side of the engine compartment. The location of the washer reservoirs depends on the year of...
Washer reservoir Main tank (indicated by an arrow) for washing the windshield and headlights is mounted on the right side of the engine compartment. The location of the washer reservoirs depends on the year of...

Battery electrolyte — check
1. To check the electrolyte level (except for vehicles equipped with maintenance-free batteries) open the holes of all 6 sections. 2. The level must be between the upper and lower control marks. 3. If the level is near...
1. To check the electrolyte level (except for vehicles equipped with maintenance-free batteries) open the holes of all 6 sections. 2. The level must be between the upper and lower control marks. 3. If the level is near...

Brake and Clutch Fluid — Check
Determining the fluid level in the reservoir of the main brake cylinder The fluid level in the reservoir of the brake master cylinder is determined by the Min and Max marks. Determining the fluid level in the clutch...
Determining the fluid level in the reservoir of the main brake cylinder The fluid level in the reservoir of the brake master cylinder is determined by the Min and Max marks. Determining the fluid level in the clutch...

Checking tire condition and tire pressure
Typical tread pattern for abnormal tire wear 1. Insufficient tire pressure; 2. Uneven wear due to violation of the angles of the front wheels; 3. Reinforced lateral tread wear; 4. Increased tire pressure; 5. Lateral...
Typical tread pattern for abnormal tire wear 1. Insufficient tire pressure; 2. Uneven wear due to violation of the angles of the front wheels; 3. Reinforced lateral tread wear; 4. Increased tire pressure; 5. Lateral...

Fluid level in automatic transmission
The fluid level in an automatic transmission should be systematically checked and maintained. Insufficient fluid level entails slippage of transmission parts and a decrease in driving performance of the car. If the...
The fluid level in an automatic transmission should be systematically checked and maintained. Insufficient fluid level entails slippage of transmission parts and a decrease in driving performance of the car. If the...

Fluid level in the hydraulic steering system
Power steering pump reservoir In early production cars, the reservoir is mounted on the pump in front of the engine; in later models, the reservoir (indicated by an arrow) located separately from the pump on the left...
Power steering pump reservoir In early production cars, the reservoir is mounted on the pump in front of the engine; in later models, the reservoir (indicated by an arrow) located separately from the pump on the left...

Changing engine oil and oil filter
Timely oil change is the most effective measure taken by the owner himself in order to avoid premature engine wear due to oil aging, dilution and contamination. 1. To provide access to the lower part of the car, the...
Timely oil change is the most effective measure taken by the owner himself in order to avoid premature engine wear due to oil aging, dilution and contamination. 1. To provide access to the lower part of the car, the...

Checking the condition and caring for the battery
Battery terminal corrosion Removing the terminal from the battery Removing corrosion from terminals and poles Klemmu (photo on the left) and battery pole (photo on the right) should be thoroughly cleaned to a shine....
Battery terminal corrosion Removing the terminal from the battery Removing corrosion from terminals and poles Klemmu (photo on the left) and battery pole (photo on the right) should be thoroughly cleaned to a shine....
Checking the cooling system
The cause of many characteristic engine failures is a malfunction of the cooling system. On vehicles with automatic transmission, the condition of the cooling system significantly affects the durability and trouble-free...
The cause of many characteristic engine failures is a malfunction of the cooling system. On vehicles with automatic transmission, the condition of the cooling system significantly affects the durability and trouble-free...
Checking and replacing hoses in the engine compartment
Air conditioning hoses are checked and changed only in a car service. Under the influence of high temperatures inside the engine compartment, rubber and plastic hoses gradually harden and destroy, ensuring the operation...
Air conditioning hoses are checked and changed only in a car service. Under the influence of high temperatures inside the engine compartment, rubber and plastic hoses gradually harden and destroy, ensuring the operation...

Checking and replacing the windshield wiper blades
Periodically check the condition of the windshield wiper and brushes for damage, loose connections, and cracks and wear on the working part of the brushes. During operation, deposits of dirt and dust accumulate on the...
Periodically check the condition of the windshield wiper and brushes for damage, loose connections, and cracks and wear on the working part of the brushes. During operation, deposits of dirt and dust accumulate on the...

Wheel swap
How to change wheels 1. Left front 2. Right front 3. Right rear 4. Left rear Wheels should be rotated periodically, or if uneven tire wear is detected. Since the car will have to be raised when changing the wheels, it...
How to change wheels 1. Left front 2. Right front 3. Right rear 4. Left rear Wheels should be rotated periodically, or if uneven tire wear is detected. Since the car will have to be raised when changing the wheels, it...

Suspension and steering check
See fig. FJ60, 62 front suspension parts , pic. FJ80 Front Suspension . Examination 1. Set the wheels to straight ahead, block the wheels. Turn the steering wheel right and left. If there is significant play, then the...
See fig. FJ60, 62 front suspension parts , pic. FJ80 Front Suspension . Examination 1. Set the wheels to straight ahead, block the wheels. Turn the steering wheel right and left. If there is significant play, then the...

Exhaust system check
The check is carried out on a cold engine (at least three hours after stopping). Check the condition of all parts of the exhaust system, from the engine to the end section of the muffler. It is best to check from the...
The check is carried out on a cold engine (at least three hours after stopping). Check the condition of all parts of the exhaust system, from the engine to the end section of the muffler. It is best to check from the...

Checking the oil level in a manual transmission
Checking the oil level in a manual transmission A - plug of the control hole in the crankcase of a manual transmission B - drain plug in the crankcase of a manual transmission 1 - 5 mm 1. Unscrew the check hole plug....
Checking the oil level in a manual transmission A - plug of the control hole in the crankcase of a manual transmission B - drain plug in the crankcase of a manual transmission 1 - 5 mm 1. Unscrew the check hole plug....

Checking the oil level in the transfer case
Checking the oil level in the transfer case A - plug of the control hole in the crankcase of the transfer case B - drain plug in the transfer case crankcase 1. Unscrew the check hole plug. The oil level must be at the...
Checking the oil level in the transfer case A - plug of the control hole in the crankcase of the transfer case B - drain plug in the transfer case crankcase 1. Unscrew the check hole plug. The oil level must be at the...

Checking the oil level in axle gearboxes
Checking the oil level in axle gearboxes A - plug of the control hole in the gearbox housing B - drain plug in the gearbox housing 1. Unscrew the check hole plug. The oil level must be at the bottom of the hole. 2. If...
Checking the oil level in axle gearboxes A - plug of the control hole in the gearbox housing B - drain plug in the gearbox housing 1. Unscrew the check hole plug. The oil level must be at the bottom of the hole. 2. If...
Checking the condition of the seat belts
1. Check for signs of belt fraying and other defects. Also check the operation of the locks and belt tensioners, the tightening of the bolts securing the belt buckles to the body. 2. Check the ignition of the belt...
1. Check for signs of belt fraying and other defects. Also check the operation of the locks and belt tensioners, the tightening of the bolts securing the belt buckles to the body. 2. Check the ignition of the belt...

Air filter thermostat (carbureted engines)
The thermostat provides the supply of heated air to the air filter at different engine temperatures. Examination 1. The operation of the thermostat is checked visually using a mirror. 2. Locate the thermostat shutter....
The thermostat provides the supply of heated air to the air filter at different engine temperatures. Examination 1. The operation of the thermostat is checked visually using a mirror. 2. Locate the thermostat shutter....

Checking and lubricating the exhaust valve
On some cars, an exhaust valve is provided, which is mounted at the junction of the exhaust pipe and the manifold. On a cold engine, the valve redirects the flow of exhaust gases to the intake manifold, resulting in...
On some cars, an exhaust valve is provided, which is mounted at the junction of the exhaust pipe and the manifold. On a cold engine, the valve redirects the flow of exhaust gases to the intake manifold, resulting in...

Gasoline vapor recovery system
The gasoline vapor recovery system is designed to absorb gasoline vapors from the tank and the fuel system in a tank with activated carbon and subsequent combustion of vapors in the engine cylinders. Examination 1. The...
The gasoline vapor recovery system is designed to absorb gasoline vapors from the tank and the fuel system in a tank with activated carbon and subsequent combustion of vapors in the engine cylinders. Examination 1. The...

Checking the recirculation system
The most common failure of this system is a stuck recirculation valve, which is mounted on the intake manifold. 1. On a cold engine, check the freedom of movement of the diaphragm. 2. If the diaphragm is stuck, replace...
The most common failure of this system is a stuck recirculation valve, which is mounted on the intake manifold. 1. On a cold engine, check the freedom of movement of the diaphragm. 2. If the diaphragm is stuck, replace...

Carburetor choke
Examination 1. The check is carried out on a cold engine. Label and disconnect the hoses and remove the air filter cover. 2. The damper is located at the top of the carburetor (arrow). Squeeze out the throttle pedal to...
Examination 1. The check is carried out on a cold engine. Label and disconnect the hoses and remove the air filter cover. 2. The damper is located at the top of the carburetor (arrow). Squeeze out the throttle pedal to...

Crankcase ventilation spool
The crankcase ventilation spool is located on the cylinder head cover. Check and replacement 1. With the engine warm, remove the spool (indicated by an arrow). 2. With the engine idling warm, put your finger on the...
The crankcase ventilation spool is located on the cylinder head cover. Check and replacement 1. With the engine warm, remove the spool (indicated by an arrow). 2. With the engine idling warm, put your finger on the...

Checking and replacing the air filter
1. Turn away a wing nut and disconnect spring latches. Disconnect hoses, remove cover and set aside. 2. Take out the filter element. 3. Examine the outer surface of the element. In case of severe contamination, replace...
1. Turn away a wing nut and disconnect spring latches. Disconnect hoses, remove cover and set aside. 2. Take out the filter element. 3. Examine the outer surface of the element. In case of severe contamination, replace...

Replacing spark plugs
Tool kit for changing spark plugs 1. Candle wrench; 2. Torque wrench; 3. Ratchet; 4. Adapter; 5. A set of gauges for checking the gap between the spark plug electrodes Adjustment 1. Prepare tools and fixtures. When...
Tool kit for changing spark plugs 1. Candle wrench; 2. Torque wrench; 3. Ratchet; 4. Adapter; 5. A set of gauges for checking the gap between the spark plug electrodes Adjustment 1. Prepare tools and fixtures. When...

Checking and adjusting valve clearances
Attention! The manufacturer recommends adjusting the valves only if there is excessive noise from the valve train. 1. Warm up the engine. 2. Remove the cylinder head cover and set the piston of the 1st cylinder to TDC...
Attention! The manufacturer recommends adjusting the valves only if there is excessive noise from the valve train. 1. Warm up the engine. 2. Remove the cylinder head cover and set the piston of the 1st cylinder to TDC...

Idle speed (carbureted engines)
Check and adjustment 1. Block the wheels (on some cars, the transmission must be switched to the Drive position and the adjustment must be carried out by two people). 2. Connect the tachometer in accordance with the...
Check and adjustment 1. Block the wheels (on some cars, the transmission must be switched to the Drive position and the adjustment must be carried out by two people). 2. Connect the tachometer in accordance with the...
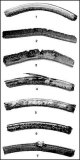
Accessory drive belts
Typical signs of V-belt wear 1. Furrows on the sides; 2. Charring; 3. Cracking; 4. Detachment from the base; 5. Wiping (glossiness); 6. Oil ingress; 7. Tearing Belt tension check 1. Ruler; 2. Bar; 3. Deflection The...
Typical signs of V-belt wear 1. Furrows on the sides; 2. Charring; 3. Cracking; 4. Detachment from the base; 5. Wiping (glossiness); 6. Oil ingress; 7. Tearing Belt tension check 1. Ruler; 2. Bar; 3. Deflection The...
Fuel system check
Attention! Observe fire safety regulations when performing maintenance on the fuel system. On vehicles with injection engines, disconnect any hoses after performing decompression measures. The fuel system is best...
Attention! Observe fire safety regulations when performing maintenance on the fuel system. On vehicles with injection engines, disconnect any hoses after performing decompression measures. The fuel system is best...

Checking disc and drum brakes
1. Raise the car and remove the wheels. Checking disc brakes 2. Pads can be checked through a window in the caliper (indicated by an arrow). 3. Measure the thickness of the friction linings, and if the thickness is less...
1. Raise the car and remove the wheels. Checking disc brakes 2. Pads can be checked through a window in the caliper (indicated by an arrow). 3. Measure the thickness of the friction linings, and if the thickness is less...
Checking the vacuum booster
1. With the engine off, press the brake pedal several times, the brake pedal travel should not change. 2. Step on the pedal and start the engine. After starting the engine, the pedal should move forward a little. 3....
1. With the engine off, press the brake pedal several times, the brake pedal travel should not change. 2. Step on the pedal and start the engine. After starting the engine, the pedal should move forward a little. 3....

Hand brake — check and adjustment
1. Move the transmission lever to the neutral position. Applying moderate force to the handbrake lever, count the number of clicks of the full travel of the lever. If the number of clicks is not correct, then the...
1. Move the transmission lever to the neutral position. Applying moderate force to the handbrake lever, count the number of clicks of the full travel of the lever. If the number of clicks is not correct, then the...

Checking and adjusting the clutch pedals (brakes)
Pedal Height 1. Check the distance of the pedal pads from the floor. If this distance differs from the norm, then adjust. 2. To adjust the clutch pedal, loosen the adjusting bolt locknut (A) and tighten the bolt. Then...
Pedal Height 1. Check the distance of the pedal pads from the floor. If this distance differs from the norm, then adjust. 2. To adjust the clutch pedal, loosen the adjusting bolt locknut (A) and tighten the bolt. Then...

Fuel filter replacement
Attention! Perform fuel system decompression measures. Work is carried out on a cold engine. Carburetor engines 1. The filter is mounted below the fuel tank (in this case, raise the car), or in the engine compartment....
Attention! Perform fuel system decompression measures. Work is carried out on a cold engine. Carburetor engines 1. The filter is mounted below the fuel tank (in this case, raise the car), or in the engine compartment....
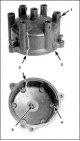
High voltage wires, slider and distributor caps
Typical defects of the distributor cap 1. Cracks in the wire lead; 2. Cover cracks; 3. breakdown; 4. Erosion of electrodes; 5. Wear of coal Check and replacement 1. High voltage spark plug wires should be checked (and...
Typical defects of the distributor cap 1. Cracks in the wire lead; 2. Cover cracks; 3. breakdown; 4. Erosion of electrodes; 5. Wear of coal Check and replacement 1. High voltage spark plug wires should be checked (and...

Checking and setting the ignition timing
Attention! The procedure for installing the ignition and the necessary data are indicated on the engine compartment plate of the car. 1. Short circuit terminals E1 and TE1 of the diagnostic connector. 2. Check idle...
Attention! The procedure for installing the ignition and the necessary data are indicated on the engine compartment plate of the car. 1. Short circuit terminals E1 and TE1 of the diagnostic connector. 2. Check idle...

Cooling System Care
Location of the coolant drain plug 1. Cylinder block drain plug (all cars); 2. Radiator drain plug on late production vehicles; 3. Radiator drain plug on early production vehicles Warning! Work is carried out on a cold...
Location of the coolant drain plug 1. Cylinder block drain plug (all cars); 2. Radiator drain plug on late production vehicles; 3. Radiator drain plug on early production vehicles Warning! Work is carried out on a cold...

Front wheel hubs and bearings
Checking and changing the lubricant 1. Front wheel bearings should be checked by rocking the wheel each time the front end is lifted. 2. If play is detected when swinging in a vertical plane, it is necessary to...
Checking and changing the lubricant 1. Front wheel bearings should be checked by rocking the wheel each time the front end is lifted. 2. If play is detected when swinging in a vertical plane, it is necessary to...

Changing automatic transmission fluid and filter
Work is carried out on a cold engine. 1. Raise the car and put it on stands. 2. Substitute the pan, unscrew the drain plug (arrow) and drain all the liquid, avoiding losses. Replace plug and tighten. 3. Remove the...
Work is carried out on a cold engine. 1. Raise the car and put it on stands. 2. Substitute the pan, unscrew the drain plug (arrow) and drain all the liquid, avoiding losses. Replace plug and tighten. 3. Remove the...
Changing the oil in a manual transmission
1. Raise the car and put it on stands. 2. Loosen the drain plug (see fig. Checking the oil level in a manual transmission ) and drain the oil. Close the plug and tighten. 3. Unscrew the filler plug and fill in fresh oil...
1. Raise the car and put it on stands. 2. Loosen the drain plug (see fig. Checking the oil level in a manual transmission ) and drain the oil. Close the plug and tighten. 3. Unscrew the filler plug and fill in fresh oil...
Changing the oil in the transfer case
1. Make a trip with the front gear on for at least 15 minutes, moving in all gears, including reverse. 2. Raise the car and put it on stands. 3. Loosen the drain plug (see fig. Checking the oil level in the transfer...
1. Make a trip with the front gear on for at least 15 minutes, moving in all gears, including reverse. 2. Raise the car and put it on stands. 3. Loosen the drain plug (see fig. Checking the oil level in the transfer...
Rear oil change (front) gearbox
1. Drive around, jack up the car and put it on stands. 2. Loosen the drain plug (see fig. Checking the oil level in axle gearboxes ) and drain the oil into a clean pan. Close the plug and tighten. 3. Check for solid...
1. Drive around, jack up the car and put it on stands. 2. Loosen the drain plug (see fig. Checking the oil level in axle gearboxes ) and drain the oil into a clean pan. Close the plug and tighten. 3. Check for solid...

Valve clearances on the 1FZ-FE engine
Check and adjustment Check and adjust the valve clearances on the 1FZ-FE engine every 96,000 km, or every 4 years. Attention! The valves on this engine are regulated by the selection of washers in thickness, so you will...
Check and adjustment Check and adjust the valve clearances on the 1FZ-FE engine every 96,000 km, or every 4 years. Attention! The valves on this engine are regulated by the selection of washers in thickness, so you will...
This section is available on: russian, bulgarian, belarusian, ukrainian, serbian, croatian, romanian, polish, slovak, hungarian
Similar sections for other Toyota models
➥ User manual: Maintenance Toyota Camry XV30 (2001-2006)
➥ General information: Maintenance Toyota Corolla E80 (1983-1990)
➥ General information: Maintenance Toyota Corona T190 (1992-1997)
➥ General information: Maintenance Toyota Carina T190 (1992-1996)
➥ General information: Maintenance Toyota Highlander 1 (2000-2007, petrol)
➥ General information: Maintenance Toyota 4Runner N120 (1989-1995)
➥ General information: Maintenance Toyota RAV 4 XA10 (1994-2000)
➥ General information: Maintenance Toyota Duet (1998-2004)
Link in different formats to this article
TEXTHTMLBB Code
- General information
- Introduction to the guide
- Controls and instruments
- Maintenance
- Power unit
- Petrol engines
- Diesel engines
- Cooling and heating
- Power and exhaust systems
- Engine electrical equipment
- Engine management systems
- Transmission
- Automatic gearbox
- Transmission line
- Chassis, running gear
- Brake system
- Car suspension
- Steering
- Body and interior
- Exterior (external elements)
- Interior (internal elements)
- Doors, locks and windows
- Electrical equipment
- Equipment and devices
- Electrical circuits
- General information
- User manual
- Maintenance
- Power unit
- Petrol engines 2F and 3F-E
- Petrol engines 1FZ-FE
- Engine overhaul
- Engine electrical equipment
- Cooling and heating
- Fuel system (carburetor)
- Fuel system (injector)
- Toxicity reduction system
- Transmission
- Car gearbox
- Clutch
- Transfer case
- Drive shafts and axles
- Chassis, running gear
- Brake system
- Car suspension
- Steering
- Body and interior
- Exterior and interior
- Doors, locks and windows
- Electrical equipment
- Equipment and devices
- Electrical circuits
- General information
- User manual
- Maintenance
- Power unit
- Engine adjustment
- Engine repair
- Fuel system
- Control system
- Turbocharging system
- Cooling and lubrication system
- Charge and start system
- Transmission
- Clutch
- Mechanical gearbox
- Automatic gearbox
- Transfer case
- Chassis, running gear
- Car suspension
- Brake system
- Steering
- Body and interior
- Body elements
- Heating and air conditioning
- Electrical equipment
- Equipment and devices
- Electrical circuits