Company Honda Company Ford Company Skoda Company Kia Company Mazda Company Mercedes Company Renault
English Русский
Български
Беларускі
Український
Српски
Hrvatski
Română
Polski
Slovenský
Magyar
Bookmark Articles Sitemap Contacts
ToyotaMan.ru


Camry Corolla Corona Carina Land Cruiser Highlander 4Runner RAV4 Others
Corolla E80 (1983-1990) Corolla Verso 3 (2004-2009)

Removal and installation the front panel and its trim (since 5/87) [Toyota Corolla E80]

  • Main
  • Corolla
  • E80 (1983-1990)
  • Body and interior
  • Interior (internal elements)
  • Removal and installation the front panel and its trim (since 5/87)
0
Contents: Removal ↓ Installation ↓

Removal


Disconnect the ground (-) cable from the battery.

Note: This will erase the entries in the on-board computer memory. In particular, the entries of faults and the radio receiver code. Before disconnecting the battery, please read the section "Removal and installation the battery".


Remove the instrument console.

Remove the radio.

Remove the steering wheel.

Remove the instrument panel kit.


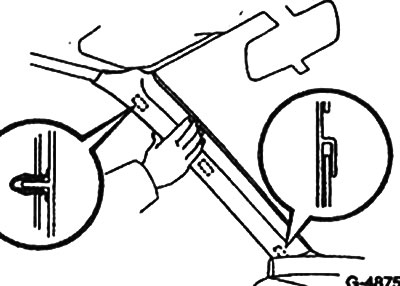
Remove the trims of the left and right front pillars by taking them out of the holders.


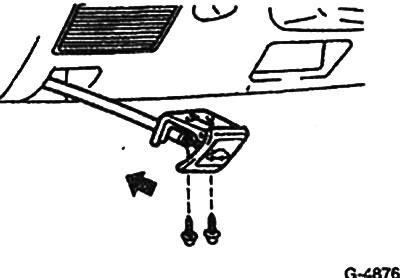
Remove the two screws and the hood lock button.


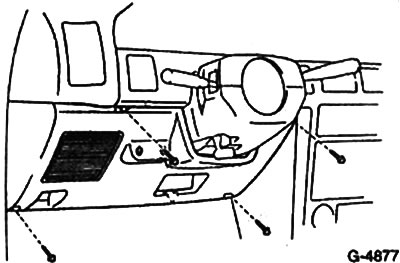
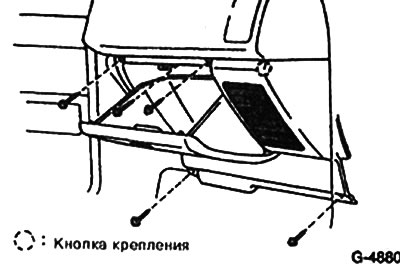
Remove 4 screws and remove the lower trim of the front panel. Disconnect the speaker cable on the back of the trim. If there is an air conditioner, disconnect the warm air supply hose to the nozzle.


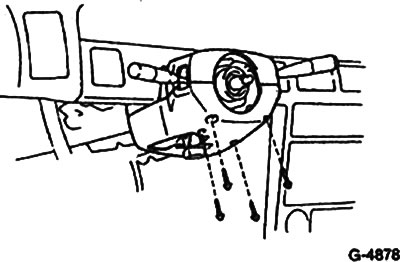
Unscrew 4 screws and remove the steering column trim covers.

Using a screwdriver, remove the 2 switch mounting screws from the front panel trim cover.

Disconnect the plug connection and remove both switches.

Remove 2 screws and take out the middle trim casing. Disconnect the plug connection.


Unscrew 5 screws and remove the lower trim of the front panel with the glove compartment lid. On the back side, disconnect the plug connection of the speaker cable.


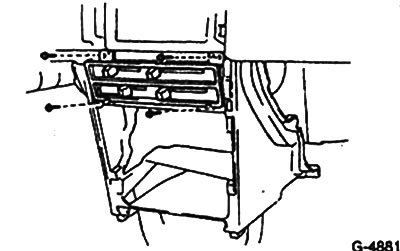
Remove 4 screws and take out the panel with the heater control levers.


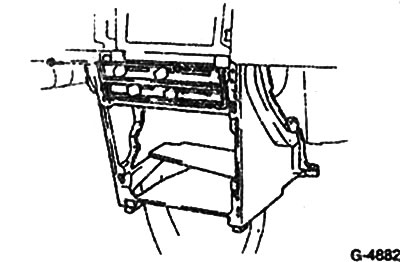
Remove 2 screws and remove the upper part of the instrument console.
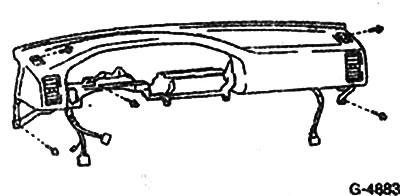


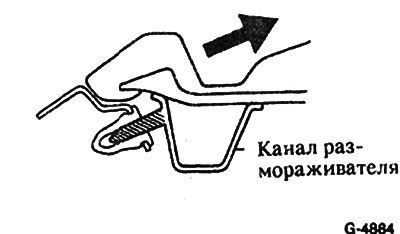
Unscrew 5 screws and remove the front panel by tilting it upwards. In order to get to the two upper screws, you must first remove the upper air nozzle grille with a screwdriver.


Note: On the back of the upper air nozzles there is a thickening that fits into the body holder. Therefore, the control panel must be removed at an upward angle.


If necessary, disassemble the front panel.

Installation


Install all front panel components in the reverse order of removal.

Connect the ground (-) cable to the battery.

Set the time on the clock, if there is one, and enter the security alarm code into the radio receiver.
This article is available at: russian, bulgarian, belarusian, ukrainian, serbian, croatian, romanian, polish, slovak, hungarian
The article material has been checked: Mitrofanova Elena
Share information:
◀ Previous
Corolla E80: Interior (internal elements)
Next ▶

Removal and installation the console (since 5/87)
Checking and adjusting the sliding sunroof
Removal and installation the door lock and door handle
Removal, installation and adjustment of window glass and window lifter
Removal and installation door trim
Removal and installation the front panel and its trim (up to 4/87)
Removal and installation the front seat
Removal and installation the rear seat
Similar articles on other Toyota models

➥ Front trim panel of the passenger compartment Toyota Cruiser 60/80 (1980-1997, petrol)
➥ Front Interior Trim Panel — Removal and Installation Toyota 4Runner N120 (1989-1995)
➥ Decorative panels for the front part of the interior trim Toyota Camry XV20 (1996-2001)
➥ Plastic body parts (front and rear bumper trim) — repair Toyota Highlander 1 (2000-2007, petrol)
➥ Scheme 18. Instrument cluster lighting on the front panel —… Toyota RAV 4 XA20 (2000-2005)
➥ Drive shaft seals (front wheel drive) Toyota Corona T190 (1992-1997)
Link in different formats to this article
Comments and feedback from visitors
No comments yet


Add two numbers 41 + 37


Corolla E80 (1983-1990) 
  • General information
  • User manual
  • Start of movement
  • Faults en route
  • Maintenance
  • Power unit
  • Engine repair
  • Lubrication system
  • Cooling system
  • Ignition system
  • Supply system
  • Fuel supply (carburetor)
  • Fuel supply (injector)
  • Diesel engine
  • Exhaust system
  • Transmission
  • Clutch
  • Manual gearbox
  • Automatic gearbox
  • Chassis, running gear
  • Front suspension
  • Rear suspension
  • Steering
  • Brake system
  • Wheels and tires
  • Body and interior
  • Exterior (external elements)
  • Interior (internal elements)
  • Interior heating
  • Electrical equipment
  • Equipment and devices
  • Power devices
  • Lighting system
  • Glass cleaners and washers
Corolla Verso 3 (2004-2009) 
  • General information
  • User manual
  • Power unit
  • Petrol engines 1ZZ, 3ZZ
  • Diesel engines 1СD-FTV
  • Cooling system
  • Lubrication system
  • Fuel system
  • Control system
  • Exhaust system
  • Transmission
  • Clutch and drive shafts
  • Mechanical gearbox
  • Chassis, running gear
  • Car suspension
  • Steering
  • Brake system
  • Body and interior
  • Exterior (external elements)
  • Electrical equipment
  • Power devices
  • Electrical circuits
ToyotaMan.ru © 2018–2026 • Mobile version • Interesting about Toyota • Administration • Sitemap: EN BG BY UA RS HR RO PL SK HU • Search system • Bookmark
Camry Vista-V40 • Camry XV10 • Camry XV20 • Camry XV30 • Corolla Verso-AR10 • Corolla E80 • Corona T190 • Carina T170 • Carina T190 • Land Cruiser J70 (diesel) • Land Cruiser J60 (petrol) • Land Cruiser J100 • Highlander XU20 (petrol) • 4Runner N120 • RAV4 XA10 • RAV4 XA20 • Duet M100 • Dyna Y50 •
We require cookies to enable some interactive features. Is that ok with you?