
Company Honda Company Ford Company Skoda Company Kia Company Mazda Company Mercedes Company Renault
English Русский
Български
Беларускі
Український
Српски
Hrvatski
Română
Polski
Slovenský
Magyar
Bookmark Articles Sitemap Contacts
ToyotaMan.ru


Camry Corolla Corona Carina Land Cruiser Highlander 4Runner RAV4 Others
RAV 4 XA20 (2000-2005) RAV 4 XA10 (1994-2000)

Cylinder head assembly [Toyota RAV4 XA20]

  • Main
  • RAV4
  • XA20 (2000-2005)
  • Power unit
  • Engine overhaul
  • Cylinder head assembly
0
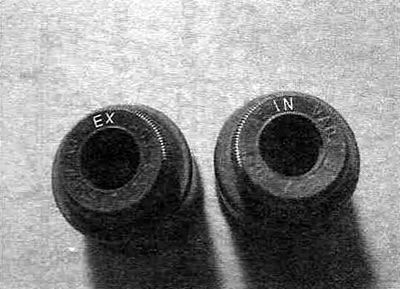
1. Working with the first valve, dip the new valve stem seal into clean engine oil, then carefully push it onto the valve stem end of the guide bushing using a suitable socket or a piece of metal pipe as a drift. Please note that although theoretically valve stem seals should be color-coded to match their intended purpose, in practice, the color of the seals does not always match Toyota documentation. For example, intake valve stem seals for engines produced before 2000 should be gray or brown, while exhaust valve stem seals for the same engines should be black. On late production engine caps, from 2001 onwards, an identification mark can be seen on the top of the cap (you may need to use a magnifying glass to do this). If you look closely, you can see the EX mark for the exhaust valve caps and the IN mark for the intake valve caps (see Figure 11.1).


Figure 11.1. The exhaust valve oil seals are marked EX, and the intake valve oil seals are marked IN.


Note: Intake valve stem seals are different from exhaust valve stem seals - don't get confused them during installation.


2. Lubricate the valve stems and place them in their places in the head. If you install new valves, place them in the places where they were ground in (see Figure 11.2).
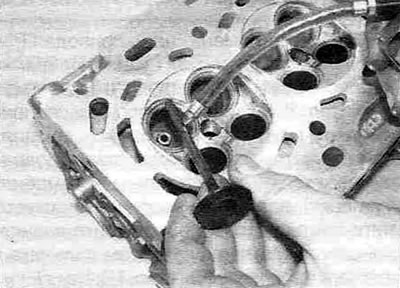


Figure 11.2. Lubricate the valve stems before installing the valves into the guides.


3. Install the spring seats, then install the springs with the upper plates.

4. Compress the valve spring with a compressor and insert the crackers into the groove on the valve stem. Release the compressor to compress the valve springs and repeat the procedure for the remaining valves.

(The original text is posted on Toyotaman.ru)

5. After completing the installation of valve springs on all valves, place the head on wooden blocks so that the valve plates do not rest on the blocks. With a hammer through a wooden block (as a mandrel) tap lightly on the ends of the valves so that the crackers fit tightly into the grooves.

6. Now you can install the cylinder head with the remaining components as described in section A, B or IN this chapter.
This article is available at: russian, bulgarian, belarusian, ukrainian, serbian, croatian, romanian, polish, slovak, hungarian
The article material has been checked: Kondratyeva Ulyana
Share information:
◀ Previous
RAV 4 XA20: Engine overhaul
Next ▶

Cylinder head — cleaning and inspection
Cylinder head — disassembly
Engine Overhaul — Disassembly Sequence
Engine — removal and installation
Engine Removal — Method and Precautions
Pistons and connecting rods — removal
Crankshaft — removal
Cylinder block — cleaning and inspection
Pistons/connecting rods — inspection
Crankshaft — inspection
Similar articles on other Toyota models

➥ Cylinder Head Cover — Removal and Installation Toyota Camry XV20 (1996-2001)
➥ Cylinder head — petrol 1.3 liters Toyota Corolla E80 (1983-1990)
➥ Cylinder head (3S-FE, 4S-FE) — removal Toyota Corona T190 (1992-1997)
➥ Removal the cylinder head Toyota Carina T190 (1992-1996)
➥ Cylinder Head Cover — Removal and Installation Toyota Cruiser 60/80 (1980-1997, petrol)
➥ Cylinder Head Cover — Removal and Installation Toyota Highlander 1 (2000-2007, petrol)
Link in different formats to this article
Comments and feedback from visitors
No comments yet


Add two numbers 39 + 26


RAV 4 XA20 (2000-2005) 
  • General information
  • Introduction to manual
  • User manual
  • Daily care
  • Maintenance (petrol)
  • Maintenance (diesel)
  • Troubleshooting
  • Power unit
  • Gasoline engines (before 2000)
  • Petrol engines (since 2001)
  • Diesel engines
  • Engine overhaul
  • Cooling and heating
  • Fuel system (petrol)
  • Fuel system (diesel)
  • Engine electrical equipment
  • Control system (petrol)
  • Control system (diesel)
  • Transmission
  • Manual gearbox
  • Automatic gearbox
  • Clutch and drive shafts
  • Chassis, running gear
  • Brake system
  • Front suspension
  • Rear suspension
  • Steering system
  • Body and interior
  • Exterior (external elements)
  • Interior (internal elements)
  • Doors, locks and windows
  • Electrical equipment
  • Equipment and devices
  • Electrical circuits
RAV 4 XA10 (1994-2000) 
  • General information
  • User manual
  • Maintenance
  • Power unit
  • Petrol engine 3S-FE
  • Petrol engine 1AZ-FE
  • Engine overhaul
  • Cooling and air conditioning
  • Fuel and exhaust system
  • Ignition system
  • Toxicity reduction system
  • Transmission
  • Clutch
  • Mechanical gearbox
  • Automatic gearbox
  • Cardan and drive shafts
  • Chassis, running gear
  • Brake system
  • Car suspension
  • Steering
  • Body and interior
  • Exterior (external elements)
  • Interior (internal elements)
  • Doors, locks and windows
  • Electrical equipment
  • Equipment and devices
  • Power devices
  • Electrical circuits
ToyotaMan.ru © 2018–2026 • Mobile version • Interesting about Toyota • Administration • Sitemap: EN BG BY UA RS HR RO PL SK HU • Search system • Bookmark
Camry Vista-V40 • Camry XV10 • Camry XV20 • Camry XV30 • Corolla Verso-AR10 • Corolla E80 • Corona T190 • Carina T170 • Carina T190 • Land Cruiser J70 (diesel) • Land Cruiser J60 (petrol) • Land Cruiser J100 • Highlander XU20 (petrol) • 4Runner N120 • RAV4 XA10 • RAV4 XA20 • Duet M100 • Dyna Y50 •
We require cookies to enable some interactive features. Is that ok with you?