
Company Honda Company Ford Company Skoda Company Kia Company Mazda Company Mercedes Company Renault
English Русский
Български
Беларускі
Український
Српски
Hrvatski
Română
Polski
Slovenský
Magyar
Bookmark Articles Sitemap Contacts
ToyotaMan.ru


Camry Corolla Corona Carina Land Cruiser Highlander 4Runner RAV4 Others
RAV 4 XA20 (2000-2005) RAV 4 XA10 (1994-2000)

Cylinder block — cleaning and inspection [Toyota RAV4 XA20]

  • Main
  • RAV4
  • XA20 (2000-2005)
  • Power unit
  • Engine overhaul
  • Cylinder block — cleaning and inspection
0

Cylinder block


Cleaning


1. Remove all external components and electrical sensors from the cylinder block, and also remove the generator and power steering pump brackets (see Figure 14.1, a-c).
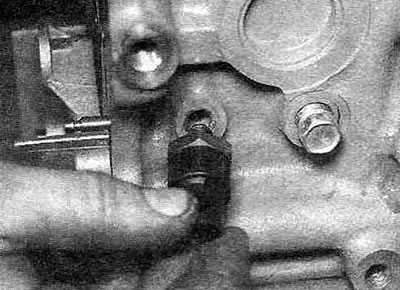


Figure 14.1,a. Removing the oil pressure sensor from the cylinder block.
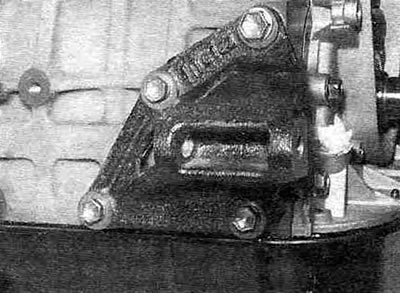


Figure 14.1.6. Removing the lower bracket of the power steering pump.
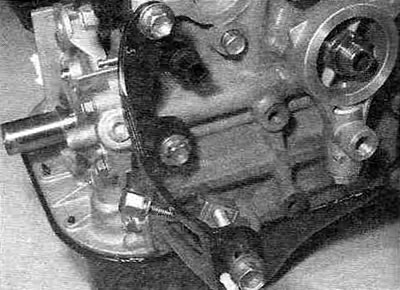


Figure 14.1, c. Generator adjustment bracket on the right side of the cylinder block.


2. For complete cleaning, ideally you need to remove the technological plugs from the cylinder block. To remove them, drill a small hole, then screw in a screw and remove the plug using pliers or an impact wrench.

3. Remove all traces of sealant from the mating surfaces of the cylinder block/crankcase connector, being careful not to damage the mating surfaces.

4. Remove the threaded plugs of the oil channels. It is unlikely that you will be able to unscrew them - carefully drill them out and run the threads with a tap, and install new plugs during assembly.

5. If the block is very dirty, it can be washed with pressure steam.

6. After cleaning the outer surfaces, clean all channels. Rinse them with hot water until the water runs clear. Dry thoroughly and apply a layer of oil to the treated surfaces to prevent corrosion. Also lubricate the cylinders of cast iron blocks/sleeves of aluminum blocks. If you have access to an air compressor, use it to speed up drying and blow out all ducts. After receiving the block from the workshop (if you handed it over for boring), washing and drying should be repeated.

Caution! Wear safety glasses when working with compressed air!


7. A block with minor dirt can be washed with hot water and soap and a stiff brush. It takes a fair amount of time to achieve good results. Regardless of the method used, all holes and channels of the block must be thoroughly cleaned and dried. After washing, the cast iron block should also be dried and lubricated with oil to prevent rust.

8. All threaded holes must be clean so that bolts can be tightened to the specified torque without fear of cracking the block. To remove rust, sealant residue and dirt from threaded holes and to restore the thread profile, run the holes with an appropriate tap. If possible, blow out the threaded holes with compressed air.

Caution! Wear safety glasses when cleaning holes with compressed air!


9. Apply a suitable sealant to the oil passage plugs and press or screw them into the block holes (depending on the design) and tighten securely. Apply sealant to the process plugs in the same manner and press them into place, using a piece of pipe or a socket head of the appropriate diameter as a mandrel.

10. If you do not plan to assemble the engine immediately, lubricate the cylinders and all mating surfaces with oil, cover it with plastic wrap and store it so that it does not rust prematurely.

Examination


11. Visually inspect the block for cracks and corrosion. Check the threaded holes for damage. If overheating or internal coolant leaks have occurred, the cylinder block must be inspected using special equipment to detect hidden cracks. If such defects are found, repair if possible; if not, replace the unit.

12. If you have any doubts about the condition of the cylinder block, have it checked by professionals at a specialized workshop. If the cylinders are heavily worn or damaged, they will help you take the necessary measurements and advise you on the possibility of restoring the block. They can also recommend a spare parts supplier. If the cylinders are worn out and it is not possible to obtain repair pistons, then there is only one solution - replacing the block.
This article is available at: russian, bulgarian, belarusian, ukrainian, serbian, croatian, romanian, polish, slovak, hungarian
The article material has been checked: Kondratyeva Ulyana
Share information:
◀ Previous
RAV 4 XA20: Engine overhaul
Next ▶

Crankshaft — removal
Pistons and connecting rods — removal
Cylinder head assembly
Cylinder head — cleaning and inspection
Cylinder head — disassembly
Pistons/connecting rods — inspection
Crankshaft — inspection
Crankshaft bearings — inspection
Engine repair — assembly sequence
Crankshaft — installation
Similar articles on other Toyota models

➥ Cylinder Block — Cleaning and Checking Toyota Camry XV20 (1996-2001)
➥ Cleaning and checking the cylinder block Toyota Cruiser 60/80 (1980-1997, petrol)
➥ Cylinder Block — Cleaning and Checking Toyota 4Runner N120 (1989-1995)
➥ Checking the cylinder block for deformation Toyota Corolla Verso 3 (2004-2009)
➥ Cylinder Block (4A-FE and 7A-FE) — Disassembly and Assembly Toyota Corona T190 (1992-1997)
➥ Preparing for disassembling the cylinder block Toyota Carina T190 (1992-1996)
Link in different formats to this article
Comments and feedback from visitors
No comments yet


Add two numbers 38 + 16


RAV 4 XA20 (2000-2005) 
  • General information
  • Introduction to manual
  • User manual
  • Daily care
  • Maintenance (petrol)
  • Maintenance (diesel)
  • Troubleshooting
  • Power unit
  • Gasoline engines (before 2000)
  • Petrol engines (since 2001)
  • Diesel engines
  • Engine overhaul
  • Cooling and heating
  • Fuel system (petrol)
  • Fuel system (diesel)
  • Engine electrical equipment
  • Control system (petrol)
  • Control system (diesel)
  • Transmission
  • Manual gearbox
  • Automatic gearbox
  • Clutch and drive shafts
  • Chassis, running gear
  • Brake system
  • Front suspension
  • Rear suspension
  • Steering system
  • Body and interior
  • Exterior (external elements)
  • Interior (internal elements)
  • Doors, locks and windows
  • Electrical equipment
  • Equipment and devices
  • Electrical circuits
RAV 4 XA10 (1994-2000) 
  • General information
  • User manual
  • Maintenance
  • Power unit
  • Petrol engine 3S-FE
  • Petrol engine 1AZ-FE
  • Engine overhaul
  • Cooling and air conditioning
  • Fuel and exhaust system
  • Ignition system
  • Toxicity reduction system
  • Transmission
  • Clutch
  • Mechanical gearbox
  • Automatic gearbox
  • Cardan and drive shafts
  • Chassis, running gear
  • Brake system
  • Car suspension
  • Steering
  • Body and interior
  • Exterior (external elements)
  • Interior (internal elements)
  • Doors, locks and windows
  • Electrical equipment
  • Equipment and devices
  • Power devices
  • Electrical circuits
ToyotaMan.ru © 2018–2026 • Mobile version • Interesting about Toyota • Administration • Sitemap: EN BG BY UA RS HR RO PL SK HU • Search system • Bookmark
Camry Vista-V40 • Camry XV10 • Camry XV20 • Camry XV30 • Corolla Verso-AR10 • Corolla E80 • Corona T190 • Carina T170 • Carina T190 • Land Cruiser J70 (diesel) • Land Cruiser J60 (petrol) • Land Cruiser J100 • Highlander XU20 (petrol) • 4Runner N120 • RAV4 XA10 • RAV4 XA20 • Duet M100 • Dyna Y50 •
We require cookies to enable some interactive features. Is that ok with you?