
Company Honda Company Ford Company Skoda Company Kia Company Mazda Company Mercedes Company Renault
English Русский
Български
Беларускі
Український
Српски
Hrvatski
Română
Polski
Slovenský
Magyar
Bookmark Articles Sitemap Contacts
ToyotaMan.ru


Camry Corolla Corona Carina Land Cruiser Highlander 4Runner RAV4 Others
RAV 4 XA20 (2000-2005) RAV 4 XA10 (1994-2000)

Pistons/connecting rods — inspection [Toyota RAV4 XA20]

  • Main
  • RAV4
  • XA20 (2000-2005)
  • Power unit
  • Engine overhaul
  • Pistons/connecting rods — inspection
0
1. Before inspecting the pistons and connecting rods, they must be cleaned of dirt and carbon deposits, washed, and the old rings removed.

Note: During a major engine overhaul, piston rings must be replaced.


2. Carefully spread the rings above the piston and remove them upwards. Be careful - piston rings are fragile and sharp; if stretched too much, they can break and scratch the piston or cut your hands. Using two or three flat feeler gauges will make the job easier and prevent the rings from falling into empty piston grooves and scratching still-good pistons (see Figure 15.2).
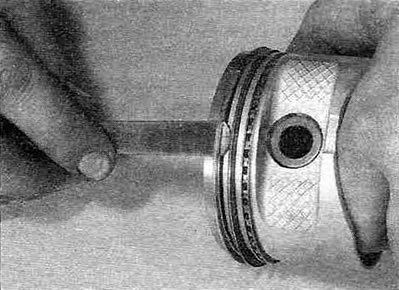


Figure 15.2. Carefully spread the rings above the piston and remove them upwards.


Third (oil scraper) the ring contains an expander.

3. Scrape off all traces of carbon deposits from the piston crown. A hand wire brush or a piece of sandpaper will help remove the bulk of the carbon buildup.

4. Remove carbon deposits from the piston grooves using old rings or their fragments. Remove only carbon deposits, do not remove metal or scratch the grooves. Take care of your hands - wear gloves.

5. After finishing cleaning the pistons, wash the pistons/connecting rods with kerosene or another suitable solvent and dry them thoroughly. Make sure that the oil passage holes in the piston grooves and the oil holes in the connecting rods are not clogged with carbon deposits (see Figure 15.5).
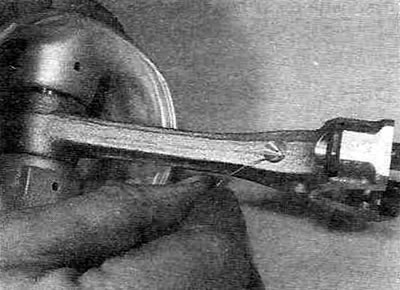


Figure 15.5. Check and, if necessary, clean the oil passage hole in the connecting rod housing.


[The official source is on the portal www.ToyotaMAN.ru]

6. If the cylinder surface is not significantly damaged and the block does not require boring (or replacement of sleeves), you can install the old pistons. Tolerable piston wear appears as uniform vertical bald spots on the friction surface and slight loosening of the upper compression ring in the piston groove. When assembling an engine, mechanics who respect their work always install new piston rings.

7. Carefully inspect the pistons - there should be no cracks near the bosses, on the skirt and in the piston partitions.

8. Check the pistons for scuffs on the rubbing surfaces, burnouts on the bottom and partitions. If the piston has scoring or pitting, the engine may have been overheating and/or the fuel may not be burning properly, causing extremely high combustion chamber temperatures. In such cases, it is necessary to check the cooling and lubrication systems. Burn-through on the piston skirt indicates that the rings were not sealing the piston/cylinder gap. Burn-through on the piston crown indicates possible incorrect ignition timing, injection timing, or engine detonation. If the above problems exist, the cause must be eliminated, otherwise the engine will soon fail again. In gasoline engines, these reasons can be caused by an over-lean mixture due to air being sucked in at the intake, incorrect ignition timing, and a malfunction in the exhaust gas recirculation system. Faulty injectors may also be to blame.

9. Piston corrosion in the form of pitting indicates coolant penetration into the combustion chamber and possibly the crankcase. These problems must be corrected, or they will persist even in a rebuilt engine.

10. If you have any doubts about the condition of the pistons and connecting rods, contact professionals at a specialized workshop. They will carry out the necessary checks and measurements. If you need to purchase new pistons/rings, they will help you select repair sizes and also perform boring (if possible) or cylinder honing.
This article is available at: russian, bulgarian, belarusian, ukrainian, serbian, croatian, romanian, polish, slovak, hungarian
The article material has been checked: Kondratyeva Ulyana
Share information:
◀ Previous
RAV 4 XA20: Engine overhaul
Next ▶

Cylinder block — cleaning and inspection
Crankshaft — removal
Pistons and connecting rods — removal
Cylinder head assembly
Cylinder head — cleaning and inspection
Crankshaft — inspection
Crankshaft bearings — inspection
Engine repair — assembly sequence
Crankshaft — installation
Piston rings — installation
Similar articles on other Toyota models

➥ Pistons and connecting rods — removal and inspection Toyota Camry XV20 (1996-2001)
➥ Pistons and connecting rods — removal and disassembly Toyota Carina T170 (1988-1992)
➥ Connecting rods and pistons — check Toyota Cruiser 60/80 (1980-1997, petrol)
➥ Pistons and connecting rods — removal Toyota Highlander 1 (2000-2007, petrol)
➥ Checking the condition of connecting rods and pistons Toyota 4Runner N120 (1989-1995)
➥ Assessment of the technical condition of connecting rods,… Toyota Dyna Y50/Y60 (1984-1995)
Link in different formats to this article
Comments and feedback from visitors
No comments yet


Add two numbers 26 + 39


RAV 4 XA20 (2000-2005) 
  • General information
  • Introduction to manual
  • User manual
  • Daily care
  • Maintenance (petrol)
  • Maintenance (diesel)
  • Troubleshooting
  • Power unit
  • Gasoline engines (before 2000)
  • Petrol engines (since 2001)
  • Diesel engines
  • Engine overhaul
  • Cooling and heating
  • Fuel system (petrol)
  • Fuel system (diesel)
  • Engine electrical equipment
  • Control system (petrol)
  • Control system (diesel)
  • Transmission
  • Manual gearbox
  • Automatic gearbox
  • Clutch and drive shafts
  • Chassis, running gear
  • Brake system
  • Front suspension
  • Rear suspension
  • Steering system
  • Body and interior
  • Exterior (external elements)
  • Interior (internal elements)
  • Doors, locks and windows
  • Electrical equipment
  • Equipment and devices
  • Electrical circuits
RAV 4 XA10 (1994-2000) 
  • General information
  • User manual
  • Maintenance
  • Power unit
  • Petrol engine 3S-FE
  • Petrol engine 1AZ-FE
  • Engine overhaul
  • Cooling and air conditioning
  • Fuel and exhaust system
  • Ignition system
  • Toxicity reduction system
  • Transmission
  • Clutch
  • Mechanical gearbox
  • Automatic gearbox
  • Cardan and drive shafts
  • Chassis, running gear
  • Brake system
  • Car suspension
  • Steering
  • Body and interior
  • Exterior (external elements)
  • Interior (internal elements)
  • Doors, locks and windows
  • Electrical equipment
  • Equipment and devices
  • Power devices
  • Electrical circuits
ToyotaMan.ru © 2018–2026 • Mobile version • Interesting about Toyota • Administration • Sitemap: EN BG BY UA RS HR RO PL SK HU • Search system • Bookmark
Camry Vista-V40 • Camry XV10 • Camry XV20 • Camry XV30 • Corolla Verso-AR10 • Corolla E80 • Corona T190 • Carina T170 • Carina T190 • Land Cruiser J70 (diesel) • Land Cruiser J60 (petrol) • Land Cruiser J100 • Highlander XU20 (petrol) • 4Runner N120 • RAV4 XA10 • RAV4 XA20 • Duet M100 • Dyna Y50 •
We require cookies to enable some interactive features. Is that ok with you?