



2. Install the engine block with the crankcase facing up.
All engines except 1.8L petrol
3. Loosen the main bearing cap mounting bolts and remove the caps. Place the lids in the correct order.
4. If not already removed, remove the old liners from the cylinder block and main bearing caps. Wipe the main bearing surfaces in the cylinder block and caps with a clean, lint-free cloth. Surfaces must be absolutely clean.
5. Remove all protective grease with kerosene and wipe the backs of the new main bearings, then lay the bearings in the beds, aligning their locks with the recesses in the beds. Try not to touch the working surfaces of the liners with your fingers. Place the grooved liners into the cylinder block (see figure 19.5, a, b).
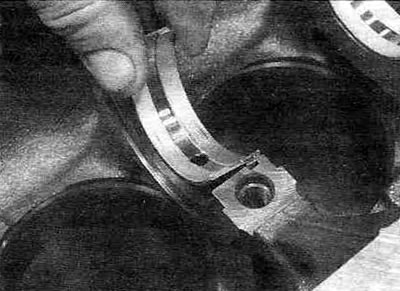
Figure 19.5,a. Press the liners into place in the cylinder block...
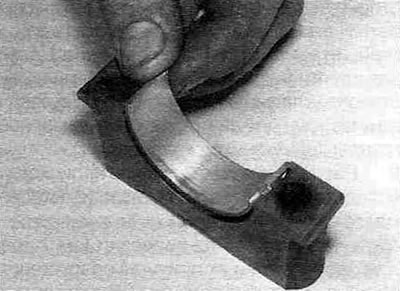
Figure 19.5, b....and in the lids.
Please note that in 2.0 liter engines produced before 2000, the width of the upper and lower liners of the central (No. 3) main bearing is 22.9 mm, while all other liners have a width of 19.2 mm - when assembling, make sure that they are installed correctly. Place the liners into the main bearing caps, aligning their locks with the recesses in the caps. Also make sure that the oil passage holes in the cylinder block and liners are aligned.
6. Install thrust washers on each side of the central (No. 3) main bearing with the oil grooves facing outward. To prevent the thrust washers from falling off during installation, apply a small amount of grease to them (see Figure 19.6).
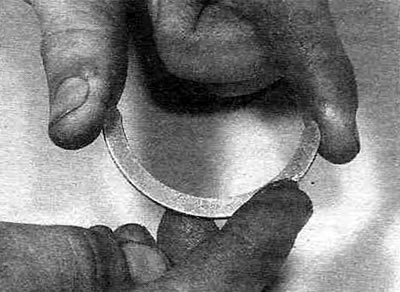
Figure 19.8. To prevent the thrust washers from falling off when installed on both sides of the central bearing, apply a small amount of grease to them.
7. Carefully wipe the working surfaces of the bearings in the block with a clean, lint-free cloth and generously lubricate them with clean engine oil. The same should be done with the thrust half rings.
8. After making sure the journals are clean, install the crankshaft in its place in the cylinder block. Lubricate the lower bearing shells in the bearing caps with clean engine oil, check that the bearing shell locks are in the corresponding recesses in the caps. Install the support covers into the block, observing the numbering and direction of the arrows. Lower thrust half rings (with tongues) must be installed on the central bearing cover so that the oil grooves are facing outward and the tabs enter the grooves of the cover (see Figure 19.8).
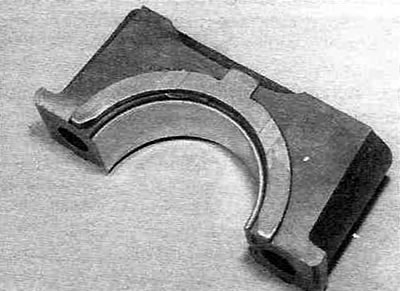
Figure 19.8. Ensure that the support half rings are correctly installed on each side of the central main bearing cap.
9. Lubricate the threads and bottoms of the bolt heads with clean engine oil and tighten them into the caps. Tighten the bolts to the specified torque Specifications moment, observing the sequence shown in the figure 19.9.
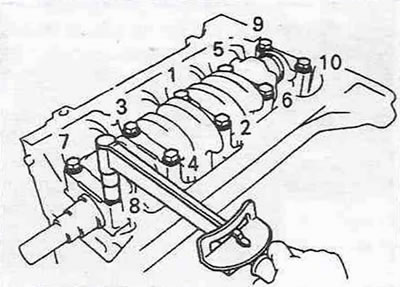
Figure 19.9. Sequence of tightening the main bearing cap bolts.
10. After tightening the mounting bolts, check the smooth rotation of the crankshaft by turning it a few revolutions by hand.
11. Check the crankshaft end play using a set of feeler gauges or a dial indicator as described in paragraph 13. If necessary, if the thrust ends are not damaged or show signs of wear, adjust the axial clearance by selecting thrust half rings of the appropriate thickness.
12. Install the new crankshaft oil seal into the housing (excluding engines produced since 2001), then install the oil seal housing into the cylinder block (see part A or IN of this chapter).
Petrol engines with a displacement of 1.8 liters
(The original source is located on the website: «ToyotaMAN.ru»)
13. If not already removed, remove the old liners from the cylinder block and main bearing cover block ("ladder"). Wipe the working surfaces of the main bearings in the cylinder block and covers with a clean, lint-free cloth. Surfaces must be absolutely clean.
14. Remove all protective grease with kerosene and wipe the back sides of the new main bearings, then place the bearings with the grooves in the cylinder block bed, aligning their locks with the recesses in the beds. Try not to touch the working surfaces of the liners with your fingers. Place the other halves of the inserts into the corresponding "ladder" lids (see figure 19.4, a, b).
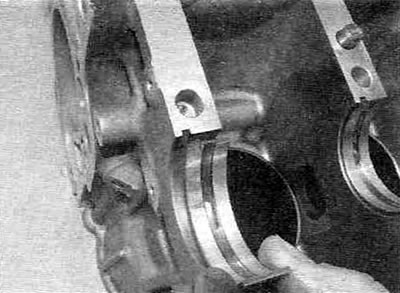
Figure 19.14,a. Place the bearing shells with oil grooves into the cylinder block...
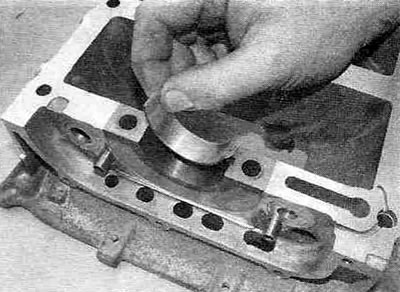
Figure 19.14, b....and place the flat liners in the block of support caps ("ladder") - for 1.8 l gasoline engines.
Make sure the bearing locks are in the recesses of the block and the ladder frame. Also, ensure that the oil passage holes in the cylinder block and bearings are aligned.
15. Install thrust washers on each side of the central (No. 3) main bearing with the oil grooves facing outward. To prevent the thrust washers from falling off during installation, apply a small amount of grease to them.
16. Carefully wipe the working surfaces of the bearings in the block with a clean, lint-free cloth and generously lubricate them with clean engine oil. The same should be done with the thrust half rings.
17. After making sure the journals are clean, install the crankshaft in its place in the cylinder block. Wipe the working surfaces of the bearing block liners ("ladder") and lubricate them with clean engine oil.
18. Apply a 2 mm bead of sealant (Toyota No. 08826-00080 or equivalent) to the mating flange of the "ladder" assembly (see figure 19.18).
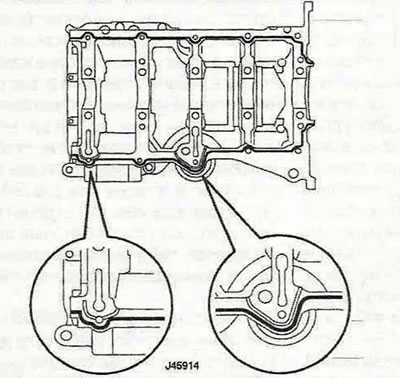
Figure 19.18. Apply a 2 mm wide bead of sealant to the ladder frame mating flange - for 1.8 L petrol engines.
Install the support block within three minutes of applying the sealant, BEFORE it hardens.
19. Tighten the ten twelve-point head bolts into the "ladder" assembly covers (inner row). Proceed in the sequence shown in the figure 19.19 Using a socket and a ratchet, tighten the bolts to the torque specified in the Specifications for the first pass, then tighten them in the same sequence to the torque specified for the second pass.
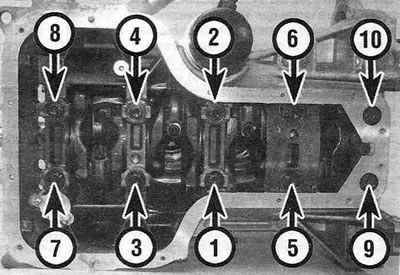
Figure 19.19. Sequence of tightening the bolts for fastening the main bearing cap block ("ladder") - for 1.8 l petrol engines.
In the same sequence, tighten the bolts to the angle prescribed for the third pass, preferably using a goniometer to ensure accuracy. If you don't have a nozzle, use paint to mark the angles on the bolt heads and casting. And finally, make a fourth pass, tightening the bolts to the specified Specifications angle.
20. Tighten the remaining bolts securing the ladder to the cylinder block (with hex heads) and gradually tighten them in a diagonal sequence to the specified torque.
21. After tightening the mounting bolts, check the smooth rotation of the crankshaft by turning it a few revolutions by hand.
22. Check the crankshaft end play using a set of feeler gauges or a dial indicator as described in paragraph 13. If necessary, if the thrust ends are not damaged or show signs of wear, adjust the axial clearance by selecting thrust half rings of the appropriate thickness.
23. Install the new crankshaft oil seal as described in Part B of this chapter.