



Contents: Removal ↓ Installation ↓
Only for vehicles with an engine power of 85 kW/116 hp. A special tool is required to install the piston. If there is no special tool, with the necessary qualifications the necessary tool can be made independently. Otherwise, it is necessary to contact a specialized workshop.
Removal
Mark the position of the wheel disk relative to the hub with paint. Thanks to this, the balanced wheel can be installed in its original place.
Loosen the wheel nuts from the vehicle while it is parked on the ground.
Raise the rear of the vehicle.
Remove the wheel.
Attention: It is not allowed to change the brake pads from the outer side to the inner side and vice versa, or from the right wheel to the left. Such a change may lead to uneven brake action. Therefore, it is necessary to change both pads of both axles at the same time. When removing and subsequently installing the brake pads, they must be marked.
Release the handbrake.
Unscrew the lower guide shaft of the brake caliper housing.
Tilt the piston body upward and tie it with wire to the body so as to eliminate the load on the hose.
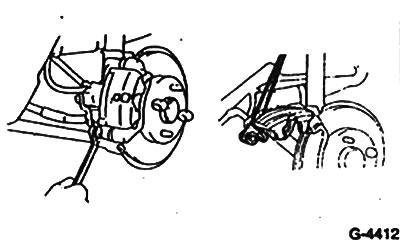
Caution: Do not remove the brake hose. Otherwise, the system will have to be bled.
Lightly tighten the wheel nuts to secure the brake disc.
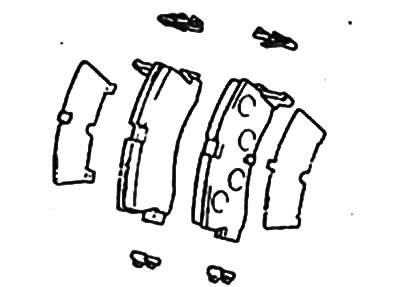
Remove two brake pads with two spacer springs (at the bottom of the picture), two retaining springs (at the top) and two anti-squeak plates.
The original text is posted on www.ToyotaMan.ru
Installation
Caution: Do not press the brake pedal with the brake pads removed. Otherwise, the piston housing may be pressed out. If the piston is accidentally pressed out, it must be reinstalled in a specialized workshop.
Clean the guide and support surfaces of the shoe in the housing shaft with a soft metal brush and wipe with alcohol. Do not use solvents containing mineral oils or tools with sharp edges.
Before installing the brake pad, check the quality of its surface by feeling it with your fingers. Do not install a pad with a ribbed surface.
Measure the thickness of the brake disc.
Check the dust boot and protective cuffs in the brake caliper for cracks. Replace the dust boot if it is damaged, as dirt getting through it will cause the caliper to lose its tightness. The caliper must be removed and disassembled (work of a specialized workshop).
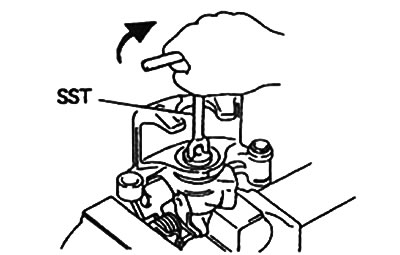
Turn the brake piston clockwise until it stops using the special tool SST 097-14020.
The brake caliper does not need to be removed for this. The figure shows the caliper removed for clarity.
Note: The brake piston must actually be turned out. If it is simply pressed out, the automatic self-adjustment of the handbrake in the caliper is disrupted.
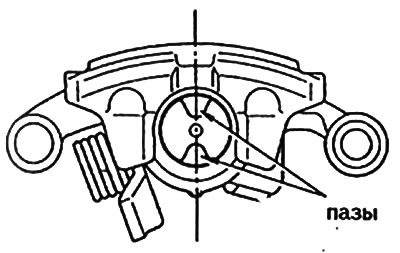
The tool for turning the piston must fit into the piston grooves so that the piston can be turned. If there is no special tool, with a certain qualification the tool can be made independently. Otherwise, it is necessary to contact a specialized workshop.
Attention: When pressing the piston, the fluid level in the reservoir increases. Monitor the fluid level in the reservoir. If necessary, suck out the fluid. To suck out the fluid, you can use a special container or a plastic bottle that is used only for brake fluid. Do not use bottles for drinking liquids! Brake fluid is poisonous and should never be sucked in by mouth through a hose. Use a siphon before sucking out. After replacing the brake pads, the fluid level in the reservoir should not exceed the "Max" mark, because when heated, the fluid expands, leaking brake fluid leads to damage to the protective varnish coating of the car and the formation of corrosion.
The following procedure is recommended. To avoid squealing in disc brakes, the backs of the brake pads and anti-squeal plates can be coated with a thin layer of grease (for example, Plastilube, Tunap VC 582/S, Chevron SRJ/2, Liqui Moly LM-36 or LM 508-ASC). Under no circumstances should the lubricant come into contact with the brake pads or brake discs. If it does come into contact with these surfaces, they must be washed with alcohol.
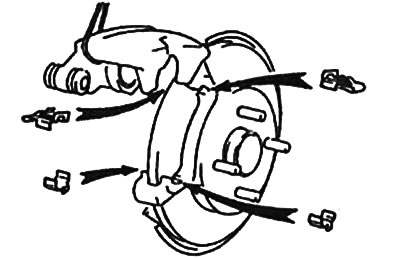
Insert new spacer and retainer springs into the brake caliper.
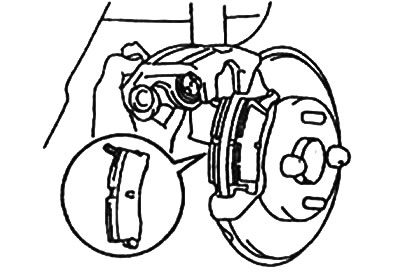
Insert the brake pads with anti-squeak plates and lower the piston housing down. The projection on the inner pad should fit into the groove of the brake piston. Make sure that the seals are not damaged when lowering the housing.
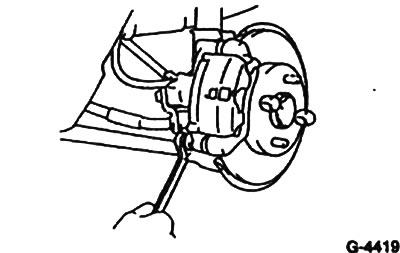
Tighten the brake holder bolt to 20 Nm.
Remove the wheel mounting nuts.
Install the wheel and tighten the wheel nuts. Observe the markings on the wheel relative to the hub. Tighten the nuts to 105 Nm crosswise.
Caution: Press the brake pedal vigorously several times until you feel strong resistance.
Check the fluid level in the tank. If necessary, top up to the "Max" mark.
Adjust the handbrake.
Allow the new brake pads to break in. To do this, brake the car several times from 80 km/h to 40 km/h by briefly pressing the brake pedal. Allow the brake to cool in between.
Attention: Do not apply sudden braking during the first 200 km of driving.