
Company Honda Company Ford Company Skoda Company Kia Company Mazda Company Mercedes Company Renault
English Русский
Български
Беларускі
Український
Српски
Hrvatski
Română
Polski
Slovenský
Magyar
Bookmark Articles Sitemap Contacts
ToyotaMan.ru


Camry Corolla Corona Carina Land Cruiser Highlander 4Runner RAV4 Others
Carina T190 (1992-1996) Carina T170 (1988-1992)

Wheel replacement [Toyota Carina T190]

  • Main
  • Carina
  • T190 (1992-1996)
  • General information
  • User manual
  • Wheel replacement
0
1. If you need to change a tire on the road, gradually reduce speed and move the car to a safe place.

2. Stop the vehicle on a level place with firm ground.

3. Stop the engine and turn on the hazard warning lights.

4. Securely apply the parking brake and move the shift lever to the reverse gear position (manual transmission) or selector to position "P" (automatic transmission).

Note: If necessary, block the wheel diagonally opposite the one to be replaced.


5. Remove the spare tire.

6. Replace the wheel.

a) Remove the decorative cap (if installed).

b) Loosen the mounting nuts of the wheel being replaced by one turn.
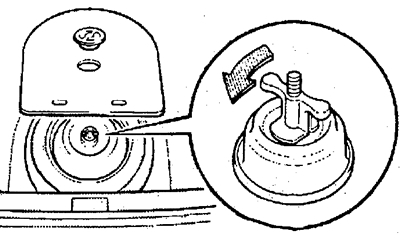


c) Install the jack (see the section "Jack installation points").
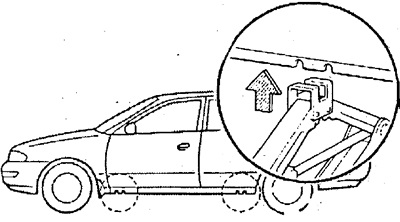


Note:
  • Make sure the jack is positioned correctly. Raising the vehicle with an improperly positioned jack can result in damage to the vehicle or the vehicle slipping off the jack.
  • Never stand under a vehicle unless the vehicle is supported only by a jack.
  • Use the jack only to raise the vehicle when changing a tire.
  • Do not lift the vehicle if anyone is inside.


d) Turn the jack handle to raise the car, loosen the wheel nuts and remove the wheel.


Note: Only raise the vehicle high enough to remove or change a wheel.


d) Before installing the wheel, remove any corrosion from the mounting surface with a wire brush or similar tool. Installing a wheel without good metal-to-metal contact on the mounting surface can cause the wheel nuts to loosen and even cause the wheel to come off while driving. Therefore, after the first 1,600 km, check that the nuts are securely fastened.

e) Install the spare wheel and tighten the mounting nuts by hand. When installing alloy wheels, pay special attention to the installation of nuts, which are installed with the cone facing inward.
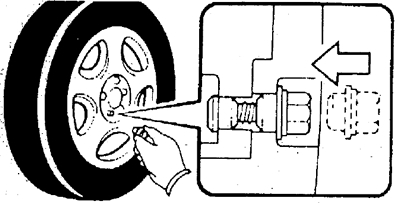


g) Lower the vehicle and tighten the wheel nuts in the sequence shown in the figure. When tightening the nuts, do not use an extension wrench or press on it with your foot.
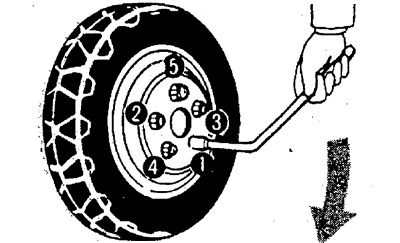


7. Check the air pressure in the installed tire.


Note: Be sure to replace the tire valve cap as dirt and moisture may enter the valve, causing air leakage.


8. Before driving, make sure all tools, jack and spare tire are securely stored in their storage areas to reduce the possibility of injury during a collision or sudden braking.
This article is available at: russian, bulgarian, belarusian, ukrainian, serbian, croatian, romanian, polish, slovak, hungarian
The article material has been checked: Kondratyeva Ulyana
Share information:
◀ Previous
Carina T190: User manual
Next ▶

Starting the engine
Towing a car
Tips for driving in different conditions
Features of the transmission of 4WD models
Driving a car with automatic transmission
Checking tire pressure and condition
Tire replacement
Features of using aluminum wheels
Replacement of wheel disks
Brake lining wear indicators
Similar articles on other Toyota models

➥ Steering wheel — adjustment Toyota Camry XV20 (1996-2001)
➥ Ignition switch with steering wheel lock (petrol engines) Toyota Corolla E80 (1983-1990)
➥ Wheel replacement Toyota Corona T190 (1992-1997)
➥ Wheel rotation Toyota Cruiser 60/80 (1980-1997, petrol)
➥ Steering wheel — removal and installation Toyota Highlander 1 (2000-2007, petrol)
➥ Steering wheel tilt adjustment Toyota 4Runner N120 (1989-1995)
Link in different formats to this article
Comments and feedback from visitors
No comments yet


Add two numbers 38 + 29


Carina T190 (1992-1996) 
  • General information
  • User manual
  • Maintenance
  • Power unit
  • Engines 4A-FE, 5A-FE, 7A-FE
  • Engines 3S-FE, 4S-FE
  • Diesel engines 2C
  • Engine repair
  • Cooling system
  • Lubrication system
  • Fuel system
  • Control system (diesel)
  • Fuel injection system
  • Engine electrical equipment
  • Transmission
  • Clutch
  • Mechanical gearbox
  • Automatic gearbox
  • Drive shafts
  • Chassis, running gear
  • Car suspension
  • Steering
  • Brake system
  • Body and interior
  • Exterior (external elements)
  • Interior (internal elements)
  • Air conditioning and heater
  • Electrical equipment
  • Equipment and devices
  • Headlights and lighting
  • Breakers and switches
  • Electrical circuits
Carina T170 (1988-1992) 
  • General information
  • Introduction to the manual
  • Power unit
  • Gasoline engines
  • Diesel engines
  • Lubrication system
  • Cooling system
  • Fuel system (carburetor)
  • Fuel system (injector)
  • Ignition system
  • Transmission
  • Clutch
  • Car gearbox
  • Drive shafts
  • Chassis, running gear
  • Front suspension
  • Rear suspension
  • Steering
  • Brake system
  • Electrical equipment
  • Power devices
  • Electrical circuits
ToyotaMan.ru © 2018–2026 • Mobile version • Interesting about Toyota • Administration • Sitemap: EN BG BY UA RS HR RO PL SK HU • Search system • Bookmark
Camry Vista-V40 • Camry XV10 • Camry XV20 • Camry XV30 • Corolla Verso-AR10 • Corolla E80 • Corona T190 • Carina T170 • Carina T190 • Land Cruiser J70 (diesel) • Land Cruiser J60 (petrol) • Land Cruiser J100 • Highlander XU20 (petrol) • 4Runner N120 • RAV4 XA10 • RAV4 XA20 • Duet M100 • Dyna Y50 •
We require cookies to enable some interactive features. Is that ok with you?