
33. Install the toothed pulley (s) on the camshaft (s) (if he (And) was filmed), turning it with the flange side out. Align the pin hole in the toothed pulley with the pin on the end of the camshaft. Do not mix up the camshaft pulleys. Install the intake camshaft sprocket to the intake shaft and the exhaust camshaft sprocket to the exhaust shaft.
34. Screw the bolt (s) toothed pulley fasteners (oh) camshaft (ov) and tighten it (their) prescribed force specified in Specifications at the beginning of this chapter.
35. Install the idler pulley. Apply thread locking compound to the first two or three threads of the bolt, then install the pulley and washer and install the bolt. Tighten the bolt to the specified torque specified in Specifications at the beginning of this chapter.
36. Install the upper intermediate pulley. Tighten the bolt to the specified torque specified in Specifications at the beginning of this chapter. Make sure the pulley rotates smoothly.
37. Align the timing marks of the camshaft pulleys (rice. 7.21).
38. Install the crankshaft sprocket by turning its flange towards the engine. Be careful not to damage the part of the toothed pulley serving as the crankshaft position sensor impulse wheel.
39. Turn the crankshaft back to the TDC position. Check the alignment of the TDC marks on the toothed pulley and the oil pump housing, reinstall the holder and screw in the bolt (pic. 7.39).
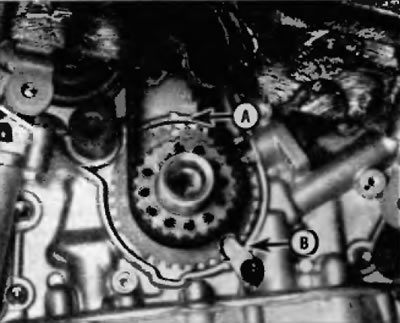
Pic. 7.39. Align the marks on the crankshaft sprocket with the mark on the oil pump housing (A) and install the toothed pulley holder (IN) and bolt
40. Install the timing belt, starting with the crankshaft sprocket, in the following sequence:
- A) stage 1: engage the belt with the crankshaft toothed pulley;
- b) stage 2: put the belt on the toothed pulley of the coolant pump;
- V) stage 3: lift the belt over the toothed pulley of the left camshaft;
- G) stage 4: pass the belt under the intermediate pulley,
- d) stage 5: lift the belt over the right camshaft sprocket;
- G) stage 6: put the belt on the idler pulley.
41. Using a press or vise, slowly squeeze the belt tensioner plunger (pic. 7.41). Insert a metal rod, drill bit or internal hex wrench into the hole in the pusher and body. Remove the tensioner from the press or vise.
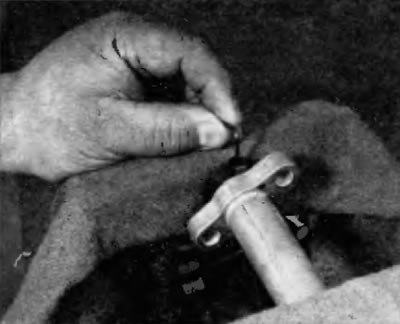
Pic. 7.41. Lock the tensioner plunger, for which the latter should be clamped in a vice and a rod with a diameter of approximately 1.5 mm should be left; make sure the rubber boot stays in place
42. Install the timing belt tensioner and tighten the bolts to the specified torque listed in the Specifications at the beginning of this chapter. Remove the fixing rod.
43. Using a socket and extension, slowly rotate the crankshaft at the pulley bolt two full turns (720°) clockwise. Check the position of the alignment marks again (rice. 7.21).
Warning. If the alignment marks do not line up exactly as shown, repeat the timing belt installation procedure. Do not start the engine until you are absolutely sure that the belt is installed correctly. If the belt is installed incorrectly, severe engine damage can result, requiring costly repairs.
44. Install the belt guide on the end of the crankshaft with the bowl side out.
45. Install the lower (№1) timing belt cover and appropriate gasket.
46. Install pulley (for drive belt) onto the crankshaft, aligning the keyway with the key on the crankshaft. Install the bolt and tighten it to the specified torque specified in Specifications at the beginning of this chapter. Hold the crankshaft from rotating using the method described in paragraph 17.
47. Reinstall engine mount tie rod support bracket (see paragraph 16).
48. Install the top (№2) timing belt cover and appropriate gasket.
49. Install engine mount tie rod and tie rods and tighten bolts securely (see paragraph 16).
50. Reinstall the remaining elements, working in the reverse order of removal.