
Removing
1. Remove the hood (see chapter 11).
2. Disconnect the ground wire from the battery (see paragraph 1 of chapter 5).
3. Raise the vehicle and place secure supports under it.
Attention! If the vehicle is equipped with electronically controlled air suspension, turn off the suspension height control switch.
4. Remove the sections of the lower engine protection (rice. 6.3).
5. Drain the engine oil and remove the oil filter. The oil pan is a two piece assembly. The aluminum section is attached to the cylinder block and gearbox in a block with a drive axle. A stamped steel section is installed from below.
6. Disconnect the front exhaust pipe from the catalytic converters and the support bracket and remove the nuts securing the pipe to the exhaust manifolds / catalytic converters of the front and rear rows of cylinders.
7. Remove the faceplate cover (pic. 12.7).
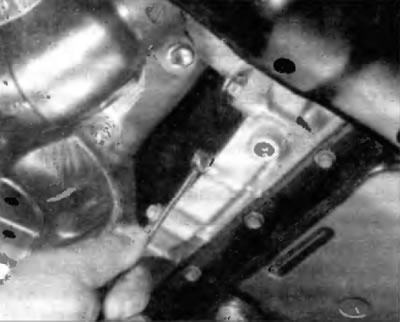
Pic. 12.7. Remove the two screws and remove the faceplate cover
8. Remove the two bolts securing the aluminum section of the oil pan to the gearbox in the block with the drive axle (pic. 12.8).
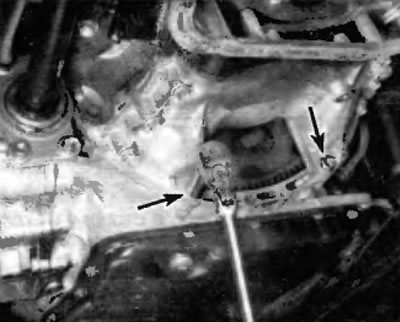
Pic. 12. 8. Turn out two bolts of fastening of the top aluminum section of the pallet to a transmission in the block with the driving axle
9. Turn out ten bolts and turn away two nuts of fastening of a stelny section of the oil pallet and disconnect this section (pic. 12.9). If it does not come off, carefully pry it off with a small screwdriver or putty knife. Do not damage the mating surfaces of the sump, as this may cause oil leakage.
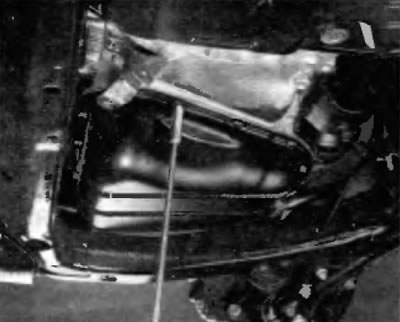
Pic. 12.9. Remove the stylish oil pan section
10. Remove the strainer / oil receiver of the oil pump (rice. 13.4).
11. Turn out bolts of fastening of the aluminum section of the oil pallet to the block.
Application. Some of the bolts are in the area previously covered by the steel pallet.
12. Remove the oil pan baffle plate (in the presence of).
Installation
13. Use a scraper to remove as much of the old sealant from the cylinder block and oil pan. Clean mating surfaces with lacquer thinner or acetone.
14. Clean the threaded bolt holes in the cylinder block.
15. Check the flange of the steel pan section for deformation, especially around the bolt holes. If necessary, place the pallet on a piece of wood and use a hammer to straighten and reshape the sealing surface.
16. If the oil deflector was removed, put it back in place.
17. Clean the mating surfaces of the cylinder block and aluminum sump section, being careful not to damage the soft metal surface, which could lead to leaks.
18. Apply RTV sealant in a 4 mm wide bead to the aluminum pan section (pic. 12.18).
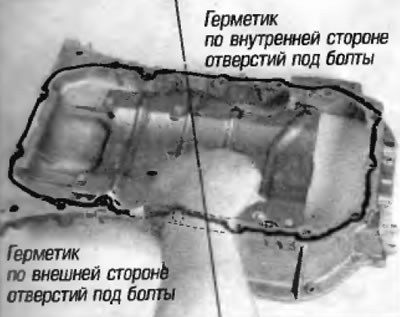
Pic. 12.18. Apply RTV Sealant in a bead around the perimeter of the aluminum pan section as shown
19. Install aluminum pan section; this should be done within five minutes after applying the sealant evenly, in how many stages, tighten the bolts to the prescribed torque indicated in a Specifications at the beginning of this chapter. Work from the center to the edges of the pallet.
20. Inspect the oil pickup pipe/strainer of the oil pump for cracks and blockage in the filter. If the oil receiver has been removed, clean it thoroughly with solvent and now install using a new gasket (see paragraph 13). Tighten the nuts/bolts to the specified torque specified in Specifications at the beginning of this chapter.
21. Apply RTV sealant in a 3-4 mm wide bead to the oil pan steel section flange.
Note. The steel pan section should be installed within five minutes of applying the sealant.
22. Carefully install the steel section of the pallet onto the aluminum section and tighten the bolts. Working from the center to the edges, and tighten them three or four stages to the prescribed torque indicated in Specifications at the beginning of this chapter.
23. The rest of the installation is carried out in the reverse order of removal. Allow the sealant to cure at least 2 hours before adding new oil and installing a new oil filter.
24. Start the engine and check for oil pressure and leaks.