



Contents: Engine 5A-FE ↓ Engine 4A-FE ↓
Note: Do not allow water or oil to come into contact with the camshaft and crankshaft sprockets and keep them clean.
1. Install the camshaft timing pulley (if it was filmed).
a) Align the dowel pin on the camshaft nose with the groove on the toothed pulley and place the pulley on the camshaft.
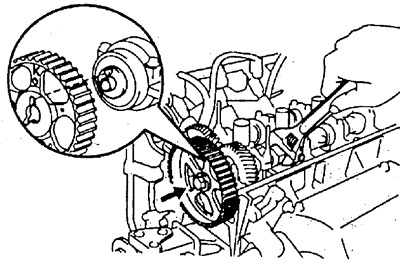
b) Temporarily install the pulley mounting bolt.
c) Holding the camshaft by its hexagonal portion with an adjustable wrench, tighten the camshaft pulley mounting bolt.
- Tightening torque - 59 Nm
2. Install the crankshaft timing pulley (if it was filmed).
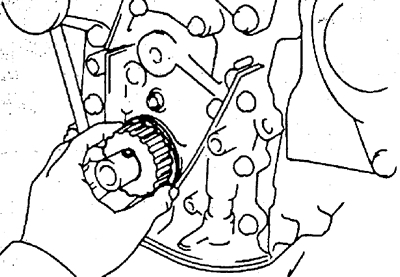
a) Align the key on the crankshaft with the keyway on the toothed pulley.
b) Place the pulley on the nose of the crankshaft until it stops with the flange facing inward.
3. Temporarily install the tensioner roller with spring.
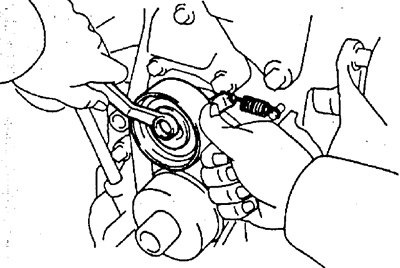
a) Secure the roller with the bolt without tightening it.
b) Install the spring.
c) Pull the roller to the left until it stops and tighten the bolt:
4. Install the timing belt.
Engine 5A-FE
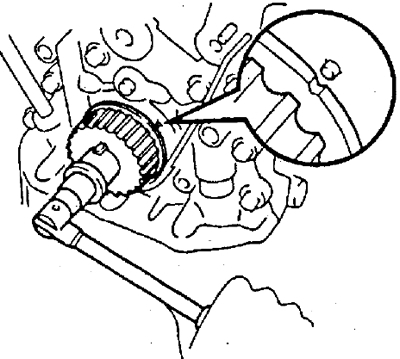
a) Set the piston of the 1st cylinder to the BMI position at the end of the compression stroke.
With an adjustable wrench placed on the hexagonal section of the camshaft, turn it and align the mark on the camshaft bearing cap with the center of the small hole on the camshaft pulley.
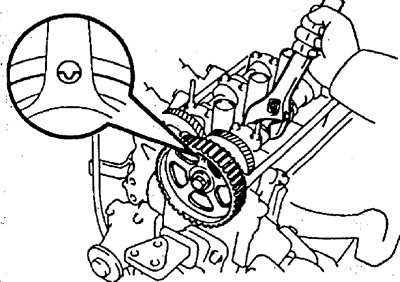
Using the crankshaft toothed pulley mounting bolt, turn the crankshaft and align the timing marks on the toothed pulley and on the oil pump housing.
b) Install the timing belt.
Warning: The engine must be cold.
Note: If reusing the belt, align the previously applied marks on the pulleys and belt and take into account the direction of rotation of the belt.
Install the timing belt, observing the marks and ensuring the required tension in the area between the toothed pulleys of the crankshaft and camshaft.
c) Check that the belt is installed correctly (valve timing).
Slowly loosen the tension roller mounting bolt.
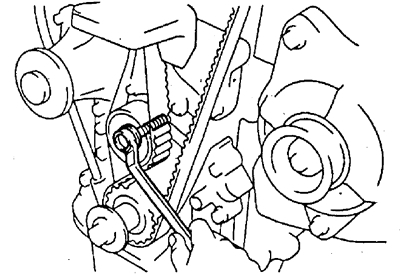
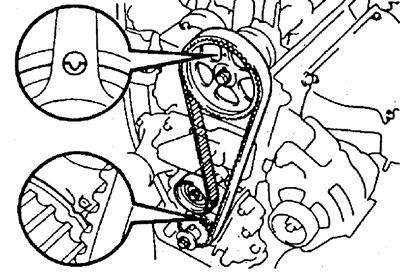
Slowly turn the crankshaft clockwise 2 turns from TDC to TDC, having first installed the toothed pulley mounting bolt.
Make sure the timing marks on each pulley are aligned with the corresponding marks on the oil pump housing (for crankshaft pulley) and on the camshaft bearing cap, as shown in the figure.
(The article was copied from the portal: www.ToyotaMan.ru)
Tighten the tensioner roller mounting bolt.
- Tightening torque - 38 Nm
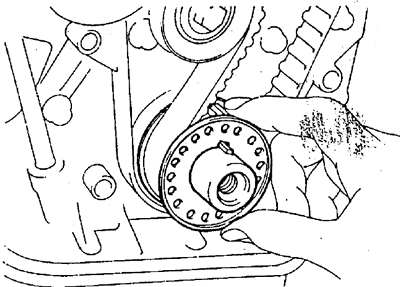
d) Install the timing belt guide with the flange facing outward, as shown in the figure.
d) Install protective cover No.1.
- Tightening torque of bolts - 8 Nm
Engine 4A-FE
a) Set the piston of the 1st cylinder to the TDC position at the end of the compression stroke.
With an adjustable wrench placed on the hexagonal section of the camshaft, turn it and align the mark on the camshaft bearing cap with the center of the small hole on the camshaft pulley.
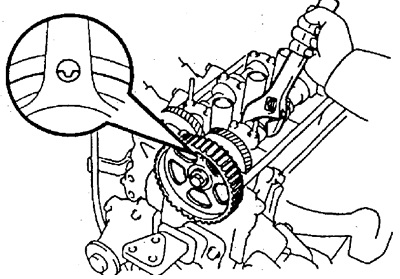
Temporarily install the timing belt.
Install the timing belt guide with the front side facing out.
Install timing belt cover No.1.
- Tightening torque - 8 Nm
Install the crankshaft pulley.
Turn the crankshaft pulley and align its mark with the timing mark "O" on the timing belt cover No.1.
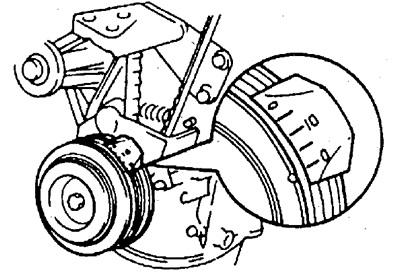
b) Install the timing belt.
Warning: The engine must be cold.
Note: If reusing the belt, align the previously applied marks on the pulleys and belt and take into account the direction of rotation of the belt.
Install the timing belt, observing the marks and ensuring the required tension in the area between the toothed pulleys of the crankshaft and camshaft.
Check that the belt is installed correctly (valve timing).
Slowly loosen the tension roller mounting bolt.
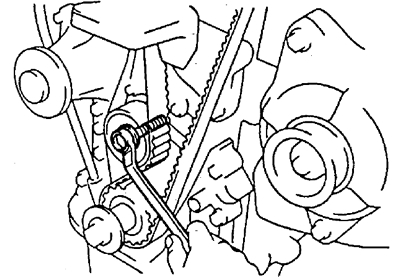
Slowly turn the crankshaft clockwise 2 turns from TDC to TDC, having first installed the toothed pulley mounting bolt.
Make sure the timing marks on each pulley are aligned with the corresponding marks as shown in the illustration.
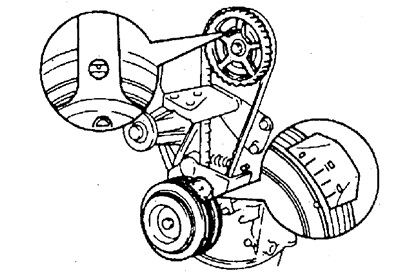
Tighten the tensioner roller mounting bolt.
- Tightening torque - 38 Nm
5. Install the right engine mount by tightening the 3 bolts and 3 mounting nuts.
Tightening torque:
- nut - 53 Nm
- bolt - 74 Nm
6. Lower the engine with a hoist.
7. Install the crankshaft pulley.
a) Align the key on the crankshaft with the groove in the pulley and place the pulley on the shaft.
b) Using a suitable tool, tighten and tighten the crankshaft pulley mounting bolt.
- Tightening torque - 120 Nm
8. Install the coolant pump pulley.
9. Install the air conditioning compressor bracket by tightening the 4 mounting bolts.
- Tightening torque - 48 Nm
10. Install the air conditioning compressor by tightening the 4 mounting bolts.
- Tightening torque - 25 Nm
11. (4A-FE, 7A-FE) Install the combustion chamber pressure sensor wire,
12. Install timing belt cover No.3.
- Tightening torque - 8 Nm
13. Install the cylinder head cover.
a) Remove old sealant.
b) Apply a layer of fresh sealant in the areas shown in the figure.
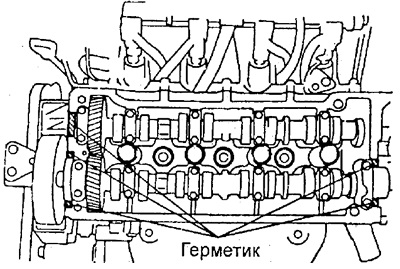
c) Install the gasket under the cylinder head cover.
d) Install the cylinder head cover, securing it with 4 nuts installed on sealing washers.
- Tightening torque of nuts - 6 Nm
14. Connect the crankcase ventilation hoses.
15. Connect the high-voltage wires.
16. Connect the wiring harness and install the wiring harness guard.
17. Install the power steering pump drive belt.
18. Install the air conditioning compressor drive belt.
19. Install the washer reservoir.
20. Install the alternator drive belt.
21. Tighten the coolant pump pulley mounting bolts.
- Tightening torque - 10 Nm
22. Install the right side of the engine guard.
23. Connect the negative terminal to the battery.