



2. Install the washer.
3. Lightly tap with a plastic-headed hammer to install the rectifier housing. Secure the housing with four nuts.
4. Install the pulley.
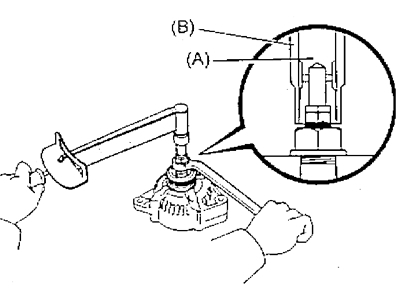
a) Install the pulley on the rotor shaft nose and hand tighten the pulley mounting nut.
b) Hold the special tool (A) with a torque wrench and tighten the special tool (B).
- Tightening torque - 39 Nm
c) Check that the special tool (A) is securely fixed to the rotor.
d) Clamp the special device (C) in a vice and install the generator on it.
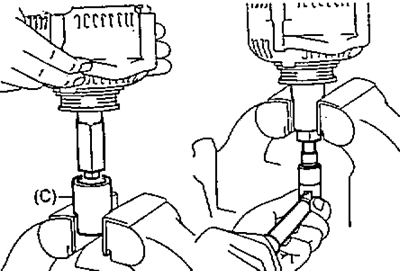
d) To tighten the pulley mounting nut, turn the special tool (A) clockwise.
- Tightening torque - 110 Nm
f) Remove the generator from the special tool (C).
g) Unscrew the special tool (B) and remove the special tools (A) and (B).
5. Install the sealing plate.
6. Install the rectifier unit.
a) Install insulators on the wire terminals.
b) Install the rectifier unit and tighten the 4 screws that secure it.
7. Install the electronic voltage regulator and brush holder.
a) Install the brush holder and tighten the brush holder mounting bolts so that the gap between the brush holder and the electrical connector is 1 mm.
[The original version is published on the website: ToyotaMAN.ru]
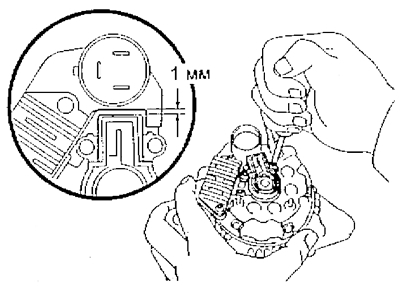
b) Install the brush holder cover onto the brush holder.
8. Install the generator cover on the rectifier side and tighten the 3 cover fastening nuts. Install the terminal insulator and tighten its fastening nut.
9. Check that the rotor rotates smoothly without jamming.