
Company Honda Company Ford Company Skoda Company Kia Company Mazda Company Mercedes Company Renault
English Русский
Български
Беларускі
Український
Српски
Hrvatski
Română
Polski
Slovenský
Magyar
Bookmark Articles Sitemap Contacts
ToyotaMan.ru


Camry Corolla Corona Carina Land Cruiser Highlander 4Runner RAV4 Others
Cruiser 100 (1998-2007) Cruiser 60/80 (1980-1997, petrol) Cruiser 70 (1985-1996, diesel)

Adjusting the height and free travel of the brake pedal [Toyota Land Cruiser J100]

  • Main
  • Land Cruiser
  • J100 (1998-2007)
  • General information
  • Maintenance
  • Adjusting the height and free travel of the brake pedal
0
Contents: Pedal height ↓ Free pedal travel ↓

Pedal height
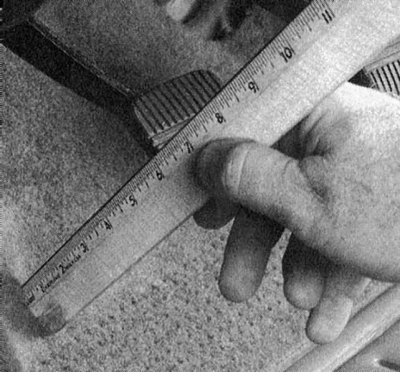


The height of the pedal position is the distance of its pad from the floor (refer to the accompanying illustration).

If the parameter in question is outside the acceptable range (see Specifications), the appropriate adjustment should be made (see below).
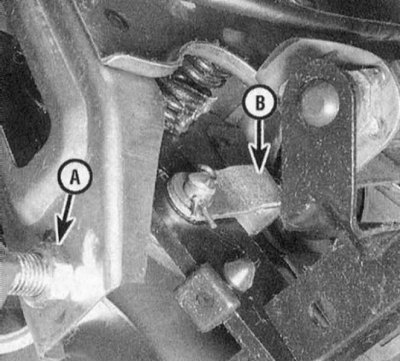


1. Before measuring the brake pedal height, make sure that the pedal is fully released, then start the engine and depress the accelerator pedal several times to activate the brake booster. Measure the pedal height. If necessary, make the appropriate adjustment by loosening the lock nut and releasing the lock bolt/brake light switch, then loosen the push rod lock nut and rotate the push rod until the pedal height is in the middle of the permissible range (refer to the accompanying illustration). Don't forget to tighten the locknuts.


2. After adjusting the pedal, screw the locking bolt/sensor-switch until it stops in the pedal assembly lever (without tension).

Free pedal travel
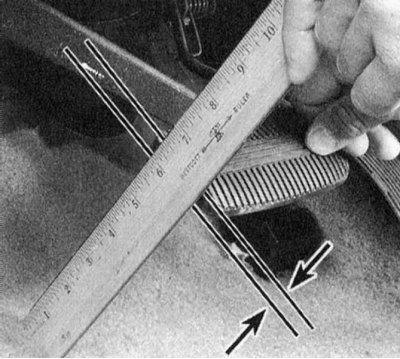


Free travel of the pedal is the amount of movement from the top point to the point where a feeling of resistance to pressing occurs (refer to the accompanying illustration), i.e. before the start of activation of the hydraulic drive of the brake system.

(The article was copied from the portal: toyotaman.ru)

If the measurement result is outside the acceptable range, appropriate adjustments should be made (see below).

Before measuring the free travel of the brake pedal, depress it half a dozen times with the engine off. Loosen the lock nut and rotate the push rod until the desired result is achieved. Tighten the lock nut.
This article is available at: russian, bulgarian, belarusian, ukrainian, serbian, croatian, romanian, polish, slovak, hungarian
The article material has been checked: Evdokimov Evgeniy
Share information:
◀ Previous
Cruiser 100: Maintenance
Next ▶

Checking the brake system
Checking the condition of the power supply system components
Checking, adjusting tension and replacing drive belts
Replacing the air cleaner filter element
Checking and replacing the Crankcase Controlled ventilation (PCV)valve
Checking the condition and replacing spark plugs
Checking and adjusting valve clearances
Replacing the fuel filter
Checking and servicing the air conditioner
Cooling system maintenance
Similar articles on other Toyota models

➥ Height and free travel of clutch and brake pedals Toyota Camry XV20 (1996-2001)
➥ Adjusting the brake pedal Toyota Corolla Verso 3 (2004-2009)
➥ Checking and adjusting the clutch pedal travel Toyota Corona T190 (1992-1997)
➥ Checking and adjusting the clutch pedal travel Toyota Carina T190 (1992-1996)
➥ Brake Pedal — Pedal Height Adjustment Toyota Highlander 1 (2000-2007, petrol)
➥ Adjusting the brake pedal Toyota 4Runner N120 (1989-1995)
Link in different formats to this article
Comments and feedback from visitors
No comments yet


Add two numbers 41 + 42


Cruiser 100 (1998-2007) 
  • General information
  • Introduction to the guide
  • Controls and instruments
  • Maintenance
  • Power unit
  • Petrol engines
  • Diesel engines
  • Cooling and heating
  • Power and exhaust systems
  • Engine electrical equipment
  • Engine management systems
  • Transmission
  • Automatic gearbox
  • Transmission line
  • Chassis, running gear
  • Brake system
  • Car suspension
  • Steering
  • Body and interior
  • Exterior (external elements)
  • Interior (internal elements)
  • Doors, locks and windows
  • Electrical equipment
  • Equipment and devices
  • Electrical circuits
Cruiser 60/80 (1980-1997, petrol) 
  • General information
  • User manual
  • Maintenance
  • Power unit
  • Petrol engines 2F and 3F-E
  • Petrol engines 1FZ-FE
  • Engine overhaul
  • Engine electrical equipment
  • Cooling and heating
  • Fuel system (carburetor)
  • Fuel system (injector)
  • Toxicity reduction system
  • Transmission
  • Car gearbox
  • Clutch
  • Transfer case
  • Drive shafts and axles
  • Chassis, running gear
  • Brake system
  • Car suspension
  • Steering
  • Body and interior
  • Exterior and interior
  • Doors, locks and windows
  • Electrical equipment
  • Equipment and devices
  • Electrical circuits
Cruiser 70 (1985-1996, diesel) 
  • General information
  • User manual
  • Maintenance
  • Power unit
  • Engine adjustment
  • Engine repair
  • Fuel system
  • Control system
  • Turbocharging system
  • Cooling and lubrication system
  • Charge and start system
  • Transmission
  • Clutch
  • Mechanical gearbox
  • Automatic gearbox
  • Transfer case
  • Chassis, running gear
  • Car suspension
  • Brake system
  • Steering
  • Body and interior
  • Body elements
  • Heating and air conditioning
  • Electrical equipment
  • Equipment and devices
  • Electrical circuits
ToyotaMan.ru © 2018–2026 • Mobile version • Interesting about Toyota • Administration • Sitemap: EN BG BY UA RS HR RO PL SK HU • Search system • Bookmark
Camry Vista-V40 • Camry XV10 • Camry XV20 • Camry XV30 • Corolla Verso-AR10 • Corolla E80 • Corona T190 • Carina T170 • Carina T190 • Land Cruiser J70 (diesel) • Land Cruiser J60 (petrol) • Land Cruiser J100 • Highlander XU20 (petrol) • 4Runner N120 • RAV4 XA10 • RAV4 XA20 • Duet M100 • Dyna Y50 •
We require cookies to enable some interactive features. Is that ok with you?