
Company Honda Company Ford Company Skoda Company Kia Company Mazda Company Mercedes Company Renault
English Русский
Български
Беларускі
Український
Српски
Hrvatski
Română
Polski
Slovenský
Magyar
Bookmark Articles Sitemap Contacts
ToyotaMan.ru


Camry Corolla Corona Carina Land Cruiser Highlander 4Runner RAV4 Others
Corolla E80 (1983-1990) Corolla Verso 3 (2004-2009)

Adjusting the brake pedal [Toyota Corolla Verso-AR10]

  • Main
  • Corolla
  • Verso-AR10 (2004-2009)
  • Chassis, running gear
  • Brake system
  • Adjusting the brake pedal
0
Contents: Checking and adjusting the height of…↓ Checking the free travel of the…↓ Checking the residual travel of the…↓

Checking and adjusting the height of the brake pedal
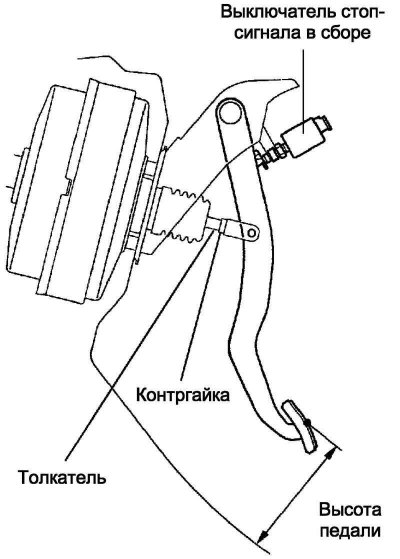


Fig. 6.10. Brake pedal height


Check the height of the brake pedal (Fig. 6.10).

Brake pedal height from engine compartment bulkhead:
  • for left-hand drive: manual transmission - 148.1–158.1 mm;
  • multimodal manual transmission - 149.9–159.9 mm.

Adjust the height of the brake pedal.

Remove the lower instrument panel trim panel.

Disconnect the connector from the brake light switch.

Remove the brake light switch assembly.

Loosen the pushrod lock nut.

Adjust the height of the brake pedal by turning the booster push rod.

Tighten the pushrod lock nut.

Tightening torque: 22 Nm.
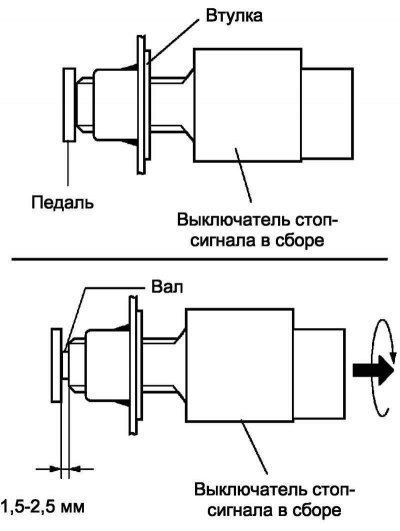


Fig. 6.11. Brake light switch installation diagram


Insert the brake light switch into the bushing until it lightly touches the brake pedal (Fig. 6.11).

Note: Do not press the brake pedal.


Finally, install the brake light switch by turning it a quarter turn clockwise.

Tightening torque: 1.5 N·m or less.

Connect the connector to the brake light switch assembly.

Check the clearance of the brake light switch assembly.

Brake light switch gap: 1.5-2.5mm.

Checking the free travel of the brake pedal


Turn off the engine and press the brake pedal several times until the vacuum in the booster completely disappears.
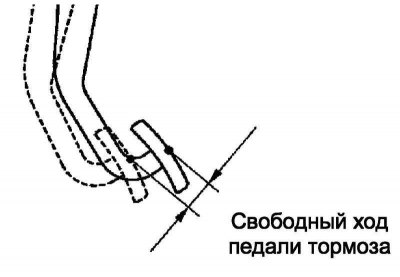


Fig. 6.12. Brake pedal free travel


Gently press the brake pedal until resistance is felt. Measure the distance as shown in Figure 6.12.

Pedal free travel: 1.0–6.0 mm.

If the free play deviates from the permissible values, proceed to the next step.

Check the brake light switch gap.

Brake light switch gap: 1.5-2.5mm.

If the gap corresponds to the nominal value, the fault should be looked for in the brake system.

If there is a deviation from the permissible values, adjust the brake light switch gap.

Checking the residual travel of the brake pedal


Release the parking brake.
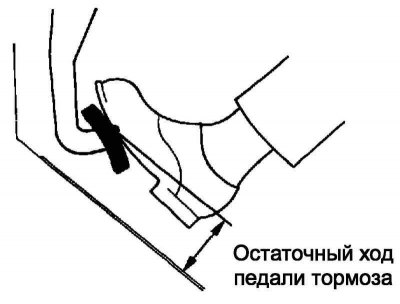


Fig. 6.13. Residual brake pedal travel


[The text is quoted from the source website: www.toyotaman.ru]

With the engine running, press the brake pedal and measure the remaining pedal travel as shown in Figure 6.13.

Residual travel of the brake pedal from the engine compartment partition when pressed with a force of 490 N: more than 50 mm.

If the residual travel deviates from the permissible values, the fault should be looked for in the brake system.
This article is available at: russian, bulgarian, belarusian, ukrainian, serbian, croatian, romanian, polish, slovak, hungarian
The article material has been checked: Mitrofanova Elena
Share information:
◀ Previous
Corolla Verso 3: Brake system
Next ▶

Bleeding the brake circuit
Electronic Brakeforce Distribution (EBD)
ABS with Electronic Brakeforce Distribution (EBD)
Car braking system — general information
Checking the brake booster assembly
Checking the Vacuum Pump Assembly (1CD-FTV)
Checking the brake actuator assembly (without VSC)
Checking the ABS and PBS actuator (with the VSC stability control system)
Adjusting the parking brake
Similar articles on other Toyota models

➥ Adjusting the parking brake pedal and/or lever Toyota Camry XV30 (2001-2006)
➥ Checking and adjusting the brake pedal Toyota Corona T190 (1992-1997)
➥ Checking and adjusting the brake pedal Toyota Carina T190 (1992-1996)
➥ Adjusting the height and free travel of the brake pedal Toyota Cruiser 100 (1998-2007)
➥ Adjusting the brake pedal Toyota 4Runner N120 (1989-1995)
➥ Adjusting the brake pedal position Toyota RAV 4 XA10 (1994-2000)
Link in different formats to this article
Comments and feedback from visitors
No comments yet


Add two numbers 12 + 10


Corolla E80 (1983-1990) 
  • General information
  • User manual
  • Start of movement
  • Faults en route
  • Maintenance
  • Power unit
  • Engine repair
  • Lubrication system
  • Cooling system
  • Ignition system
  • Supply system
  • Fuel supply (carburetor)
  • Fuel supply (injector)
  • Diesel engine
  • Exhaust system
  • Transmission
  • Clutch
  • Manual gearbox
  • Automatic gearbox
  • Chassis, running gear
  • Front suspension
  • Rear suspension
  • Steering
  • Brake system
  • Wheels and tires
  • Body and interior
  • Exterior (external elements)
  • Interior (internal elements)
  • Interior heating
  • Electrical equipment
  • Equipment and devices
  • Power devices
  • Lighting system
  • Glass cleaners and washers
Corolla Verso 3 (2004-2009) 
  • General information
  • User manual
  • Power unit
  • Petrol engines 1ZZ, 3ZZ
  • Diesel engines 1СD-FTV
  • Cooling system
  • Lubrication system
  • Fuel system
  • Control system
  • Exhaust system
  • Transmission
  • Clutch and drive shafts
  • Mechanical gearbox
  • Chassis, running gear
  • Car suspension
  • Steering
  • Brake system
  • Body and interior
  • Exterior (external elements)
  • Electrical equipment
  • Power devices
  • Electrical circuits
ToyotaMan.ru © 2018–2026 • Mobile version • Interesting about Toyota • Administration • Sitemap: EN BG BY UA RS HR RO PL SK HU • Search system • Bookmark
Camry Vista-V40 • Camry XV10 • Camry XV20 • Camry XV30 • Corolla Verso-AR10 • Corolla E80 • Corona T190 • Carina T170 • Carina T190 • Land Cruiser J70 (diesel) • Land Cruiser J60 (petrol) • Land Cruiser J100 • Highlander XU20 (petrol) • 4Runner N120 • RAV4 XA10 • RAV4 XA20 • Duet M100 • Dyna Y50 •
We require cookies to enable some interactive features. Is that ok with you?