
Warning! When servicing power system components, remember that gasoline is a highly flammable liquid. Do not smoke near the place of work, do not approach it with an open flame! Immediately collect all traces of spilled fuel, put rags soaked in fuel and lubricants in a place where the possibility of accidental ignition is absolutely excluded! Always keep a class B fire extinguisher handy! Try not to let gasoline come into contact with exposed skin; prolonged contact of this kind can lead to the development of cancer. Remember that the fuel injection system path is constantly under excessive internal pressure, which must be released without fail before starting work (see chapter Power supply and exhaust systems).
Attention! Before removing the fuel filter, it is necessary to relieve pressure in the power supply system (see chapter Power supply and exhaust systems)!
Fuel filter location on 1999-2000 models with 2UZ-FE engine
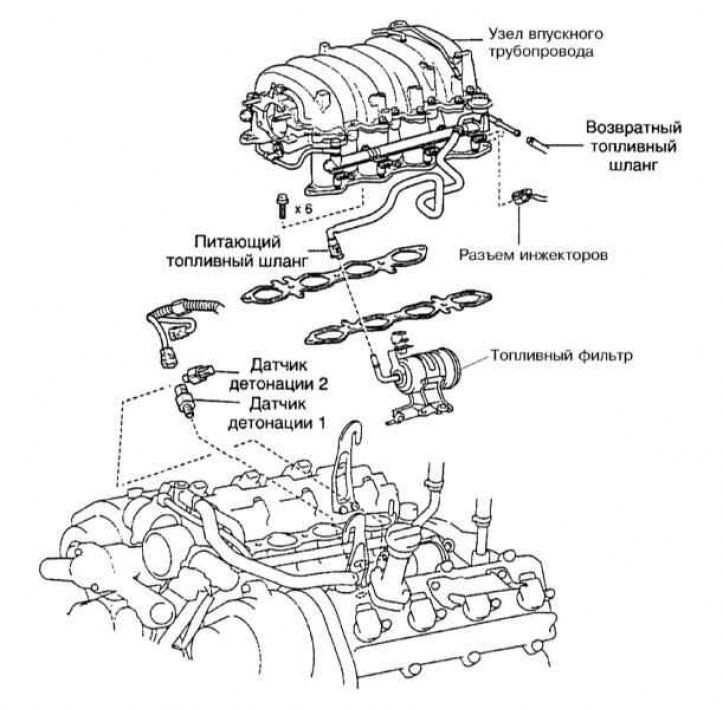
1. The fuel filter is mounted on the frame under the vehicle, under the hood or under the intake manifold (refer to illustration above).
2. This work must be done with a cold engine (after waiting at least 3 hours after the trip is completed). Put a drain container under the filter, prepare a supply of rags or old newspapers to collect spilled fuel.

3. Loosen the choke bolts on both ends of the filter assembly to depressurize the line (refer to accompanying illustration), - use a special ring wrench.
4. Give both bolts of a basic arm and remove the filter in gathering with the last.
5. Turn out a coupling bolt of a fixing collar and release the filter from a basic arm. Pay attention to the markings indicating the connection points to the filter inlet and outlet lines.
6. Fix the new filter in the bracket clamp and install the assembly in its regular place, firmly tighten the mounting bolts. Remember that the filter must be installed flange down.
7. Replacing the sealing washers (two for each docking station), screw in the hollow bolts of the union connections of the fuel lines. Tighten the bolts to the required torque.
8. Further installation is carried out in the reverse order to the dismantling of the components.
9. Start the engine and check the filter and fuel lines for signs of leaks.