
Audio system panel for Lexus LX 470 models
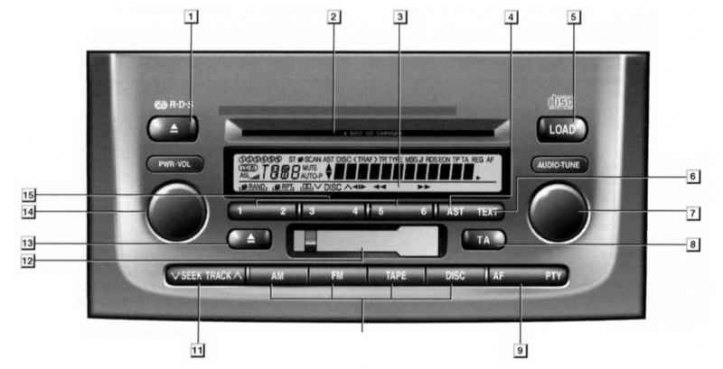
1 - Button to stop and eject CD; 2 - CD installation slot; 3 - Information display; 4 - Button for automatic scanning of radio stations and entering and into the memory of the audio system; 5 - CD installation button; 6 - Switch for displaying text transmitted by the selected radio station; 7 - Switch for setting the equalizer, sound balance and automatic volume control; 8 - Switch for selecting a radio station broadcasting traffic information; 9 - Button for selecting an alternative frequency of the selected radio station (AF) and selecting a radio station of a certain broadcast format (PTY); 10 - Buttons for operating modes of the audio system; 11 - Button to search for a radio station or audio track on a cassette or CD, as well as select the playback mode; 12 - Cassette installation slot; 13 - Button to stop and eject the cassette; 14 - Handle for turning on the audio system and adjusting the volume; 15 - Buttons for selecting a radio station from the audio system memory or selecting a playback mode, depending on the functions assigned to them by the information display
These models also have audio remote control buttons located on the steering wheel (talk to Controls and techniques for the safe operation of the car).
Note. The audio system of Toyota Land Cruiser models is described in detail in a separate published «ARUS» Owner's manual for these vehicles.
The audio system in question has the ability to receive an RDS radio signal at the frequencies LW, MW, FM1, FM2 and FM3, listen to audio cassettes and CDs (CD). It can install up to 6 CDs at the same time.
Assignment of function buttons (1-6) may vary depending on the selected mode and is indicated in the information display directly above the corresponding button. Some functions assigned to a particular button require pressing the button multiple times to select options for that function. For example, the RPT function (looping one track) when pressed again, it changes to the function of cyclic playback of the entire disc, and when pressed a third time, to the function of cyclic playback of all installed discs. The random playback function is implemented in a similar way. When selecting a function «SCAN» only the first 10 seconds of each track on the disc will be played (ov).
Due to the ease of use of the audio system, the following is only a description of how to insert CDs into it.
1. To insert a CD, press the button «LOAD». The brown LEDs at the edges of the slot will flash and the display will show «WAIT». Then the color of the indicators will turn green, the inscription on the display will change to «LOAD» and the slot shutter will open. At this time, insert the CD.
Note. If the disc is not installed correctly, the display will show «ERROR1».
2. To install multiple CDs, press the button «LOAD» and hold it until you hear a beep. Then the events described in paragraph 1 will cyclically occur. The disk should be installed when the inscription appears «WAIT». To stop the cycle, press the button «LOAD» or «DISC».