
Checking the fuel level sensor
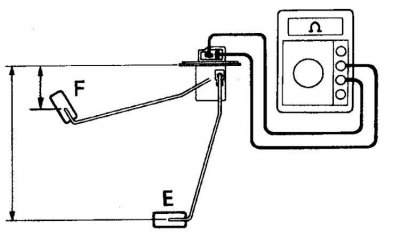
F - full
E - empty
Check and replacement
1. Before checking the fuel level sensor, determine the amount of fuel in the tank.
2. On older vehicles, the sensor wiring is located under the tank.
3. On vehicles of later releases, the middle seat and hatch cover must be removed.
4. Disconnect the battery from the ground and the sensor connector on the tank.
5. Check the resistance of the sensor, which should be 17 ohms when the tank is full, and about 120 ohms when empty.
6. You can also remove the sensor and check the resistance according to the scheme (see fig. Checking the fuel level sensor).
7. If the sensor resistances are different, replace the sensor.
8. To replace the sensor, remove the tank on early production vehicles, and on 80 series vehicles, remove the middle seat.
9. Slightly tilting, carefully remove the sensor with the bracket.
10. Disconnect the connector, unscrew the screw and remove the sensor from the bracket.
11. The sensor is installed in the reverse order.