
Typical carburetor arrangement
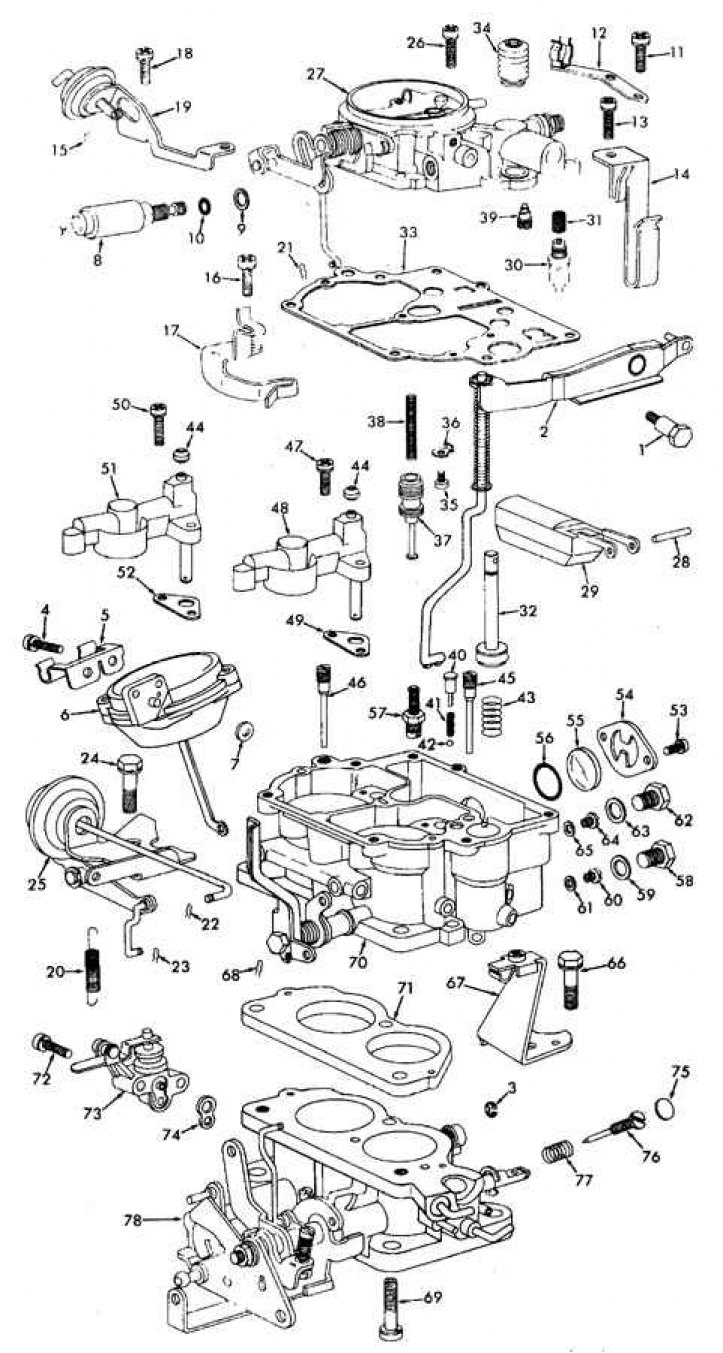
1. Accelerator pump lever screw; 2. Lever; 3. Lock washer; 4. Screw with spring washer; 5. Bracket; 6. Aperture of the secondary chamber; 7, 33. Gasket; 8. Fuel cut-off valve; 9. Gasket; 10. Ring; 11, 13, 16, 18, 24, 26, 35, 47, 50, 66, 69, 72. Screw with spring washer; 12, 17. Wiring bracket; 14. Bracket; 15. Diaphragm bracket; 19. Air damper diaphragm assembly; 20. Spring; 21, 22, 23. Emphasis; 25. Bracket with lever; 27. Air damper assembly; 28. Float axis; 29. Float; 30. Needle valve and seat; 31. Screen; 32. Piston; 34. Case; 36. Lock washer; 37. Economizer piston; 38. Spring; 39. Air jet idling of the primary chamber; 40, 68. Limiter; 41. Ball spring; 42. Ball; 43. Return spring; 44. Small diffuser jet; 45. Fuel jet idling of the primary chamber; 46. Fuel jet idling of the secondary chamber; 48. Nozzle of the small diffuser of the primary chamber; 49, 52. Small diffuser gasket; 51. Small diffuser nozzle of the secondary chamber; 53. Screw; 54. Frame; 55. Viewing window; 56. Ring; 57. Economizer valve; 58, 62. 75. Plug; 59, 61, 63, 65, 74. Gasket; 60. The main jet of the primary chamber (brass); 64. The main jet of the secondary chamber (chromium-plated); 67. Air damper cable bracket; 70. Middle section with float chamber; 71. Spacer; 73. Shut-off valve of the secondary chamber; 76. Idle needle valve; 77. Spring; 78. Throttle body
The carburetor adjustment data is indicated on the engine compartment plate.
Typically, signs of abnormal carburetor operation are overflowing of gasoline in the float chamber, difficulty starting the engine, frequent engine stops at idle, flame backsurges, and slow vehicle acceleration.
Some causes of abnormal engine operation, which are often associated with the carburetor, are due to a violation of the tightness of the hoses, improper engine adjustment, and leakage from under the gaskets.
Examination
1. Before disassembling the carburetor, the following steps should be taken.
2. Check the integrity of the vacuum hoses and the correct connection.
3. Check the tightness of the nuts and bolts of the carburetor and suction manifold.
4. Check the compression in the cylinders.
5. Check the integrity of the wires of the ignition system.
6. Clean spark plugs.
7. Check the operation of the accelerator pump by removing the air filter and pressing the throttle lever.
8. Check throttle opening.
9. Check the operation of the recirculation valve and crankcase ventilation spool.
10. Carburetor electronic components are checked in a car service.
Disassembly
It is recommended to purchase a remanufactured carburetor, guided by the label on the body of the old unit (Part numbers must match exactly).
When disassembling, assembling and cleaning the carburetor, you should keep the previous installation order for all parts.
Before disassembly, purchase a carburetor repair kit, which comes with instructions with diagrams.