
Company Honda Company Ford Company Skoda Company Kia Company Mazda Company Mercedes Company Renault
English Русский
Български
Беларускі
Український
Српски
Hrvatski
Română
Polski
Slovenský
Magyar
Bookmark Articles Sitemap Contacts
ToyotaMan.ru


Camry Corolla Corona Carina Land Cruiser Highlander 4Runner RAV4 Others
Cruiser 100 (1998-2007) Cruiser 60/80 (1980-1997, petrol) Cruiser 70 (1985-1996, diesel)

Liquid Temperature Sensor — Checking and Replacing [Toyota Land Cruiser J60]

  • Main
  • Land Cruiser
  • J60 (1980-1997)
  • Power unit
  • Cooling and heating
  • Liquid Temperature Sensor — Checking and Replacing
0
Contents: Examination ↓ Replacement ↓

Location of the temperature sensor on the 3F-E engine
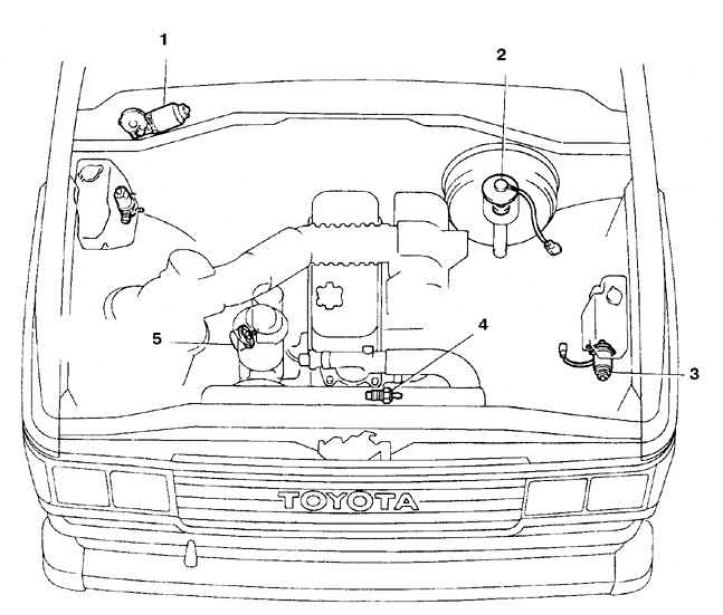


1. Windscreen wiper motor; 2. Brake fluid level sensor; 3. Headlight washer motor; 4. Liquid temperature sensors; 5. Oil pressure sensor


Location of the temperature sensor on the 1FZ-FE engine
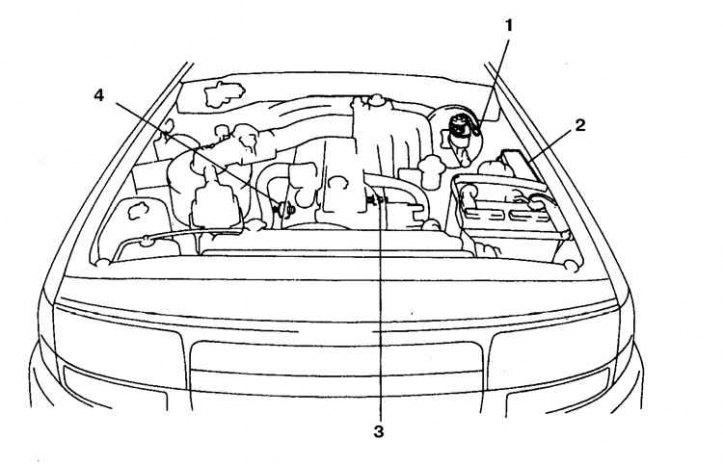


1. Brake fluid level sensor; 2. Relay block; 3. Liquid temperature sensor; 4. Oil pressure sensor


Examination


1. If the gauge does not register temperature, check the fuses.

2. If the sensor indicates the "Hot" state immediately after starting the cold engine, disconnect the wire from the sensor.

3. If the reading drops, replace the sensor.

4. If the reading remains high, the reasons may be a short circuit to ground in the sensor wire, or a faulty indicator. On the 3F-E engine, the sensor is located under the thermostat.


5. If the sensor stops showing temperature after the engine has fully warmed up (approximately 10 minutes after launch), and the fuses are in good condition, then proceed as follows.

6. Stop the engine, disconnect the wire from the sensor and use a piece of wire to short-circuit the sensor wire to a well-cleaned area of the engine.

7. Turn on the ignition briefly, but do not start the engine.

8. If the indicator now shows "Hot", then replace the sensor.

The original text is posted on: ToyotaMan.ru

9. If there are no sensor readings, the cause may be a break in the circuit or a faulty sensor (see subsection 11.1).

Replacement


1. Disconnect the wire from the sensor.

2. Unscrew the sensor and screw in a new one, tighten securely. Do not use sealant.

3. Connect the wire.

4. Fill with liquid, check the sensor readings.
This article is available at: russian, bulgarian, belarusian, ukrainian, serbian, croatian, romanian, polish, slovak, hungarian
The article material has been checked: Evdokimov Evgeniy
Share information:
◀ Previous
Cruiser 60/80: Cooling and heating
Next ▶

Coolant pump — removal, inspection and installation
Oil cooler — removal and installation
Radiator and expansion tank — removal and installation
Fan impeller and fluid coupling — removal and inspection
Thermostat — Checking and Replacing
Heater Fan Motor and Circuit
Heater radiator — removal and installation
Heating and air conditioning control panel
Adjusting the control cables
Checking the heater/air conditioner controls
Similar articles on other Toyota models

➥ Coolant Temperature Sensor — Checking and Replacing Toyota Camry XV10 (1991-1996)
➥ Coolant Temperature Sensor — Checking and Replacing Toyota 4Runner N120 (1989-1995)
➥ Fuel Temperature Sensor — Checking and Replacing Toyota RAV 4 XA20 (2000-2005)
➥ Checking the fan switch temperature sensor Toyota Corolla E80 (1983-1990)
➥ Checking the coolant temperature sensor Toyota Carina T190 (1992-1996)
➥ Checking and replacing fuses Toyota Corona T190 (1992-1997)
Link in different formats to this article
Comments and feedback from visitors
No comments yet


Add two numbers 47 + 31


Cruiser 100 (1998-2007) 
  • General information
  • Introduction to the guide
  • Controls and instruments
  • Maintenance
  • Power unit
  • Petrol engines
  • Diesel engines
  • Cooling and heating
  • Power and exhaust systems
  • Engine electrical equipment
  • Engine management systems
  • Transmission
  • Automatic gearbox
  • Transmission line
  • Chassis, running gear
  • Brake system
  • Car suspension
  • Steering
  • Body and interior
  • Exterior (external elements)
  • Interior (internal elements)
  • Doors, locks and windows
  • Electrical equipment
  • Equipment and devices
  • Electrical circuits
Cruiser 60/80 (1980-1997, petrol) 
  • General information
  • User manual
  • Maintenance
  • Power unit
  • Petrol engines 2F and 3F-E
  • Petrol engines 1FZ-FE
  • Engine overhaul
  • Engine electrical equipment
  • Cooling and heating
  • Fuel system (carburetor)
  • Fuel system (injector)
  • Toxicity reduction system
  • Transmission
  • Car gearbox
  • Clutch
  • Transfer case
  • Drive shafts and axles
  • Chassis, running gear
  • Brake system
  • Car suspension
  • Steering
  • Body and interior
  • Exterior and interior
  • Doors, locks and windows
  • Electrical equipment
  • Equipment and devices
  • Electrical circuits
Cruiser 70 (1985-1996, diesel) 
  • General information
  • User manual
  • Maintenance
  • Power unit
  • Engine adjustment
  • Engine repair
  • Fuel system
  • Control system
  • Turbocharging system
  • Cooling and lubrication system
  • Charge and start system
  • Transmission
  • Clutch
  • Mechanical gearbox
  • Automatic gearbox
  • Transfer case
  • Chassis, running gear
  • Car suspension
  • Brake system
  • Steering
  • Body and interior
  • Body elements
  • Heating and air conditioning
  • Electrical equipment
  • Equipment and devices
  • Electrical circuits
ToyotaMan.ru © 2018–2026 • Mobile version • Interesting about Toyota • Administration • Sitemap: EN BG BY UA RS HR RO PL SK HU • Search system • Bookmark
Camry Vista-V40 • Camry XV10 • Camry XV20 • Camry XV30 • Corolla Verso-AR10 • Corolla E80 • Corona T190 • Carina T170 • Carina T190 • Land Cruiser J70 (diesel) • Land Cruiser J60 (petrol) • Land Cruiser J100 • Highlander XU20 (petrol) • 4Runner N120 • RAV4 XA10 • RAV4 XA20 • Duet M100 • Dyna Y50 •
We require cookies to enable some interactive features. Is that ok with you?