
Checking and replacing the working fluid in the gearbox
1. Checking the level of the working fluid in the gearbox.
A) Park the vehicle on a level surface and apply the parking brake.
b) Start the engine and, without depressing the accelerator pedal, move the range select lever to all positions from "R" before "L" and set it back to position "R".
V) Remove the dipstick from the box and wipe it with a clean cloth.
Note: the orange dipstick for measuring the level of the working fluid is located to the left of the engine in the direction of the car.
G) Insert the dipstick into place.
d) Remove the dipstick again and check that the fluid level is in the range "NOT".
Note:
- The working fluid in the gearbox must be heated to a temperature of 70 - 80°C.
- Label "COOL" on the dipstick is used only for a rough estimate of the level, in the event of a fluid change or engine malfunction.
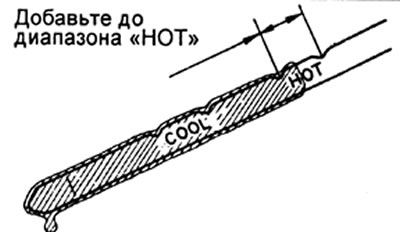
e) If the level is lower than required, then add the working fluid to the gearbox.
Type of working fluid: DEXRON ® II.
Attention: do not overfill the working fluid.
2. Check up a condition of a working liquid in a transmission. If the working fluid smells burnt or blackened, then it should be replaced.
3. Changing the working fluid (if necessary).
Attention: automatic transmission fluid should be replaced every 30-40 thousand km.
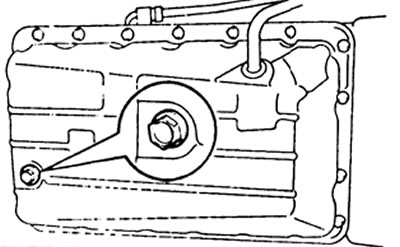
A) Unscrew the drain plug in the gearbox housing and drain the working fluid.
b) Reinstall the drain plug and tighten fee securely.
Tightening torque - 20 N.m
V) With the engine off, fill in new fluid through the filler tube.
Type of working fluid: DEXRON II.
The volume of the filled working fluid is 2.0 l
G) Start the engine at idle, move the selector one by one to all positions from "R" before "L" and then set it to position "R".
d) While the engine is idling, check the fluid level. Add fluid up to range "COOL" on the dipstick if necessary.
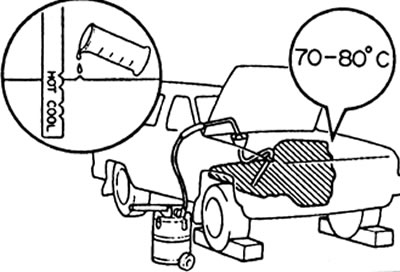
d) Warm up the transmission to normal operating temperature (70-80°C) and check the fluid level. If necessary, add working fluid to the level "NOT" on the probe.
Attention: do not overfill above the set level.
Automatic transmission filter replacement
1. Remove the bottom protection cover (if installed).
2. To prevent contamination, wash the outer surfaces of the automatic transmission case.
3. Unscrew the drain plug and drain the working fluid into a suitable container.
4. Turn away bolts of fastening and remove the pallet.
Attention: some liquid always remains in the sump (1.0 - 1.5 l).
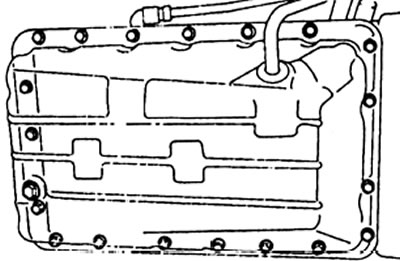
5. Insert a special tool blade between the crankcase and sump and cut off the sealant, then carefully remove the sump and gasket (if installed). Attention: do not damage the pallet flange.
7. Turn away bolts of fastening and remove the automatic transmission filter.
8. Check for presence of automatic transmission wear products in the filter. Rinse the filter if necessary and blow with compressed air.
Attention: the presence of a large amount of wear products and particles of control elements in the filter indicates the need for a major overhaul of the automatic transmission.
9. Install the filter in place and tighten the mounting bolts.
Tightening torque - 10 N.m
Bolt length:
- bolt "A" - 16 mm
- bolt "IN" - 20 mm
- bolt "WITH" - 28 mm

10. Installation of the pallet.
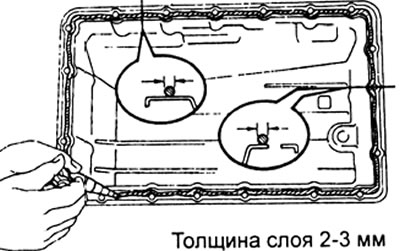
A) Remove sealant residues, do not allow oil to enter the contact surfaces of the crankcase and sump.
b) Apply new sealant to the sump as shown.
Sealant: Tree Bond 1281 or equivalent
V) Install and tighten the 19 mounting bolts.
Tightening torque - 7.4 N.m
7. Install the drain plug and a new gasket, then tighten the plug.
Tightening torque - 20 N.m
8. Install the bottom guard (if filmed).
9. Fill in the working fluid in the automatic transmission The volume of the working fluid to be filled in is 2.0 liters.
10. Start the engine at idle, move the selector one by one to all positions from "R" before "L" and then set it to position "R". Check the fluid level and top up if necessary.
Type of working fluid: DEXRON II.
Attention: do not overfill above the set level.
Checking and adjusting the throttle control cable
1. Check that the cable is installed correctly and that there are no kinks in the cable.
2. Measure the distance between the end of the boot and the stop on the cable with the throttle valve fully open and closed. Normal distance when the valve is fully closed 0 - 1 mm
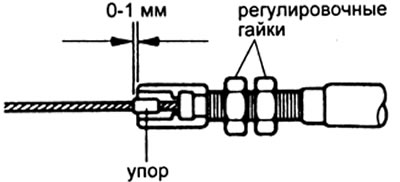
3. If the distance is not correct, adjust the cable with the adjusting nuts.
Checking the selector
1. When moving the selector from the position "N" (neutral) to other positions, check the smoothness and accuracy of the transfer of the selector to each position.
2. If necessary, adjust the position of the selector.
A) Loosen the nut on the control rod.
b) Move the control shaft lever to full travel towards the rear of the vehicle.
V) Return the control shaft lever two notches to the position "N".
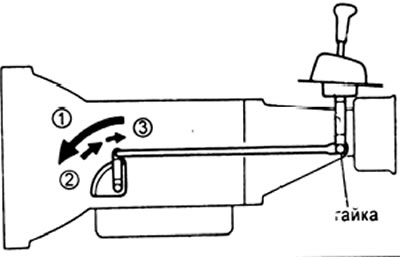
G) Set the selector to position "N" (neutral).
d) Hold the selector slightly towards the position "R", tighten the shift control rod nut.
e) Start the engine and check that the car begins to move forward when the selector is moved from the position "N" into position "D", or back - when the selector is moved to the position "IN".
Checking the engine start inhibit switch
1. Make sure that the engine can only be started if the selector is in the "N" or "R".
2. If discrepancies are found, adjust the sensor-switch.
A) Loosen the sensor bolt and set the selector to position "N".
b) Align the line with the neutral base line.
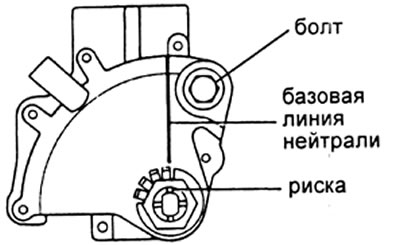
V) While holding the sensor in this position, tighten the bolt.
Tightening torque - 13 N.m