
Removal and installation
1. Drain the brake fluid from the master cylinder.
Note: After installation, bleed the clutch hydraulics, then adjust the position and travel of the clutch pedal.
2. Disconnect the inlet tube.
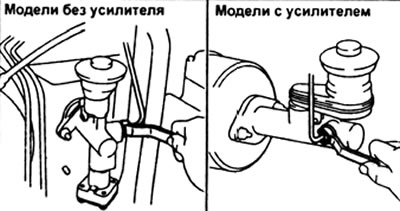
3. For non-amplifier models: remove cotter pin and pin.
4. Turn away nuts of fastening and remove the main cylinder.
#img2#
Clutch Master Cylinder (models without amplifier). 1 - pin, 2 - cover, 3 - float, 4 - tank, 5 - rubber bushing, 6 - spring, 7 - piston assembly, 8 - pusher, 9 - washer, 10 - circlip, 11 - cuff, 12 - locknut, 13 - cotter pin, 14 - fork, 15 - pin, 16 - clutch master cylinder.
Clutch Master Cylinder (models without amplifier). 1 - pin, 2 - cover, 3 - float, 4 - tank, 5 - rubber bushing, 6 - spring, 7 - piston assembly, 8 - pusher, 9 - washer, 10 - circlip, 11 - cuff, 12 - locknut, 13 - cotter pin, 14 - fork, 15 - pin, 16 - clutch master cylinder.
#img3#
Clutch Master Cylinder (models with amplifier). 1 - pin, 2 - cover, 3 - float, 4 - sleeve, 5 - reservoir, 6 - piston, 7 - retaining ring, 8 - cuff, 9 - clutch master cylinder.
Clutch Master Cylinder (models with amplifier). 1 - pin, 2 - cover, 3 - float, 4 - sleeve, 5 - reservoir, 6 - piston, 7 - retaining ring, 8 - cuff, 9 - clutch master cylinder.