Company Honda Company Ford Company Skoda Company Kia Company Mazda Company Mercedes Company Renault
English Русский
Български
Беларускі
Український
Српски
Hrvatski
Română
Polski
Slovenský
Magyar
Bookmark Articles Sitemap Contacts
ToyotaMan.ru


Camry Corolla Corona Carina Land Cruiser Highlander 4Runner RAV4 Others
Duet (1998-2004) Dyna Y50/Y60 (1984-1995)

Checking R452 and R453 gearbox components [Toyota Dyna Y50]

  • Main
  • Toyota
  • Dyna Y50/Y60 (1984-1995)
  • Transmission
  • Manual gearbox
  • Checking R452 and R453 gearbox components
0
1. Check the secondary shaft.

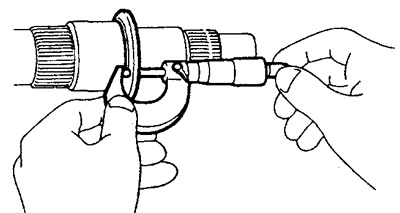
a) Using a micrometer, measure the thickness of the secondary shaft edges.
  • Minimum thickness - 4.70 mm


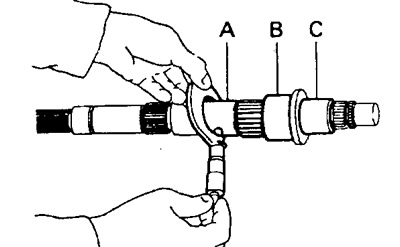
b) Using a micrometer, measure the outside diameter of the secondary shaft journals.

Minimum diameter:
  • A - 38.860 mm
  • B - 46.860 mm
  • C - 37.860 mm


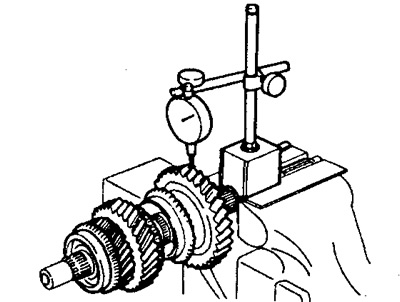
c) Using a digital indicator, check the runout of the secondary shaft.
  • Maximum runout - 0.06 mm

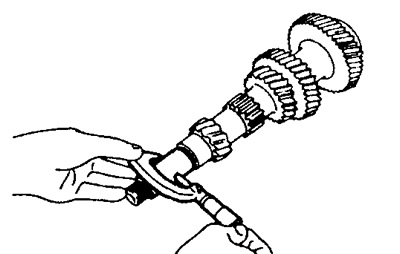
2. Using a micrometer, measure the thickness of the intermediate shaft.
  • Minimum diameter - 27.860 mm


3. Check the oil wedge of each gear.


Using a digital indicator, measure the oil wedge between the gear and the shaft with the roller bearing installed.
  • Nominal clearance - 0.015 - 0.068 mm
  • Maximum gap - 0.16 mm

If the gap is greater than the maximum, replace the gear, inner bearing ring and bearing.


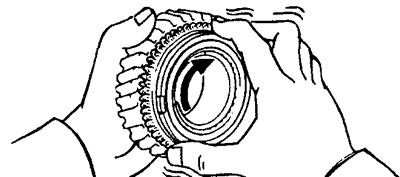
4. Check the synchronizer rings.

a) By turning the synchronizer ring, check its friction properties.


b) Measure the gap between the synchronizer ring and the gear.
  • Nominal clearance - 0.8 -1.6 mm
  • Minimum gap - 0.6 mm


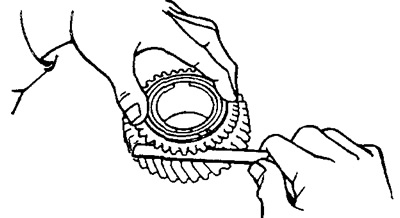
5. Using a feeler gauge, measure the gap between the gear shift forks and the synchronizer sleeves.


  • Maximum gap - 1.0 mm

If the gap exceeds the maximum, replace the fork.
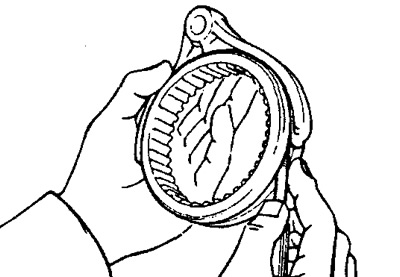


6. If necessary, replace the input shaft bearing.

a) Using round-nose pliers, remove the retaining ring.

b) Using a press, remove the bearing and install a new bearing.

c) Select a retaining ring to ensure minimum axial play and install it on the shaft.
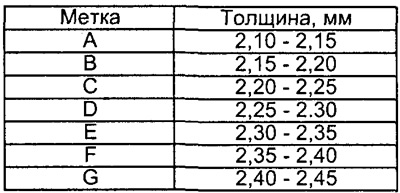


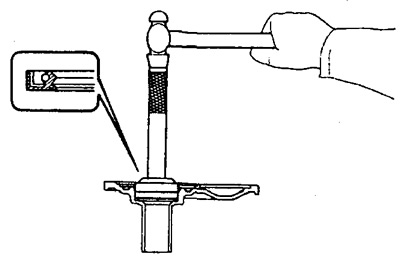
7. If necessary, replace the front bearing housing oil seal.

a) Using a screwdriver, remove the seal.

b) Using a tool head, press in a new oil seal.
  • Seal installation depth: 11.2-12.2 mm


8. If necessary, replace the front intermediate shaft bearing.


a) Using round-nose pliers, remove the retaining ring.

b) Using a vice and a tool head, remove the bearing and replace it.

c) Select a retaining ring to ensure minimum axial play and install it on the shaft.
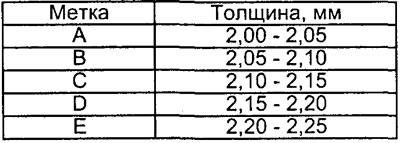


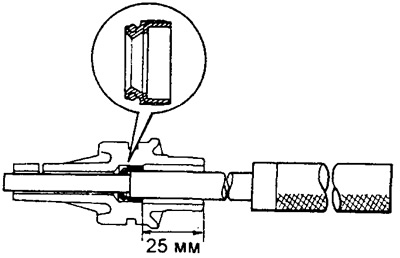
9. If necessary, replace the speedometer drive gear oil seal.

a) Using a special tool, remove the oil seal.
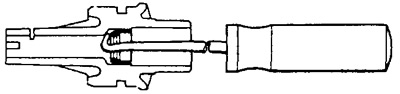


b) Using a tool head, insert a new oil seal.
  • Pressing depth - 25 mm


10. If necessary, replace the gear selector lever seal.


a) Using a screwdriver, remove the seal.

b) Using a 14mm socket and hammer, press in the new seal.

11. If necessary, replace the gear shift lever seal.

a) Using a screwdriver, remove the seal.

b) Using a 21mm socket and hammer, press in the new seal.

12. If necessary, replace the extension housing seal.

The publication is taken from the website www.toyotaman.ru

Using a special tool, remove and install a new oil seal.
This article is available at: russian, bulgarian, belarusian, ukrainian, serbian, croatian, romanian, polish, slovak, hungarian
The article material has been checked: Evdokimov Evgeniy
Share information:
◀ Previous
Dyna Y50/Y60: Manual gearbox
Next ▶

Disassembling the R452 and R453 gearbox
Assembly of the G55 and G56 gearbox
Checking the components of the G55 and G56 gearbox
Disassembling the G55 and G56 gearbox
Removal the gearbox
Assembly of gearbox R452 and R453
Gearbox installation
Adjusting the neutral position of the gear shift lever
Similar articles on other Toyota models

➥ Checking the front suspension components Toyota Camry XV30 (2001-2006)
➥ Checking the starter components Toyota Corona T190 (1992-1997)
➥ Checking the Timing Belt Components Toyota Carina T190 (1992-1996)
➥ Checking the condition of the cooling system components Toyota Cruiser 100 (1998-2007)
➥ Checking the oil level in the gearbox Toyota 4Runner N120 (1989-1995)
➥ Checking the ignition system and its components Toyota RAV 4 XA10 (1994-2000)
Link in different formats to this article
Comments and feedback from visitors
No comments yet


Add two numbers 14 + 43


Duet (1998-2004) 
  • General information
  • User manual
  • Maintenance
  • Power unit
  • Petrol engines 1.0 l
  • Petrol engines 1.3 l
  • Engine overhaul
  • Cooling system
  • Lubrication system
  • Fuel injection system
  • Starting and charging system
  • Transmission
  • Clutch
  • Mechanical gearbox
  • Automatic gearbox
  • Drive shafts and cardan
  • Chassis, running gear
  • Car suspension
  • Steering
  • Brake system
  • Body and interior
  • Body elements
  • Heating and air conditioning
  • SRS security system
  • Electrical equipment
  • Equipment and devices
  • Electrical circuits
Dyna Y50/Y60 (1984-1995) 
  • Petrol engines «Y»
  • Checks and adjustments
  • Overhaul engine
  • Cooling and lubrication system
  • Fuel system
  • Starting and charging system
  • Ignition system
  • Diesel engines «L»
  • Engine repair
  • Cooling and lubrication system
  • Fuel system
  • Starting and charging system
  • Transmission
  • Clutch
  • Manual gearbox
  • Cardan shaft
  • Chassis, running gear
  • Car suspension
  • Brake system
  • Steering
  • Electrical equipment and body
  • Body elements
  • Equipment and devices
  • Electrical diagrams
ToyotaMan.ru © 2018–2026 • Mobile version • Interesting about Toyota • Administration • Sitemap: EN BG BY UA RS HR RO PL SK HU • Search system • Bookmark
Camry Vista-V40 • Camry XV10 • Camry XV20 • Camry XV30 • Corolla Verso-AR10 • Corolla E80 • Corona T190 • Carina T170 • Carina T190 • Land Cruiser J70 (diesel) • Land Cruiser J60 (petrol) • Land Cruiser J100 • Highlander XU20 (petrol) • 4Runner N120 • RAV4 XA10 • RAV4 XA20 • Duet M100 • Dyna Y50 •
We require cookies to enable some interactive features. Is that ok with you?