



Contents: Removal ↓ Installation ↓
Petrol engine with a working volume of 1.3 l, models from 7/84
Caution: Removing the diesel timing belt look here.
Removal
Place the vehicle on a lift and remove the cover on the right wheel housing.
Remove the spark plugs.
Remove the V-belt.
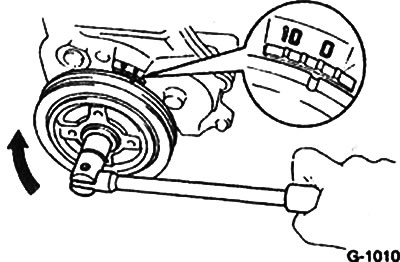
Turn the crankshaft until the marking on the camshaft pulley matches the "0" marking on the timing mechanism cover.
To be able to turn the crankshaft, engage fifth gear and move the car from a place on a level surface. You can also turn the crankshaft in another way. To do this, lift one of the front wheels, engage fifth gear and turn the wheel by hand.
Loosen the cylinder head cover mounting bolts and remove the cover.
Check if the rocker arms of the valves of the first cylinder are pressed. There should be a small gap between the rocker arms and the valves. The rocker arms of the valves of the fourth cylinder should be pressed. If these conditions are not met, return the crankshaft a full revolution.
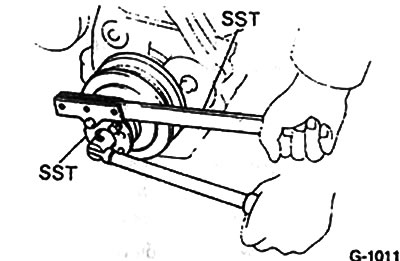
Unscrew the mounting bolt and remove the crankshaft pulley. To prevent the pulley from turning, specialized TOYOTA workshops use special tools SST 09213-14010 and SST09330-00020. If the specified tool is not available, engage first gear and the handbrake, thus blocking the engine.

Remove the crankshaft pulley. For this, use the SST09213-31021 tool. If you do not have this tool, you can use a universal puller, such as the HAZET 787N-16.
Caution: Before removing the pulley, set the gearbox to neutral and check again whether the markings on the crankshaft pulley match the markings on the timing cover. If the markings match, do not change the position of the crankshaft under any circumstances.
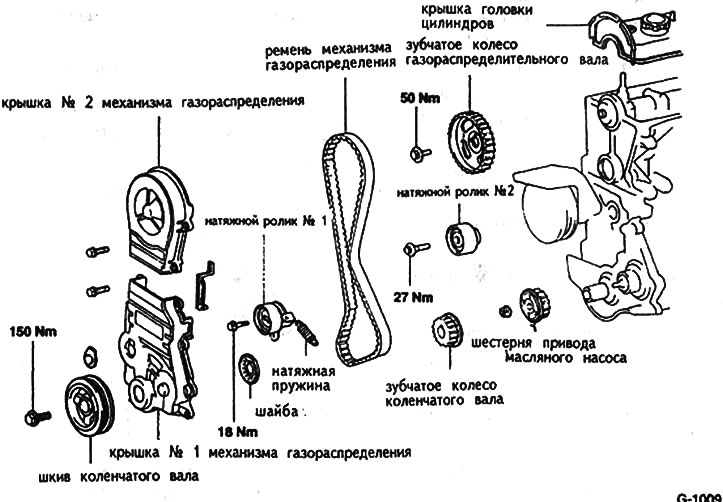
Remove the upper and lower timing belt covers.
Remove the crankshaft gear.
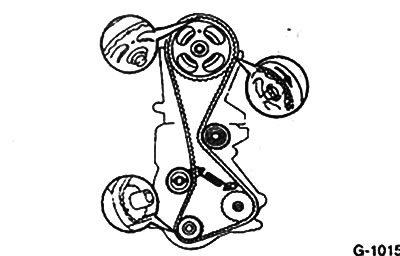
If a previously used timing belt is to be installed, it is necessary to mark the direction of rotation on it with a felt-tip pen, for example. The engine rotates clockwise. It is necessary to mark the gear wheels of the crankshaft and camshaft and the corresponding markings on the timing belt.
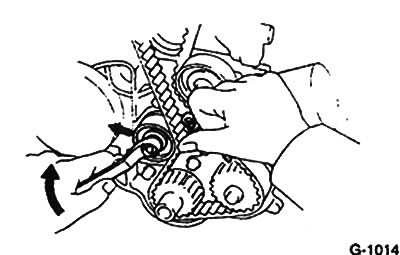
Loosen the tension roller mounting bolt 1 and press the roller until it stops in the direction of the arrow. In this position, tighten the tension roller mounting bolt (Fig. G-1014).
Remove the toothed belt. After this, do not change the position of the toothed wheels.
Installation
Attention: Do not bend or twist the toothed belt. It is better to replace a dirty or damaged belt. Check the ease and uniformity of rotation of the tension rollers.
Caution: If the camshaft is turned with the timing belt removed, the pistons must not be allowed to be at TDC. This can cause serious damage to the pistons and valves. If it becomes necessary to turn the camshaft, it is necessary to first set the pistons to the middle position along the cylinder height. To do this, mark the crankshaft pulley with chalk on top (the piston of the first cylinder must be set to TDC). Then turn the crankshaft pulley to the right or left by 1/2 turn. The marking will point to the right or left.
Put on the toothed belt. If you are installing an old belt, you must observe the direction of its rotation.
Caution: When installing the timing belt, do not change the position of the crankshaft and camshaft. Otherwise, this may cause serious damage to the engine or loss of engine power.
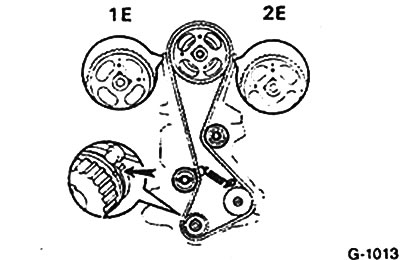
Check whether the camshaft is in the position corresponding to the TDC of the piston of the first cylinder. For this, the marking on the camshaft wheel must be in a vertical position above the wheel mounting bolt.
Note: The camshaft wheel may have several markings. Use the marking that corresponds to the engine type (1E or 2E).
At the same time, the marking on the crankshaft gear must match the marking on the oil pump housing. In this case, the piston of the first cylinder is at TDC.
Loosen the tension roller mounting bolt 1 and press the roller against the toothed belt.
Turn the crankshaft twice in the direction of engine rotation and check that the markings match.
Tighten the tension roller mounting bolt to 18 Nm.
Turn the crankshaft twice in the direction of engine rotation and check the alignment of the markings again.
Check the tension of the toothed belt. Between the two wheels farthest apart, the toothed belt should twist by hand at an angle of 90°. If this twist angle is not achieved, loosen the tension roller mounting bolt and tighten it again.
Install the crankshaft wheel washer in place.
Replace the timing belt cover and secure it with six bolts.
Install the key on the crankshaft. To facilitate installation of the pulley, install the key so that it is recessed slightly more at the front than at the rear.
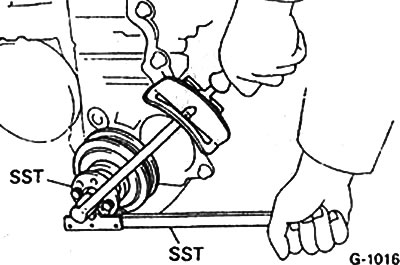
Install the pulley on the crankshaft, using a pipe to fit it if necessary. Clamp the pulley with the SST 09213-14010 tool and tighten the bolt to 150 Nm. If these tools are not available, engage first gear and, with the help of an assistant, press the brake pedal, thus blocking the engine.
Install the cylinder head cover.
Install the V-belt and tighten it.
Install the spark plugs in place.
Secure the cover to the right wheel housing with bolts.