



Contents: Removal ↓ Installation ↓
Oil pan and oil pump installation details
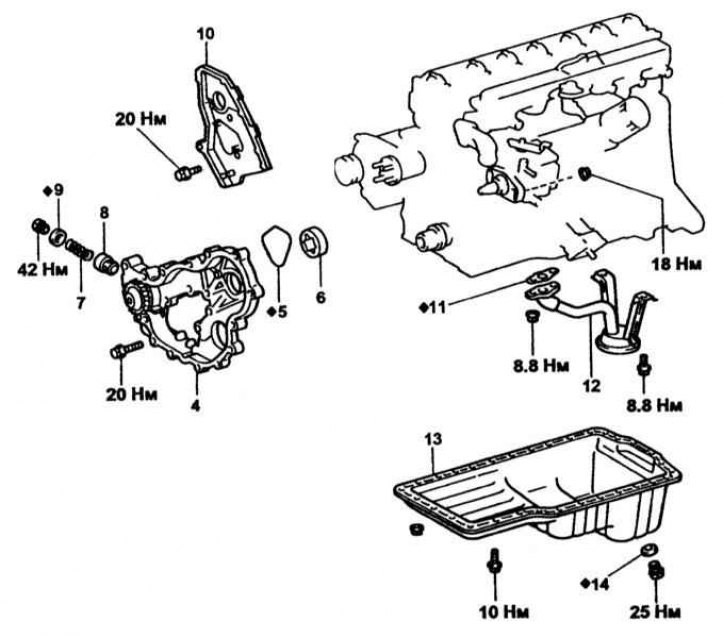
1, 13 - Oil pan; 2, 5, 11 - Gasket; 3, 12 - Oil intake; 4 - Oil pump housing; 6 - Driven gear; 7 - Spring; 8 - Pressure reducing valve; 9 - Washer; 10 - Rear timing belt cover; 14 - Washer
Removal
1. The installation elements of the engine oil pan and oil pump are shown in the illustration above.
2. Remove the timing drive components (see section Removal and installation timing gear wheels).
3. Drain the coolant.
4. Drain the engine oil and remove the oil filter.
5. Loosen the oil pan fasteners, then separate it from the engine block, if necessary, carefully prying it off with a small screwdriver or spatula, trying not to damage the mating surfaces.
6. If necessary, remove the oil pickup with the gasket.
Installation
1. Carefully scrape off all traces of sealant and old gasket material from the mating surfaces of the pan and block. Wipe the mating surfaces thoroughly with a rag soaked in acetone. Clean the threads of the blind bolt holes in the aluminum block casting.
2. Check the condition of the oil intake screen filter, wash the oil intake tube with solvent, replace the sealing gasket, install the oil intake assembly on the engine and tighten the mounting bolts to the required force.
3. If removed, install the oil intake in place with a new gasket, tightening its mounting bolts to the required force.
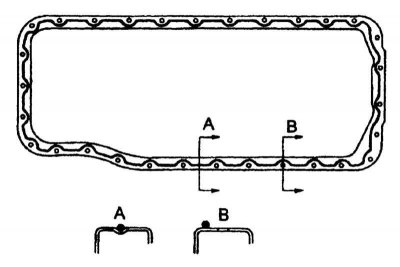
4. Apply a 2-3 mm thick bead of sealant to the specified surfaces (refer to the accompanying illustration).
5. Carefully press the pan against the engine block and screw in the mounting bolts. Moving from the center outward, tighten the fasteners to the required force in three or four steps.
6. Further installation is carried out in the reverse order of dismantling the components. Tighten the fasteners with the required force. Do not forget to replace the filter and top up the oil.
Publication Reprinted from a web portal ToyotaMan.ru
7. Start the engine and check the oil pan for signs of developing leaks. Also check the oil pressure.