
Removing
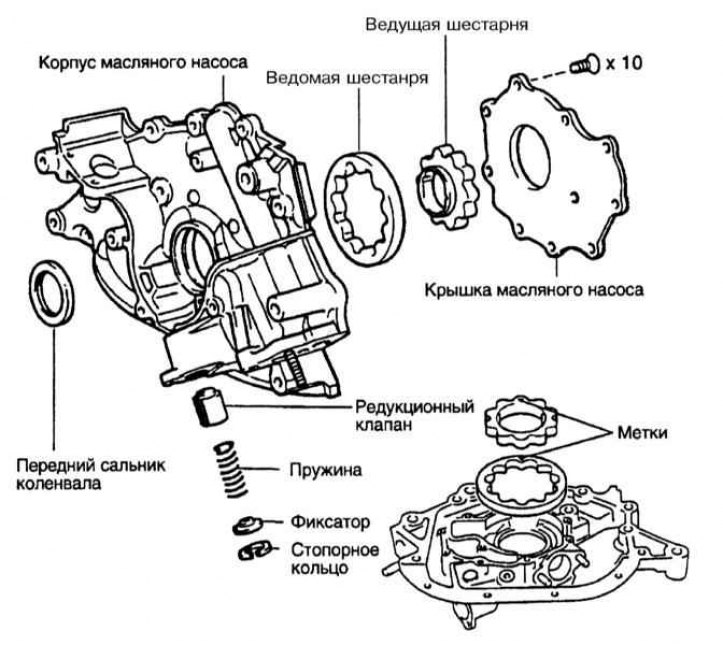
Oil Pump Assembly Components
1. Remove the engine from the vehicle and place it on a suitable stand.
2. Remove the timing belt, its intermediate rollers and the crankshaft pulley (see Section Removing, checking the condition and installing the gas distribution belt and timing gears).
3. Remove the crankshaft position sensor (CKP).
4. Give a bolt of fastening of a directing probe of measurement of level of impellent oil to the left head of cylinders and remove directing.
5. Remove the oil filter, oil cooler and filter bracket from the front of the cylinder block, having previously disconnected the hose from the oil cooler and the wiring connector on the oil pressure switch.
6. Remove the oil pan and, if necessary, the oil pickup (see Section Removal and installation of the pallet crankcase of the engine).
7. Give 8 bolts of fastening of the oil pump and remove it from the block, trying not to damage their interfaced surface. Discard the gasket - you will need a new one to install.
Note. The oil pump is mounted with bolts of different sizes - do not mix them up when installing!
8. Unscrew the plug, remove the sealing ring and disassemble the pressure reducing valve (refer to illustration above).
Attention! The valve assembly spring is compressed tight enough, take care of your eyes and hands!
9. Using a large Phillips screwdriver, remove the eight machine screws and remove the back cover of the pump assembly and remove the pump gears.
10. Scrape off all traces of sealant and old gasket material from the mating surfaces of the pump and engine block, then wipe the surfaces with a rag soaked in acetone.
Examination
1. Wash all components in solvent, then inspect them for signs of excessive wear and mechanical damage.
2. Inspect the friction surfaces of the pressure reducing valve components, evaluate the condition of the valve spring. If necessary, replace the valve assembly.
Installation
1. Lay the drive and driven gears in the pump housing with the markings towards the cover.
2. Fill the cavities inside the assembly with petroleum jelly and install the back cover. Tighten the cover fixing screws firmly diagonally.
3. Lubricate the pressure reducing valve components with clean engine oil and install them in their proper place.

4. Apply a 3 mm pad of RTV sealant to the pump mating surface, do not overdo it: the sealant must not get inside the oil passages and bolt holes (refer to accompanying illustration). Pump installation must be completed within five minutes of applying sealant.
5. Place a new O-ring in the block.
6. Achieve the correct introduction of the drive gear into engagement with the crankshaft trunnion and install the pump in its regular place.
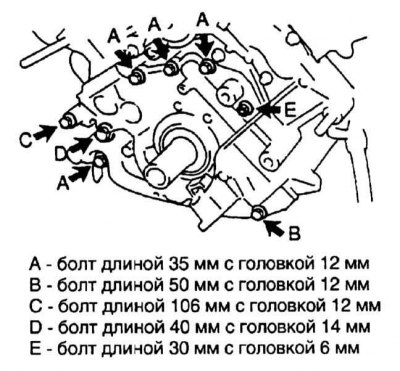
7. Screw the fixing bolts back into place and tighten them diagonally to the required torque (refer to accompanying illustration).
8. Install the remaining components in the reverse order of their dismantling. Tighten fasteners to the required torque.
9. Add the required amount of engine oil, start the engine and check it for signs of leak development.
10. Check the engine oil level again.