
Note. If equipped, lock the front axle differential.
Installation details of the front differential assembly
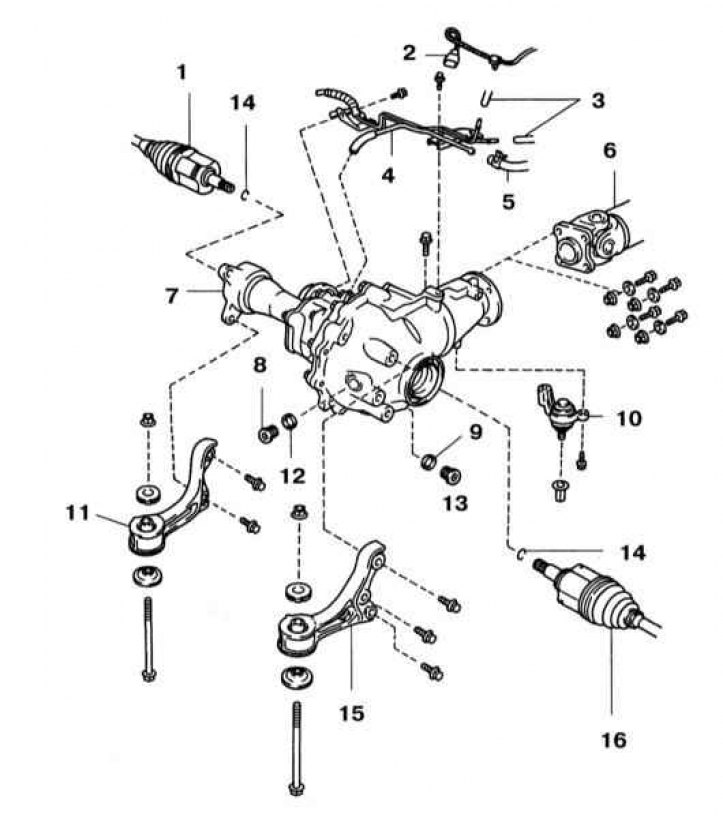
1 - Right drive shaft; 2 - Wiring of the sensor-switch ADD; 3 - Vacuum hose (models with ADD; 4 - Tube; 5 - Breather pipe; 6 - Front propeller shaft; 7 - Assembling the differential; 8 - Filler plug; 9 - Sealing washer; 10 - Cushion of the rear support; 11 - Cushion of the right front support; 12 - Sealing washer; 13 - Drain plug; 14 - Retaining ring; 15 - Cushion of the left front support; 16 - Left drive shaft
1. Loosen the wheel nuts, jack up the vehicle and place it on jack stands. Remove the front wheels.
2. Remove the crankcase protection.
3. Drain the differential oil (see chapter Vehicle settings and routine maintenance).
4. Disconnect the cardan shaft from the front differential assembly (see Section Removal and installation of cardan shaft) and tie its front end to the elements of the car frame. Disconnect the breather pipe, give the vacuum tube mounting bolt and disconnect the tube assembly from the differential (refer to illustration above).
5. Remove drive shafts (see Section Removal and installation of power shafts).
6. Support the differential with a transmission or trolley jack and remove the differential support fasteners.
7. Lower the differential assembly and remove it from under the vehicle, being careful not to scratch the mating surfaces.
8. Installation is carried out in the reverse order.