
1.6.1. Checking the engine oil level
The engine oil level should be checked after approximately 600 km. To do this, remove the oil dipstick and wipe it with a clean cloth. Insert the oil dipstick and pull it out again. With the vehicle mounted horizontally, the oil should be between the two marks shown in Figure 2. When the oil level is below the lower mark "L" oil should be added to the engine. Do not pour oil above the upper mark "F". The oil volume between both marks is about 1.0 liters, which allows you to estimate oil consumption.
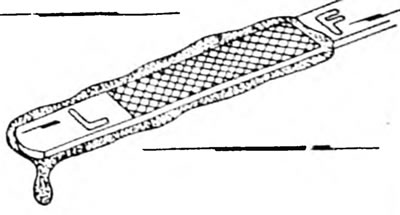
Fig.2. Oil dipstick. The oil should be between marks F and L
1.6.2. Checking the brake fluid level
The brake fluid reservoir is located on the master cylinder on the left side of the engine compartment. The tank is transparent, which allows you to check the fluid level from the outside. Always keep the brake fluid level at the mark "MAX". If necessary, unscrew the cap and add clean brake fluid.
1.6.3. Checking brake lights
The operation of the brake lights can be checked both with and without an assistant. In the first method, press the brake pedal and have an assistant monitor the lightning of the brake light lamps. When checking without an assistant, stand with your back to the garage door and press the brake pedal. If one brake light does not light, replace the lamp; If both brake lights do not illuminate, the brake light switch is faulty.
1.6.4. Lighting control
Turn on all lights one by one (including horn and hazard warning lights) and check their functioning. The best place to check your taillights and reverse lights is in the dark in front of your garage door without leaving your vehicle.
1.6.5. Checking tire pressure
Check tire pressure at a gas station. If you have forgotten the tire pressures, they are indicated for the front and rear wheels on a sticker in the car, or you can find them at the gas station, where they usually have pressure charts for most models. The specified pressure varies for different types of tires. It is also given in the operating instructions.
1.6.6. Checking the coolant level
Cold coolant should be between the marks "Full" And "Low" on the expansion tank. If the engine is hot, wait until the coolant cools and add additional coolant. Then unscrew the radiator cap until the first click and wait for the pressure to release. After this, remove the radiator cap.
1.6.7. Checking the oil level in an automatic transmission
Since the automatic transmission does not shift easily without oil, the oil level must be checked frequently. The check is carried out in the following sequence (oil change is described in Chapter 10.2):
- Place the vehicle on a level surface and apply the parking brake.
- Turn on the engine and switch the lever several times to all positions. Then set the lever to position "R" (parking).
- Check the oil level with the engine running at idle speed.
- Pull out the oil dipstick.
- In a warm automatic transmission, the oil level should be between the marks "Cold" And "Hot". When the box is cold, the level should be below the mark "Cold", no more than 10 mm, but not lower than the slot on the mark "Cold".
- If necessary, add oil through the dipstick hole. This requires a funnel. Do not overfill oil. Dexron fluid is added.
1.6.8. Checking the oil level in a manual transmission
When checking the oil level in the gearbox, the engine must be turned off. The oil filler plug is screwed into the side of the box. After unscrewing the plug (To do this, place the car on stands) insert your index finger into the hole. If your finger reaches the oil, the level is normal. Otherwise, add oil and tighten the plug.
1.6.9. Checking the wedge tension (drive) belts
The location of V-belts on a vehicle depends on the composition of the equipment. Adjusting the tension of the water pump and generator drive belt on a 1.6 liter engine and a diesel engine or adjusting the tension of the generator drive belt on a 2 liter engine (the water pump is driven via a timing belt) described in chapter "Electrical equipment". You should also check the tension adjustment of the power steering pump belt if it is installed on the vehicle.
Checking the belt tension is carried out only on a cold engine. If the engine is hot, wait at least 30 minutes for the engine to cool before checking.
Since a new belt stretches over a short period of time, the tension should be checked after approximately 500 km. If the tension is within tolerance, no adjustment is required.
1.6.10. Adjusting the parking brake
After a certain time, due to wear of the brake pads, the travel of the parking brake lever required for braking increases.
Adjustment is required if the rear wheels do not lock when the lever is tightened to 4-7 teeth for drum brakes and 5-8 teeth for disc brakes of the rear wheels (rear wheels must be raised). The adjustment is described in the chapter "Brake system". For adjustment, there is an adjusting nut next to the parking brake lever (see Pic. 3).
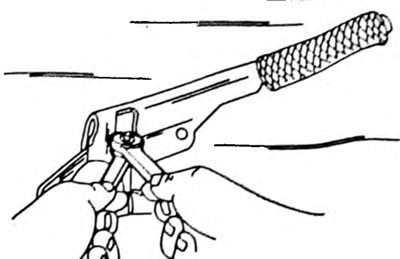
Pic. 3. Parking cables are adjusted at the parking brake lever