Company Honda Company Ford Company Skoda Company Kia Company Mazda Company Mercedes Company Renault
English Русский
Български
Беларускі
Український
Српски
Hrvatski
Română
Polski
Slovenský
Magyar
Bookmark Articles Sitemap Contacts
ToyotaMan.ru


Camry Corolla Corona Carina Land Cruiser Highlander 4Runner RAV4 Others
Cruiser 100 (1998-2007) Cruiser 60/80 (1980-1997, petrol) Cruiser 70 (1985-1996, diesel)

Lubrication of chassis components [Toyota Land Cruiser J100]

  • Main
  • Land Cruiser
  • J100 (1998-2007)
  • General information
  • Maintenance
  • Lubrication of chassis components
0

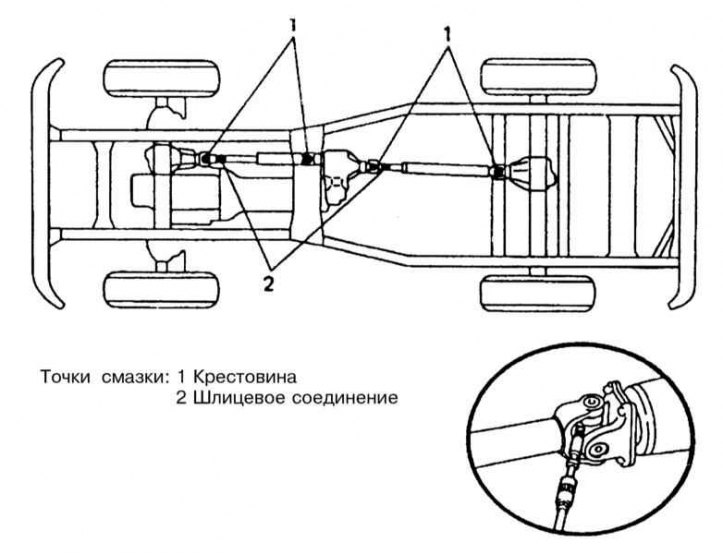
Lubrication points of cardan propeller shafts


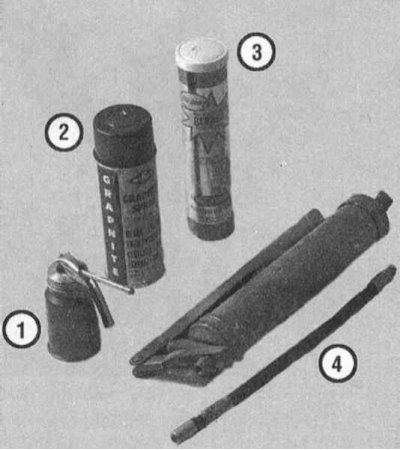
1. Prepare the required supply of grease of the required grade (see Specifications) and a grease gun for packing hollow components (refer to the accompanying illustration):
  • 1 - Liquid motor oil;
  • 2 - Graphite aerosol;
  • 3 - Lubrication;
  • 4 - Grease gun.

Note: Some units may have plugs installed instead of grease nipples, also make sure you have a set of nipples on hand, threaded nipple attachments are available in various shapes, providing adequate access to almost any component.


2. Look under the vehicle to locate the grease fittings for the steering, suspension, and transmission components (refer to the illustration at the beginning of the Section). Typically, nipples are included in the standard equipment of such units as tie rod ends and cardan joints. If plugs are installed instead of nipples, prepared nipple nozzles should be screwed in instead of them (see paragraph 1).


3. Jack up the car and place it on supports, or drive it onto a lift.

Note: If you plan to rotate the wheels at this stage, be sure to loosen the lug nuts before they are lifted off the ground.


4. To clean the gun nozzle from dirt, squeeze out a little grease. Wipe the nozzle with a clean rag.

5. Prepare a supply of rags and start packing the components with grease.

6. Wipe the grease nipple and the surrounding component surface with a clean rag, attach the gun nozzle to the nipple and begin packing. Continue pumping grease until it begins to ooze through the joints of the component's mounting surfaces.

Note: If grease starts to leak from the gun nozzle, clean it and pay special attention to the tightness of the clamp. If necessary, replace the nipple.


7. Use a rag to remove excess grease from the surface of the component and proceed to packing the next unit.
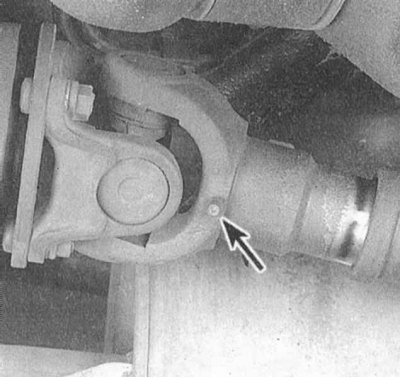


8. Continue packing the universal joint sliding clamp of the cardan shaft until grease begins to ooze through the seal of the assembly (refer to the accompanying illustration).
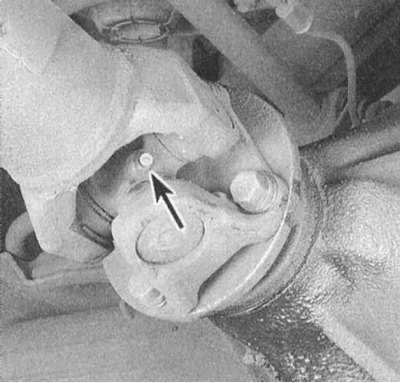


9. When packing conventional type universal joints, grease should begin to ooze through the joints of the assembly components (refer to the accompanying illustration).


10. Without getting out from under the car, wipe the parking brake cables and lubricate their guides and actuator levers with your fingers.
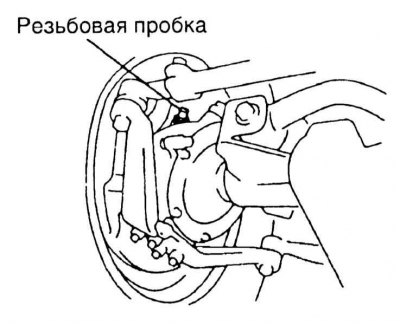


11. If the vehicle is equipped with the appropriate grease, apply lithium-based grease to the contact surfaces of the thrust brackets and adjusting bolts of the steering knuckle assemblies (refer to the accompanying illustration).

12. Open the hood and apply a small amount of chassis grease to the latch mechanism. Have an assistant pull the hood release lever under the instrument panel all the way out and lubricate all exposed surfaces of the drive cable.

13. Lubricate the hinges of all doors and the hood with liquid engine oil.

14. For lubricating the lock cylinders, it is most convenient to use graphite grease supplied in aerosol cans – ask in car accessory stores.

15. Lubricate the door sealing strips with silicone grease to protect them from premature wear.
This article is available at: russian, bulgarian, belarusian, ukrainian, serbian, croatian, romanian, polish, slovak, hungarian
The article material has been checked: Evdokimov Evgeniy
Share information:
◀ Previous
Cruiser 100: Maintenance
Next ▶

Checking the condition of the suspension and steering components
Wheel rotation (rearrangement)
Checking the condition and replacing the windshield wipers
Checking the condition and replacing the hoses located in the engine…
Checking the condition of the cooling system components
Checking the condition of the exhaust system components
Checking the lubrication level in the transfer case
Checking the differential lubrication level
Checking the condition of seat belts
Checking and adjusting idle speed
Similar articles on other Toyota models

➥ Lubrication of chassis, suspensions, steering and body parts Toyota 4Runner N120 (1989-1995)
➥ Location of engine cooling system components Toyota Camry XV20 (1996-2001)
➥ Engine lubrication diagram Toyota Corolla E80 (1983-1990)
➥ Checking the Timing Belt Components Toyota Corona T190 (1992-1997)
➥ Checking the Timing Belt Components Toyota Carina T190 (1992-1996)
➥ Checking the ignition system and its components Toyota RAV 4 XA10 (1994-2000)
Link in different formats to this article
Comments and feedback from visitors
No comments yet


Add two numbers 12 + 15


Cruiser 100 (1998-2007) 
  • General information
  • Introduction to the guide
  • Controls and instruments
  • Maintenance
  • Power unit
  • Petrol engines
  • Diesel engines
  • Cooling and heating
  • Power and exhaust systems
  • Engine electrical equipment
  • Engine management systems
  • Transmission
  • Automatic gearbox
  • Transmission line
  • Chassis, running gear
  • Brake system
  • Car suspension
  • Steering
  • Body and interior
  • Exterior (external elements)
  • Interior (internal elements)
  • Doors, locks and windows
  • Electrical equipment
  • Equipment and devices
  • Electrical circuits
Cruiser 60/80 (1980-1997, petrol) 
  • General information
  • User manual
  • Maintenance
  • Power unit
  • Petrol engines 2F and 3F-E
  • Petrol engines 1FZ-FE
  • Engine overhaul
  • Engine electrical equipment
  • Cooling and heating
  • Fuel system (carburetor)
  • Fuel system (injector)
  • Toxicity reduction system
  • Transmission
  • Car gearbox
  • Clutch
  • Transfer case
  • Drive shafts and axles
  • Chassis, running gear
  • Brake system
  • Car suspension
  • Steering
  • Body and interior
  • Exterior and interior
  • Doors, locks and windows
  • Electrical equipment
  • Equipment and devices
  • Electrical circuits
Cruiser 70 (1985-1996, diesel) 
  • General information
  • User manual
  • Maintenance
  • Power unit
  • Engine adjustment
  • Engine repair
  • Fuel system
  • Control system
  • Turbocharging system
  • Cooling and lubrication system
  • Charge and start system
  • Transmission
  • Clutch
  • Mechanical gearbox
  • Automatic gearbox
  • Transfer case
  • Chassis, running gear
  • Car suspension
  • Brake system
  • Steering
  • Body and interior
  • Body elements
  • Heating and air conditioning
  • Electrical equipment
  • Equipment and devices
  • Electrical circuits
ToyotaMan.ru © 2018–2026 • Mobile version • Interesting about Toyota • Administration • Sitemap: EN BG BY UA RS HR RO PL SK HU • Search system • Bookmark
Camry Vista-V40 • Camry XV10 • Camry XV20 • Camry XV30 • Corolla Verso-AR10 • Corolla E80 • Corona T190 • Carina T170 • Carina T190 • Land Cruiser J70 (diesel) • Land Cruiser J60 (petrol) • Land Cruiser J100 • Highlander XU20 (petrol) • 4Runner N120 • RAV4 XA10 • RAV4 XA20 • Duet M100 • Dyna Y50 •
We require cookies to enable some interactive features. Is that ok with you?