
Company Honda Company Ford Company Skoda Company Kia Company Mazda Company Mercedes Company Renault
English Русский
Български
Беларускі
Український
Српски
Hrvatski
Română
Polski
Slovenský
Magyar
Bookmark Articles Sitemap Contacts
ToyotaMan.ru


Camry Corolla Corona Carina Land Cruiser Highlander 4Runner RAV4 Others
Cruiser 100 (1998-2007) Cruiser 60/80 (1980-1997, petrol) Cruiser 70 (1985-1996, diesel)

Checking and adjusting idle speed [Toyota Land Cruiser J100]

  • Main
  • Land Cruiser
  • J100 (1998-2007)
  • General information
  • Maintenance
  • Checking and adjusting idle speed
0
Contents: Gasoline engine ↓ Diesel engine ↓
Idle speed is the rotation frequency of the crankshaft when the accelerator pedal is released. This parameter is one of the critical ones, determining both the operation of the engine in general and the correct functioning of its various subsystems.

1. Check the air cleaner and all vacuum lines for proper installation and condition. Check for any signs of leaks in the air intake tract.

2. Set the parking brake and support the wheels with wheel chocks. Switch off all on-board electrical consumers and check that the ignition timing is set correctly (see chapter Engine electrical equipment).

3. The engine must be warmed up to normal operating temperature, which ensures automatic shutdown of fast idle.

4. Make sure the transmission is in position "P".

5. Only a remotely connected digital tachometer can provide the required accuracy of measuring the engine speed when checking its idle speed. Connect the device strictly in accordance with the manufacturer's instructions.

Gasoline engine


1. Connect the tachometer. Connect the tachometer tester probe to the "IG" (-) terminal of the diagnostic connector.

Caution: Do not allow the tachometer wire to touch ground, this may cause damage to the coil assembly.


2. Start the engine and increase the crankshaft speed to 1000 rpm; holding it for about 5 seconds. Release the gas pedal.

3. Read the tachometer readings and compare them with the requirements Specifications. If the idle speed does not meet the requirements Specifications, the fault most likely lies in the Electronic Idle Control System (ETCS). Idle speed on engines with fuel injection (EFI) is controlled by the ECM, there is no mechanical adjustment in this system.


Diesel engine


Minimum speed adjustment
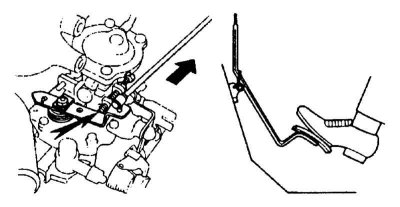


1. Make sure that when the gas pedal is released, the fuel injection pump control lever touches the minimum idle speed adjustment screw (refer to the accompanying illustration). Otherwise, adjust the drive lever.

2. Start the engine, check the idle speed and compare the test results with the requirements Specifications.
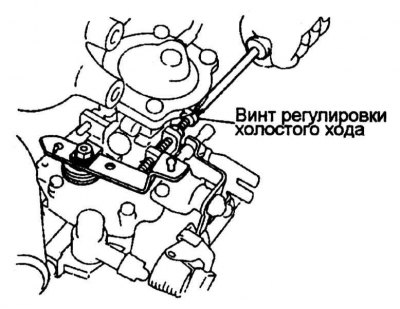


3. To adjust, disconnect the fuel injection pump lever drive and set the minimum idle speed by turning the screw to a position corresponding to the middle of the specified range (refer to the accompanying illustration).

4. Tighten the adjusting screw lock nut and check the idle speed again.

5. Connect the control lever drive and adjust it if necessary.


Adjusting maximum speed
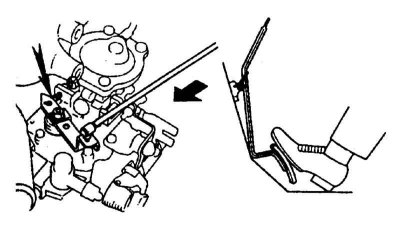


1. Make sure that when the gas pedal is depressed, the fuel injection pump control lever touches the maximum speed adjustment screw (refer to the accompanying illustration). Otherwise, adjust the drive lever.

2. Start the engine, fully depress the gas pedal, measure the maximum crankshaft speed and compare the measurement results with the requirements Specifications.

Note: Do not run the engine at maximum speed for more than 5 seconds. Adjust only when the minimum idle speed is adjusted.
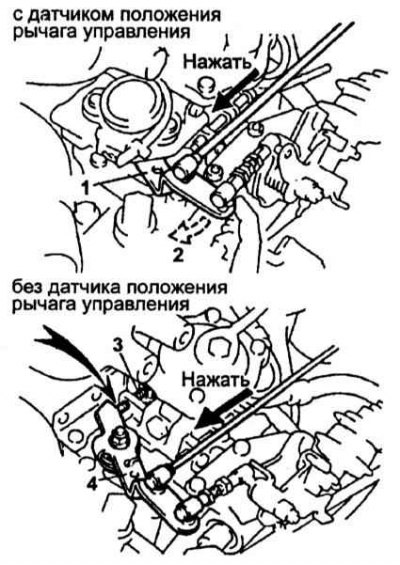


3. To adjust, disconnect the accelerator rod, cut off the seal of the adjusting screw and loosen its lock nut with a special key. Set the maximum idle speed by turning the screw to a position corresponding to the middle of the specified range (refer to the accompanying illustration).


4. Tighten the adjusting screw lock nut, adjust the minimum idle speed, and check the maximum speed again.

5. Connect the accelerator rod and adjust the drive if necessary. Install a new seal on the adjusting screw.
This article is available at: russian, bulgarian, belarusian, ukrainian, serbian, croatian, romanian, polish, slovak, hungarian
The article material has been checked: Evdokimov Evgeniy
Share information:
◀ Previous
Cruiser 100: Maintenance
Next ▶

Checking the condition of seat belts
Checking the differential lubrication level
Checking the lubrication level in the transfer case
Checking the condition of the exhaust system components
Lubrication of chassis components
Checking the condition of the protective covers of the drive shafts
Checking and replacing the Crankcase Controlled ventilation (PCV)valve
Replacing the air cleaner filter element
Checking, adjusting tension and replacing drive belts
Checking the condition of the power supply system components
Similar articles on other Toyota models

➥ Checking and adjusting idle speed and CO concentration Toyota Corolla E80 (1983-1990)
➥ Checking and adjusting the idle speed when turning on the… Toyota Carina T190 (1992-1996)
➥ Checking the generator electrical circuit at idle speed Toyota Camry XV30 (2001-2006)
➥ Adjusting the idle speed when the air conditioner is turned… Toyota Corona T190 (1992-1997)
➥ Checking the idle speed Toyota Duet (1998-2004)
➥ Checking and adjusting valve clearances (96,000 km or 6… Toyota Highlander 1 (2000-2007, petrol)
Link in different formats to this article
Comments and feedback from visitors
No comments yet


Add two numbers 19 + 14


Cruiser 100 (1998-2007) 
  • General information
  • Introduction to the guide
  • Controls and instruments
  • Maintenance
  • Power unit
  • Petrol engines
  • Diesel engines
  • Cooling and heating
  • Power and exhaust systems
  • Engine electrical equipment
  • Engine management systems
  • Transmission
  • Automatic gearbox
  • Transmission line
  • Chassis, running gear
  • Brake system
  • Car suspension
  • Steering
  • Body and interior
  • Exterior (external elements)
  • Interior (internal elements)
  • Doors, locks and windows
  • Electrical equipment
  • Equipment and devices
  • Electrical circuits
Cruiser 60/80 (1980-1997, petrol) 
  • General information
  • User manual
  • Maintenance
  • Power unit
  • Petrol engines 2F and 3F-E
  • Petrol engines 1FZ-FE
  • Engine overhaul
  • Engine electrical equipment
  • Cooling and heating
  • Fuel system (carburetor)
  • Fuel system (injector)
  • Toxicity reduction system
  • Transmission
  • Car gearbox
  • Clutch
  • Transfer case
  • Drive shafts and axles
  • Chassis, running gear
  • Brake system
  • Car suspension
  • Steering
  • Body and interior
  • Exterior and interior
  • Doors, locks and windows
  • Electrical equipment
  • Equipment and devices
  • Electrical circuits
Cruiser 70 (1985-1996, diesel) 
  • General information
  • User manual
  • Maintenance
  • Power unit
  • Engine adjustment
  • Engine repair
  • Fuel system
  • Control system
  • Turbocharging system
  • Cooling and lubrication system
  • Charge and start system
  • Transmission
  • Clutch
  • Mechanical gearbox
  • Automatic gearbox
  • Transfer case
  • Chassis, running gear
  • Car suspension
  • Brake system
  • Steering
  • Body and interior
  • Body elements
  • Heating and air conditioning
  • Electrical equipment
  • Equipment and devices
  • Electrical circuits
ToyotaMan.ru © 2018–2026 • Mobile version • Interesting about Toyota • Administration • Sitemap: EN BG BY UA RS HR RO PL SK HU • Search system • Bookmark
Camry Vista-V40 • Camry XV10 • Camry XV20 • Camry XV30 • Corolla Verso-AR10 • Corolla E80 • Corona T190 • Carina T170 • Carina T190 • Land Cruiser J70 (diesel) • Land Cruiser J60 (petrol) • Land Cruiser J100 • Highlander XU20 (petrol) • 4Runner N120 • RAV4 XA10 • RAV4 XA20 • Duet M100 • Dyna Y50 •
We require cookies to enable some interactive features. Is that ok with you?