Company Honda Company Ford Company Skoda Company Kia Company Mazda Company Mercedes Company Renault
English Русский
Български
Беларускі
Український
Српски
Hrvatski
Română
Polski
Slovenský
Magyar
Bookmark Articles Sitemap Contacts
ToyotaMan.ru


Camry Corolla Corona Carina Land Cruiser Highlander 4Runner RAV4 Others
Cruiser 100 (1998-2007) Cruiser 60/80 (1980-1997, petrol) Cruiser 70 (1985-1996, diesel)

Wheel brake cylinder — removal and disassembly [Toyota Land Cruiser J60]

  • Main
  • Land Cruiser
  • J60 (1980-1997)
  • Chassis, running gear
  • Brake system
  • Wheel brake cylinder — removal and disassembly
0
Contents: Removal ↓ Disassembly ↓

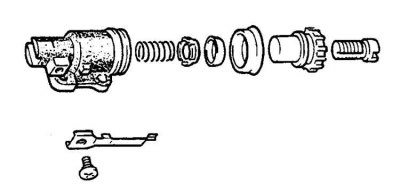
Wheel cylinder parts of horizontal brake shoes


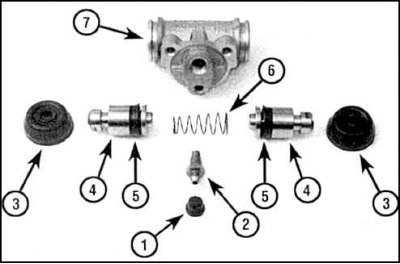
Wheel cylinder parts of vertical brake shoes


1. Cap; 2. Bleeding nipple; 3. Cover; 4. Piston; 5. Cuff; 6. Spring; 7. Cylinder


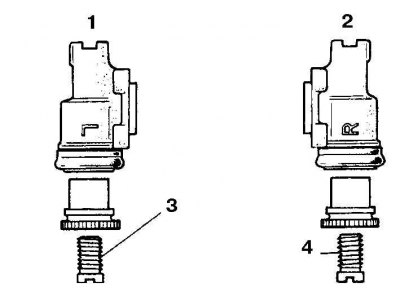
Diagram of cylinder installation on brakes with horizontal pad arrangement


1. Left wheel; 2. Right wheel; 3. Left-hand thread; 4. Right-hand thread


Attention! If a leak is detected, replace the cylinder. Cylinders are replaced only in pairs per axle.


Removal


1. Raise the car.

2. Remove the pads.

3. Clean the wheel cylinder.


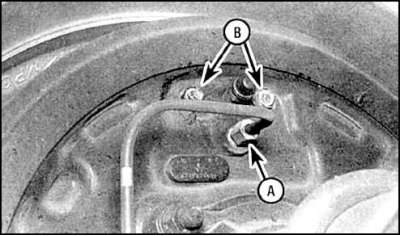
4. Unscrew the hydraulic drive nipple (A) and bolts (B), do not disconnect the tube.

5. Loosen the cylinder mounting bolts.

6. Remove the cylinder and plug the pipes.

Disassembly


1. Unscrew the bleed nipple, remove the dust covers, take out the pistons with cuffs and springs.

[See the source on the internet resource: toyotaman]

2. Wash the parts with alcohol or brake fluid.

3. Dry and blow out the cylinder channels.

4. Check the condition of the cylinder surface. If severe damage (scratches) is found, replace the cylinder.

5. Lubricate the new seals with brake fluid.

6. Install the seals on the pistons so that the edges of the seals face the inside of the cylinder.

7. Assemble the cylinder.

8. Install the cylinder, tighten the bolts by hand. Screw in the nipple and tighten the mounting bolts (see fig. Diagram of cylinder installation on brakes with horizontal pad arrangement).

9. Tighten the nipple and install the pads.

10. Remove air from the hydraulic drive.

11. Check the operation of the brakes.
This article is available at: russian, bulgarian, belarusian, ukrainian, serbian, croatian, romanian, polish, slovak, hungarian
The article material has been checked: Evdokimov Evgeniy
Share information:
◀ Previous
Cruiser 60/80: Brake system
Next ▶

Replacing drum brake shoes
Brake disc — inspection, removal and installation
Brake Caliper — Removal, Disassembly and Installation
Replacing disc brake pads (front or rear)
Diagnostics and repair of ABS system
Brake Master Cylinder — Removal, Disassembly and Installation
Hydraulic Hoses and Tubes — Replacement
Bleeding the brake hydraulic system
Vacuum brake booster — removal, inspection and installation
Rear disc brake handbrake pads
Similar articles on other Toyota models

➥ Wheel brake cylinder — removal and installation Toyota Camry XV20 (1996-2001)
➥ Removal and installation the wheel brake cylinder Toyota Corolla E80 (1983-1990)
➥ Wheel brake cylinder Toyota Carina T170 (1988-1992)
➥ Rear Brake Wheel Cylinder — Removal and Installation Toyota 4Runner N120 (1989-1995)
➥ Replacing the wheel brake cylinder Toyota RAV 4 XA10 (1994-2000)
➥ Installing the master brake cylinder Toyota Corona T190 (1992-1997)
Link in different formats to this article
Comments and feedback from visitors
No comments yet


Add two numbers 16 + 17


Cruiser 100 (1998-2007) 
  • General information
  • Introduction to the guide
  • Controls and instruments
  • Maintenance
  • Power unit
  • Petrol engines
  • Diesel engines
  • Cooling and heating
  • Power and exhaust systems
  • Engine electrical equipment
  • Engine management systems
  • Transmission
  • Automatic gearbox
  • Transmission line
  • Chassis, running gear
  • Brake system
  • Car suspension
  • Steering
  • Body and interior
  • Exterior (external elements)
  • Interior (internal elements)
  • Doors, locks and windows
  • Electrical equipment
  • Equipment and devices
  • Electrical circuits
Cruiser 60/80 (1980-1997, petrol) 
  • General information
  • User manual
  • Maintenance
  • Power unit
  • Petrol engines 2F and 3F-E
  • Petrol engines 1FZ-FE
  • Engine overhaul
  • Engine electrical equipment
  • Cooling and heating
  • Fuel system (carburetor)
  • Fuel system (injector)
  • Toxicity reduction system
  • Transmission
  • Car gearbox
  • Clutch
  • Transfer case
  • Drive shafts and axles
  • Chassis, running gear
  • Brake system
  • Car suspension
  • Steering
  • Body and interior
  • Exterior and interior
  • Doors, locks and windows
  • Electrical equipment
  • Equipment and devices
  • Electrical circuits
Cruiser 70 (1985-1996, diesel) 
  • General information
  • User manual
  • Maintenance
  • Power unit
  • Engine adjustment
  • Engine repair
  • Fuel system
  • Control system
  • Turbocharging system
  • Cooling and lubrication system
  • Charge and start system
  • Transmission
  • Clutch
  • Mechanical gearbox
  • Automatic gearbox
  • Transfer case
  • Chassis, running gear
  • Car suspension
  • Brake system
  • Steering
  • Body and interior
  • Body elements
  • Heating and air conditioning
  • Electrical equipment
  • Equipment and devices
  • Electrical circuits
ToyotaMan.ru © 2018–2026 • Mobile version • Interesting about Toyota • Administration • Sitemap: EN BG BY UA RS HR RO PL SK HU • Search system • Bookmark
Camry Vista-V40 • Camry XV10 • Camry XV20 • Camry XV30 • Corolla Verso-AR10 • Corolla E80 • Corona T190 • Carina T170 • Carina T190 • Land Cruiser J70 (diesel) • Land Cruiser J60 (petrol) • Land Cruiser J100 • Highlander XU20 (petrol) • 4Runner N120 • RAV4 XA10 • RAV4 XA20 • Duet M100 • Dyna Y50 •
We require cookies to enable some interactive features. Is that ok with you?