
Note:
- Do not operate the vehicle before the system is charged, otherwise the A/C compressor will be damaged (due to lack of lubrication).
- see picture "Charging system".
- After charging, let the engine run for 2 minutes at 2000 rpm.
- After charging, make sure there are no leaks from the system.
Install the charging bottle.
Note: When working with a charging cylinder, always follow the requirements described in the instructions for it.
A) Charge the charging cylinder with the required amount of refrigerant.
- Refrigerant quantity - 400±30 g
b) Connect the center hose to the charging bottle.
Attention: do not open the valves on the pressure gauge block!
V) Open the valve on the charging cylinder.
G) Press on the valve core located on the side of the gauge block and bleed air from the center hose.
System leak test
1. Open the high pressure valve on the gauge block and charge the system with refrigerant.
2. When the pressure on the low pressure side reaches 100 kPa, close the high pressure valve.
3. Check the system for leaks with a leak detector.
If leaks are found after repair, repeat the evacuation procedure.
Refilling the refrigerant
Top up the system with coolant. After checking for leaks, top up the amount of refrigerant.
Attention:
- Never charge the system through the high pressure side while the engine is running.
- Do not open the low pressure valve when the system is being charged with liquid refrigerant.
1. Fully open the pressure gauge block high pressure valve.
2. Fully charge the system, then close the high pressure valve.
Note: The sign of a fully charged system is the absence of bubbles in the service window.
Removing the gauge block
1. Close both gauge block valves.
2. Disconnect the quick-release adapter from the refrigeration line service valves as shown.
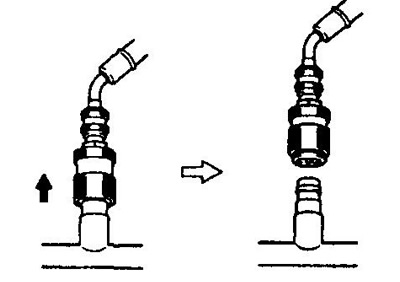
3. Install plugs on the service valves of the cooling system.
Checking the system with a block of pressure gauges
1. Connect the gauge block.
2. Take readings from pressure gauges under the following conditions.
A) The air temperature in the air intake is 30 - 35°C.
b) The engine is running at 1500 rpm.
V) Fan speed control switch in position "HI" (high speed).
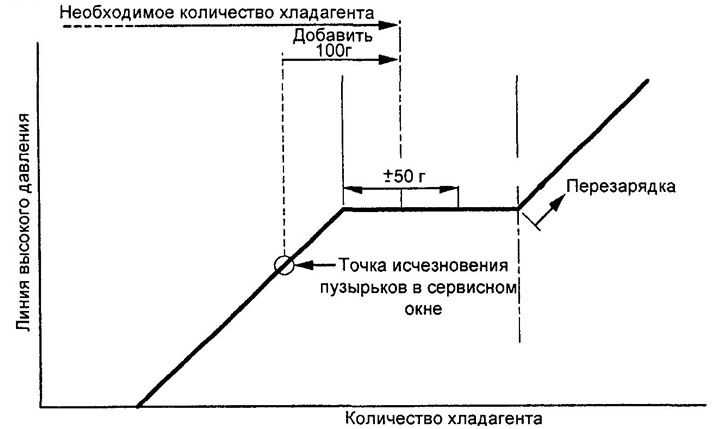
System charging.
G) Temperature control in the maximum cooling position "COOL".
Note: Meter readings may vary slightly depending on ambient temperature.
Presence of water in the system
Pressure in the low pressure line changes from normal to vacuum (cooling works only intermittently, then stops working).
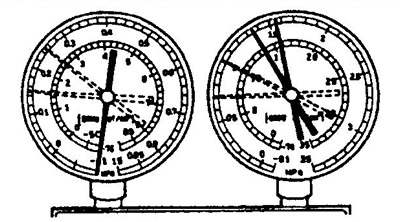
Cause: Water freezing in the expansion valve temporarily stops the cycle (blocks the circulation of the refrigerant). After defrosting, the system returns to normal.
Remedy:
- A) Replace receiver.
- b) Vacuum the water removal system.
- V) Charge the system with coolant.
Lack of refrigerant
Reduced pressure in the entire system. Insufficient cooling. Constant bubbles in the service window.
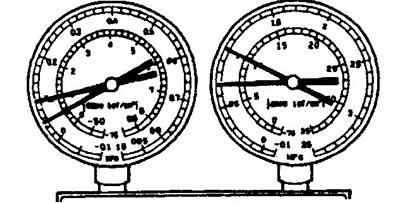
Cause: Lack of refrigerant.
Remedy:
- A) Check the system for leaks.
- b) Top up the refrigerant (disappearance of bubbles in the window).
Poor refrigerant circulation
Reduced pressure in the entire system. Frost on the pipeline from the receiver to the cooling unit. Insufficient cooling.
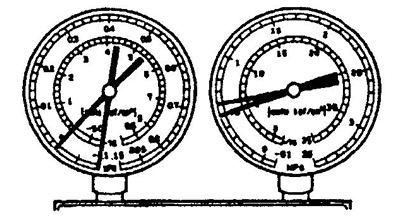
Cause: The circulation of the refrigerant is difficult due to clogging of the receiver.
Remedy: Replace the receiver.
No cooling or refrigerant not circulating
Vacuum in the low pressure line, reduced pressure in the high pressure line (no cooling or cooling only intermittent; frost or condensate near the receiver or expansion valve).
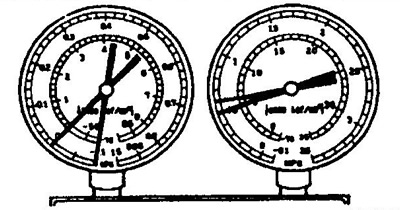
Cause: Refrigerant does not circulate due to moisture or contamination in the system, or refrigerant leakage from the expansion valve.
Remedy:
- A) Check temperature sensitive tube and expansion valve.
- b) If the cause is contamination, then remove and clean the expansion valve with a jet of air. Replace valve if dirt cannot be removed.
- V) Replace receiver.
- G) Vacuum and prime the system. If there is gas leakage from the heat sensitive tube, replace the expansion valve.
Too much refrigerant or insufficient condenser cooling
High pressure throughout the system. Insufficient cooling. No bubbles in the service window, even when the engine is running at low speeds.
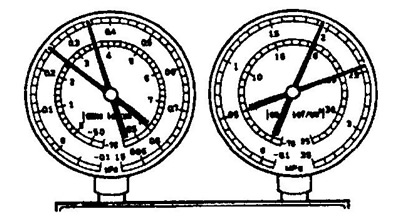
Causes: Insufficient refrigerant circulation. Insufficient cooling of the condenser.
Remedy:
- A) Clean the condenser plates.
- b) Check fan operation.
- V) If items "A" And "b" completed, check the amount of refrigerant.
Presence of air in the cooling system
High pressure throughout the system. Insufficient cooling. The low pressure line is hot. Bubbles in the service window.
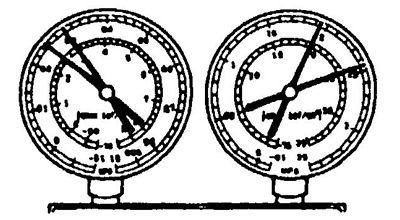
Cause: Air in the system (it is possible that the system was not evacuated before charging).
Remedy:
- A) Check the absence of contamination and the amount of compressor oil.
- b) Vacuum and prime the system.
Incorrect installation of expansion valve and temperature sensitive tube
High pressure in the entire system, insufficient cooling, frost or abundant condensate on the low pressure pipe.
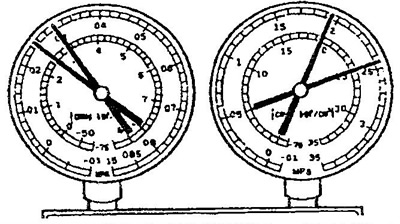
Cause:
- A) Heat sensitive tube out of adjustment.
- b) Expansion valve incorrectly installed.
Remedy:
Check the heat sensitive tube; if it is working, then check the expansion valve. Replace defective parts.
Compressor failure
In the low pressure line - increased pressure, in the high pressure line - reduced pressure. No cooling.
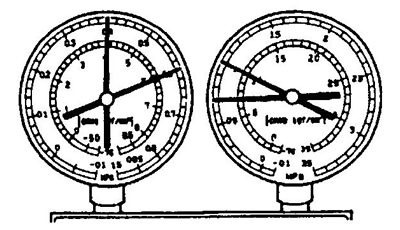
Reason: Faulty compressor (valve leaks or worn parts).
Remedy: Repair or replace the compressor.
Checking the amount of refrigerant
1. Test mode:
A) Open all doors.
b) Set the temperature control to the maximum cooling mode - "COOL".
V) Set the air intake damper to position "FRESH".
G) Maintain idle speed at 1000 rpm.
d) Turn on the air conditioner.
2. Check the amount of refrigerant by the presence of bubbles in the service window of the receiver.
A) If bubbles are visible in the service window (lack of refrigerant), then check for leaks in the system and top up the system to the correct level.
b) If bubbles are not visible (either the amount of refrigerant is normal, or the system is recharged, or there is no refrigerant), then the method of elimination - see paragraphs. "V" And "G".
V) If there is no temperature difference between the compressor inlet and outlet (either there is no refrigerant or the amount of refrigerant is minimal), check for refrigerant leaks, then recharge the system to normal.
G) If there is a large temperature difference between the inlet and outlet of the compressor (either the amount of refrigerant is normal, or the system is recharged), then the method of elimination - see paragraphs. "d" And "e".
d) If the refrigerant in the service window becomes transparent immediately after turning off the air conditioner (system recharge), then remove all refrigerant, evacuate and charge the system to normal.
e) If the refrigerant foams and then becomes clear after the air conditioner is turned off, the refrigerant amount is normal.
- Refrigerant quantity - 400±30 g