



Contents: Removal the master cylinder ↓ Disassembling the master cylinder ↓ Checking the Master Cylinder…↓ Assembling the master cylinder ↓ Installing the master cylinder ↓
Removal the master cylinder
Warning: Do not allow brake fluid to come into contact with painted surfaces. Wash it off immediately.
1. Remove the brake fluid with a syringe.
2. Remove the first air duct.
3. Remove the steering column assembly.
4. Disconnect the two brake pipes from the master cylinder.
5. Unscrew the nuts securing the caliper and the master brake cylinder, remove them together.
6. Using pliers, disconnect the two reservoir hoses from the master cylinder.
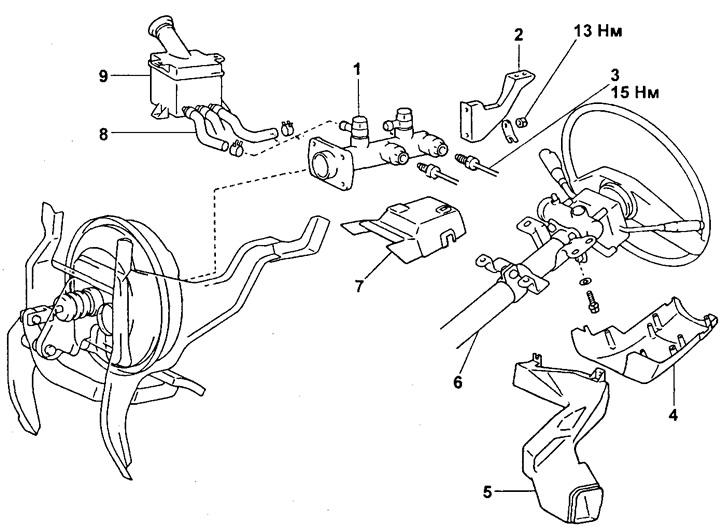
Removing the master cylinder.
1 - Master brake cylinder,
2 - Support,
3 - Brake pipe,
4 - Lower steering column cover,
5 - First air duct,
6 - Steering column assembly,
7 - Upper steering column cover,
8 - Tank hose,
9 - Tank.
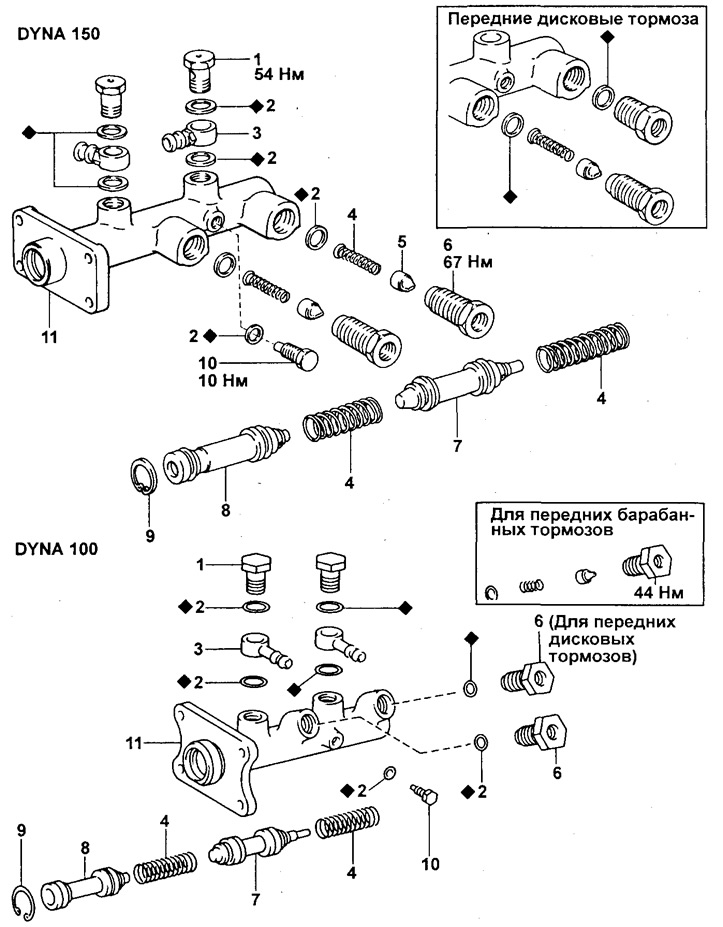
Master brake cylinder.
1 - Bypass bolt,
2 - Gasket,
3 - Fitting,
4 - Spring,
5 - Check valve,
6 - External plug,
7 - Piston No.2,
8 - Piston No.1,
9 - Retaining ring,
10 - Lock bolt,
11 - Cylinder.
Disassembling the master cylinder
1. Clamp the cylinder in a vice.
2. Unscrew the bypass bolt, remove the fitting and gaskets.
3. Unscrew the outer plug, remove the check valve, spring and gasket.
4. Using a screwdriver, push the pistons all the way in, then remove the piston lock bolt and gasket.
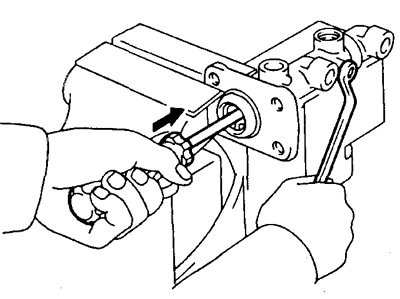
5. Remove the two pistons with springs.
a) Press on the piston with a screwdriver and remove the retaining ring using round-nose pliers.
b) Use your hand to remove the first piston with the spring, pulling them out without tilting them.
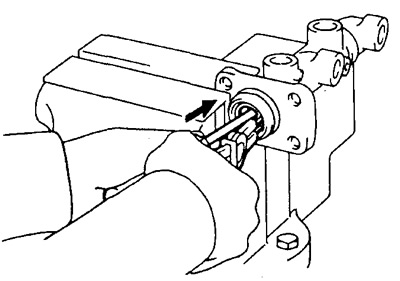
Warning: Pulling at an angle may damage the cylinder.
c) Place a rag and two wooden blocks on the workbench, lightly tap the cylinder flange on the blocks, then remove the piston by hand.
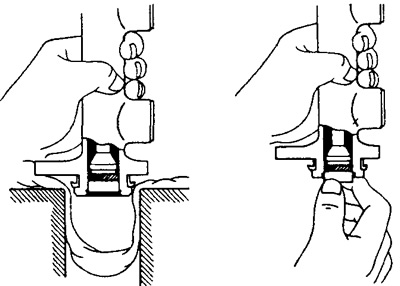
Checking the Master Cylinder Components
Note: Clean disassembled parts by blowing them with compressed air.
1. Check the cylinder bore for rust or scoring.
2. Check the cylinder for wear or damage.
If necessary, clean or replace the cylinder.
Assembling the master cylinder
1. Apply lithium based grease as shown in the figure.
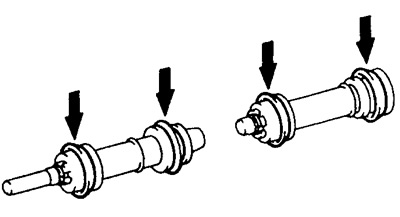
2. Insert two pistons with springs.
Warning: Be careful not to damage the rubber lips of the pistons.
a) Insert two pistons with springs into the master cylinder body.
Warning: If inserted at an angle, damage to the cylinder bore may occur.
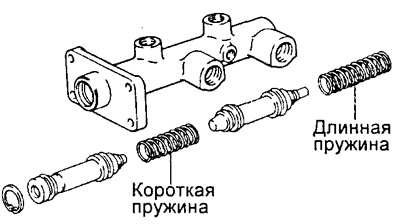
b) Using a screwdriver, push the pistons in and install the spring retaining ring.
3. After pushing the pistons all the way in with a screwdriver, screw in the piston lock bolt, having first put a new sealing gasket on the bolt.
- Tightening torque - 10 Nm
4. Installing the check valve and external plug.
a) Insert the check valve and spring into the outer plug.
Note: If the vehicle has front disc brakes, the valve and spring are located in the outer plug.
b) Install the outer plug together with the new gasket onto the cylinder and tighten it.
Tightening torque:
- DYNA 150 — 67 Nm
DYNA 100:
- Front disc brakes - 44 Nm
- Front drum brakes - 67 Nm
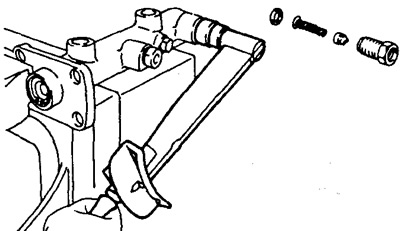
5. Install the fitting, new gaskets and tighten the bypass bolt.
- Tightening torque: 54 Nm
Note: Install the fitting in the direction shown in the figure.
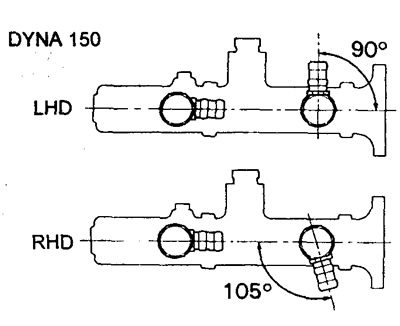
Scheme of installation of fittings.
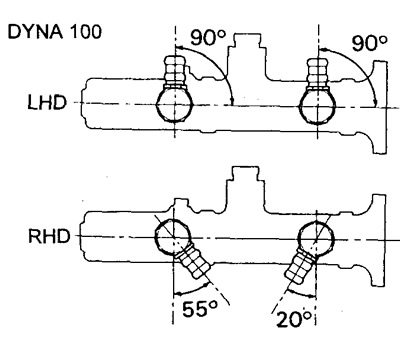
Scheme of installation of fittings.
Installing the master cylinder
1. Adjust the brake booster rod length before installing the master cylinder.
2. Install the master cylinder and caliper.
a) Using pliers, connect the two hoses from the reservoir to the master cylinder.
b) Install the cylinder and caliper, tighten them with four nuts.
- Tightening torque: 13 Nm
c) Tighten the bolt securing the upper part of the caliper.
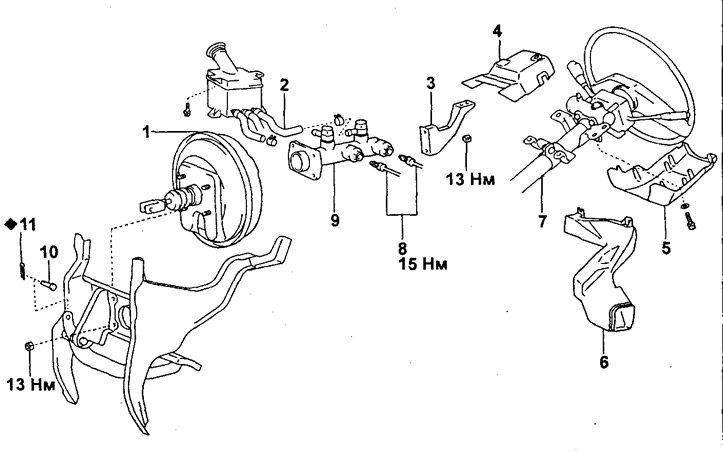
Vacuum brake booster.
1 - Brake booster,
2 - Hose from the tank,
3 - Support,
4 - Upper steering column cover,
5 - Lower steering column cover,
6 - First air duct,
7 - Steering column assembly,
8 - Brake pipe,
9 - Master cylinder,
10 - Pin,
11 - Cotter pin.
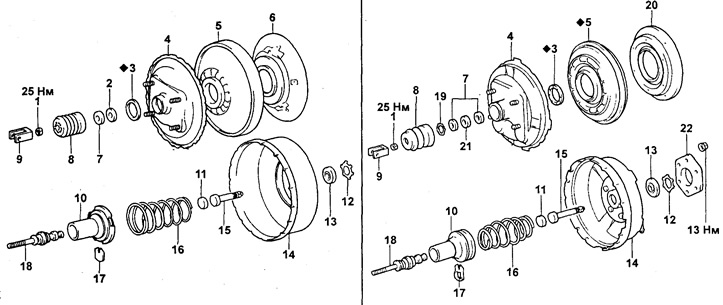
Single-chamber vacuum booster AISIN / Single-chamber vacuum booster JKC
1 - Lock nut,
2 - Separator,
3 - Housing seal,
4 - Back of the body,
5 - Diaphragm,
6 - Booster piston,
7 - Air filter,
8 - Cover,
9 - Earring,
10 - Valve body,
11 - Jet disk,
12, 19 - Ring with protrusions,
13 - Housing seals,
14 - Front part of the body,
15 - Stock,
16 - Diaphragm spring,
17 - Lock pin,
18 - Drive rod,
20 - Diaphragm plate,
21 - Felt bushing,
22 - Spacer.
3. Connect the two brake pipes.
- Tightening torque: 15 Nm
4. Install the steering column assembly.
5. Install the first air duct.
6. Fill the reservoir with brake fluid and bleed the brake system.
7. Check for brake fluid leaks.
8. Check and adjust the brake pedal.