
Company Honda Company Ford Company Skoda Company Kia Company Mazda Company Mercedes Company Renault
English Русский
Български
Беларускі
Український
Српски
Hrvatski
Română
Polski
Slovenský
Magyar
Bookmark Articles Sitemap Contacts
ToyotaMan.ru


Camry Corolla Corona Carina Land Cruiser Highlander 4Runner RAV4 Others
Corolla E80 (1983-1990) Corolla Verso 3 (2004-2009)

Checking and disposing of the shock absorber [Toyota Corolla E80]

  • Main
  • Corolla
  • E80 (1983-1990)
  • Chassis, running gear
  • Front suspension
  • Checking and disposing of the shock absorber
0
Contents: Manual check ↓ Disposal of the front shock absorber ↓ Recycling the rear shock absorber ↓
Signs of a damaged shock absorber are:
  • Long, undamped vibrations of the body when driving on an uneven road.
  • The body sways when driving over uneven surfaces.
  • The car rears up when accelerating.
  • Wheel bouncing on normal road surfaces.
  • Sharp forward displacement of the body when braking (there may be other reasons).
  • Unstable cornering due to poor road grip. Vehicle swaying.
  • Grinding noise while driving. The shock absorber can be checked by hand. If checking the shock absorber is possible, then using special equipment.

Manual check


Remove the shock absorber.

While holding the shock absorber in the working position, compress and release.

Throughout its entire stroke, the shock absorber should move evenly, heavily and without jerking.

Push the shock absorber rod all the way in and then release it. The rod should extend at a uniform speed.

Traces of oil on the shock absorber rod are not a sign of damage to the shock absorber and do not indicate the need to replace it.

If there are significant oil leaks, the shock absorber should be replaced.

Caution: Before disposing of the shock absorber, it is necessary to release the gas from it.


Install the shock absorber in place.

Disposal of the front shock absorber
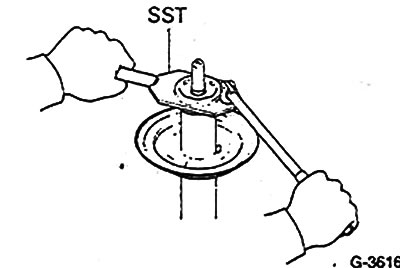


Loosen the round nut on the shock absorber 2-3 turns, releasing the gas pressure completely.


Recycling the rear shock absorber


The original can be read on the website ToyotaMAN
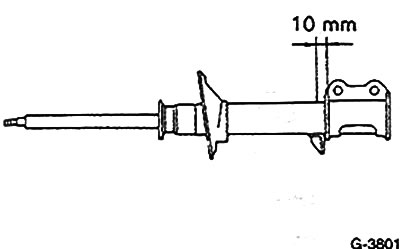


Drill a hole with a diameter of 2-3 mm in the place indicated in Fig. G-3801, releasing the gas pressure.

Note: The gas contained in the shock absorber is colourless, odourless and non-toxic.
This article is available at: russian, bulgarian, belarusian, ukrainian, serbian, croatian, romanian, polish, slovak, hungarian
The article material has been checked: Mitrofanova Elena
Share information:
◀ Previous
Corolla E80: Front suspension
Next ▶

Disassembling the shock absorber. Removing and installing the shock…
Removal and installation the shock absorber strut
Description and structure of the front suspension
Removal and installation the anti-roll bar
Removal and installation the transverse suspension arm. Replacing the…
Checking, removing and installing the ball joint
Removal and installation front wheel drive shafts
Checking and disassembling the front drive shafts. Replacing the…
Similar articles on other Toyota models

➥ Checking and installing the front suspension shock absorber Toyota Camry XV30 (2001-2006)
➥ Assembling the shock absorber strut Toyota Carina T170 (1988-1992)
➥ Checking the tank with the absorber Toyota 4Runner N120 (1989-1995)
➥ Rear shock absorber — removal and installation Toyota RAV 4 XA10 (1994-2000)
➥ Front shock absorber Toyota Duet (1998-2004)
➥ Checking tire pressure and condition Toyota Corona T190 (1992-1997)
Link in different formats to this article
Comments and feedback from visitors
No comments yet


Add two numbers 47 + 33


Corolla E80 (1983-1990) 
  • General information
  • User manual
  • Start of movement
  • Faults en route
  • Maintenance
  • Power unit
  • Engine repair
  • Lubrication system
  • Cooling system
  • Ignition system
  • Supply system
  • Fuel supply (carburetor)
  • Fuel supply (injector)
  • Diesel engine
  • Exhaust system
  • Transmission
  • Clutch
  • Manual gearbox
  • Automatic gearbox
  • Chassis, running gear
  • Front suspension
  • Rear suspension
  • Steering
  • Brake system
  • Wheels and tires
  • Body and interior
  • Exterior (external elements)
  • Interior (internal elements)
  • Interior heating
  • Electrical equipment
  • Equipment and devices
  • Power devices
  • Lighting system
  • Glass cleaners and washers
Corolla Verso 3 (2004-2009) 
  • General information
  • User manual
  • Power unit
  • Petrol engines 1ZZ, 3ZZ
  • Diesel engines 1СD-FTV
  • Cooling system
  • Lubrication system
  • Fuel system
  • Control system
  • Exhaust system
  • Transmission
  • Clutch and drive shafts
  • Mechanical gearbox
  • Chassis, running gear
  • Car suspension
  • Steering
  • Brake system
  • Body and interior
  • Exterior (external elements)
  • Electrical equipment
  • Power devices
  • Electrical circuits
ToyotaMan.ru © 2018–2026 • Mobile version • Interesting about Toyota • Administration • Sitemap: EN BG BY UA RS HR RO PL SK HU • Search system • Bookmark
Camry Vista-V40 • Camry XV10 • Camry XV20 • Camry XV30 • Corolla Verso-AR10 • Corolla E80 • Corona T190 • Carina T170 • Carina T190 • Land Cruiser J70 (diesel) • Land Cruiser J60 (petrol) • Land Cruiser J100 • Highlander XU20 (petrol) • 4Runner N120 • RAV4 XA10 • RAV4 XA20 • Duet M100 • Dyna Y50 •
We require cookies to enable some interactive features. Is that ok with you?