
Note. When removing the inner lining of the upholstery, stock up on various clips - when removed, they often break.
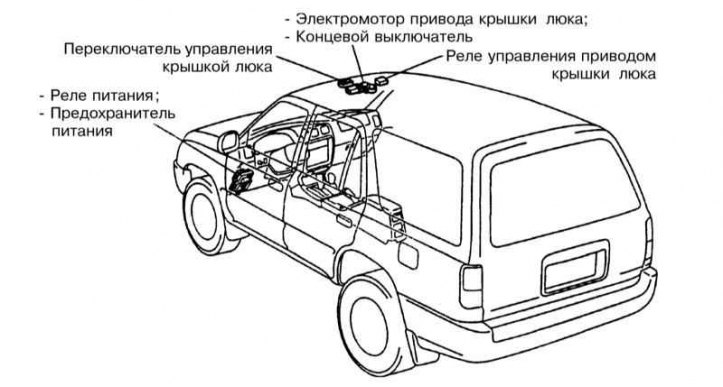
Location of sunroof controls
1. Remove the following components:
- tailgate sill trim;
- Backseat;
- Left and right side upholstery;
- Side pad of the rear seat;
- rear door sill trim;
- Front lower side trim;
- Facing the opening of the front and rear doors;
- Lower trim of the central pillar;
- Shoulder brace (anchor) front seat belt;
- Upper lining of the central pillar;
- Seat belt height adjuster;
- Both external fixators (anchors) rear seat belts;
- Trim of the third rack;
- Rear pillar trim;
- Top handles;
- Front pillar trim and visors with brackets;
- Interior rear view mirror;
- Front and rear interior lighting;
- Facing of an aperture of a door of a back;
- Upper hatch molding;
2. Remove the control switch by removing the cover. Detach the cover from the housing, unscrew the switch mount. Disconnect the connector and remove the switch with bracket (refer to illustration above).
3. Remove the ceiling panel mounting clips.
4. Remove the top hatch cover drive control relay and disconnect the connector from it.
5. Turn away bolts of fastening of a drive with an arm. Remove the drive and disconnect the connector.
6. Remove hatch covers. Prying from the inside, unhook the clips of the pads.
7. Remove glass of the hatch. Loosen nuts and remove washers. There should be six balls in total. The glass is lifted up.
8. Remove the drive tunnel.
9. Remove wind deflector.
10. Disconnect the drain hose and remove the manhole cover housing.
11. Adjust the sunroof drive chute. Use a screwdriver to move the rod forward or backward to align the two marks.
12. Adjust and install the drive assembly as follows:
- a. Loosen the screw and remove the cam plate cover;
- b. Remove the large screw, remove the washers;
- c. Turn the drive shaft with a screwdriver so that the dot marks on the housing and gear are aligned;
- d. Install the cam plate cover by fixing it with the screw;
- e. Install the drive unit and secure with four bolts;
- f. Connect the connector.
13. Install the drive control relay with the bracket, connect the connector.
14. Install the remaining parts in the reverse order of removal.