
Warning! Some of the vehicles discussed in this manual are equipped with an additional security system (SRS), better known as an airbag. Before doing any work near the cushion or steering column assembly, be sure to turn off the system to avoid injury from accidental operation (see Onboard electrical equipment). The insulation and connectors of the SRS wiring harness are bright yellow. Do not connect any diagnostic devices to this circuit!
Note. Below is a description of the procedure for removing the heat exchanger assembly itself, it should be noted that the procedure for dismantling the casing of the assembly is simplified if the air conditioning evaporator is removed first, although this is due to the need to evacuate the system.
Attention! The air conditioning system is constantly under high pressure. Never disconnect refrigeration lines or remove any system components without first discharging the system. The discharge of the air conditioning system must be carried out by an experienced specialist in a car service workshop. Always wear safety goggles when disconnecting refrigerant lines!
Note. Car manufacturers recommend that in order to provide access to the heater heat exchanger, complete dismantling of the instrument panel and lowering the steering column. These works are associated with disconnection of many electrical contacts and are associated with the risk of damage to fasteners made of plastic, in view of which it would be reasonable to entrust their implementation to car service specialists.
Attention! Do not allow antifreeze to come into contact with exposed areas of the body and painted surfaces of the car. Accidental splashes should be washed off immediately with plenty of water. Remember that antifreeze is a highly toxic liquid and getting it into the body, even in small quantities, is fraught with the most serious consequences (up to death). Never leave antifreeze stored in a loosely sealed container and clean up spilled coolant on the floor without delay. Remember that the sweet smell of antifreeze can attract the attention of children and animals. Consult any car service station about ways to dispose of used coolant. In many regions of the world, special points have been set up to receive various types of detention. Never drain old coolant down the drain and onto the ground! Recently, non-toxic grades of antifreeze have been developed, but they must also be disposed of in an organized manner.
Attention! Wait until the engine has completely cooled down before proceeding with the procedure.
1. Disconnect the negative cable from the battery.
Attention! If the stereo system installed in the car is equipped with a security code, before disconnecting the battery, make sure that you have the correct combination to activate the audio system!
2. After waiting for the final cooling of the engine, empty the cooling system (see chapter Vehicle settings and routine maintenance).
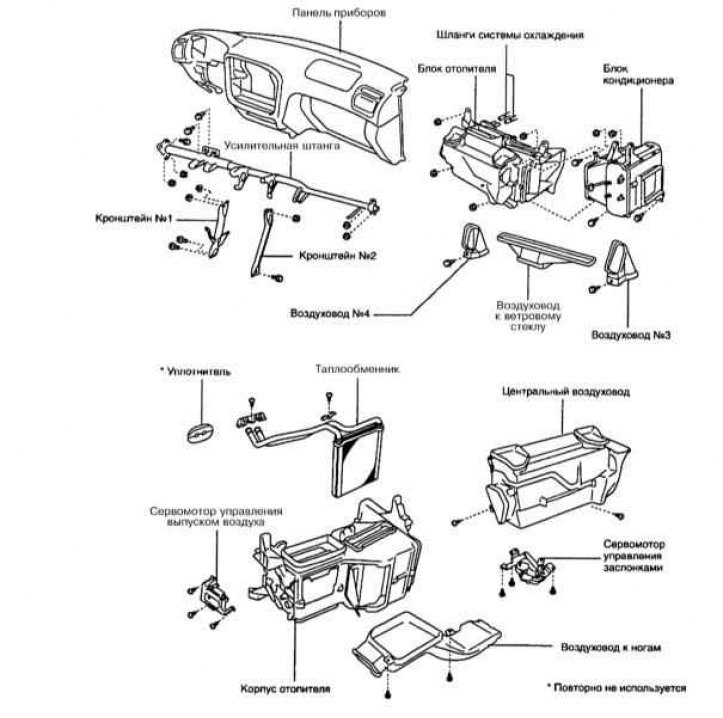
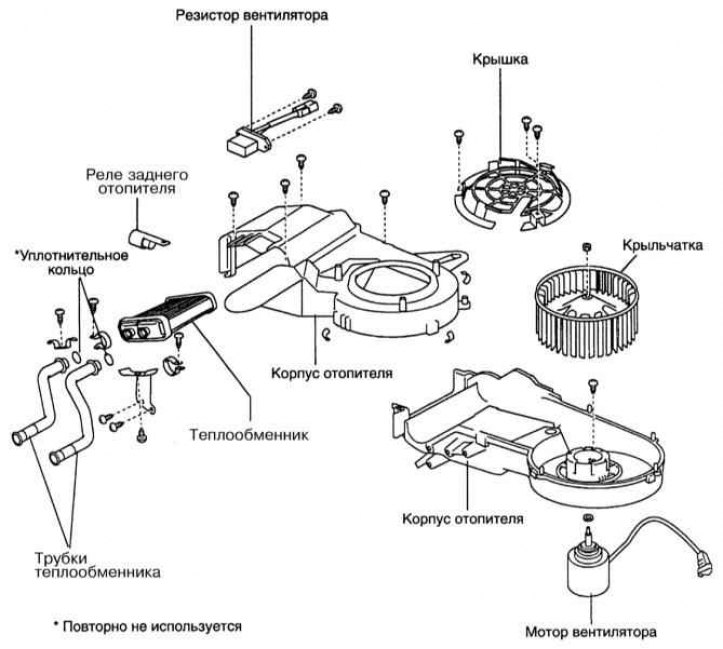
Front heater
Front heater installation details
1. Having addressed for the help to the expert, discharge A/V and remove the A/V evaporator.
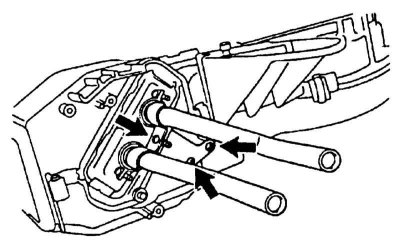
2. In the engine compartment, disconnect the heating hoses from the pipes of the heater heat exchanger passed through the rear bulkhead, remembering their position (refer to illustration above). Push the rubber seals into the cabin. Seal the open ends of the fittings immediately to prevent splashing of coolant when the heat exchanger is removed.
3. Remove the center console, assembly and instrument panel reinforcing bar (see chapter Body and Onboard electrical equipment).
4. Under the instrument panel, disconnect the air ducts from the heater housing.
5. Disconnect the control cables from the heater block, being careful not to bend them.
6. Remove the control cable spring clip so that it can be manipulated.
7. Disconnect the electrical wiring from the fan.
8. Give the bolts securing the heater housing to the instrument panel and remove the heater housing by pulling it towards you and down.
9. Prepare enough rags to catch spilled coolant.
10. Remove the heat exchanger fasteners to the body, remove the lining and clamps. Lift the heat exchanger out of the housing.
11. Assembly is carried out in the reverse order. Track reliability of a tightening of hose collars. Before installing the heat exchanger, test it with compressed air.
12. Adjust each cable so that the stroke of the dampers matches the position of the control levers:
- a. Set the control knob on the instrument panel to the FRESH position. Raise the adjusting latch and pull the outside air damper control cable away from the housing. Release the adjusting latch;
- b. Set the front panel control knob to the DEF position. Raise the adjusting latch and move the control cable towards the heater until the maximum lever travel is obtained. Release the adjusting latch;
- With. Set the control knob to position «COOL». Raise the adjuster latch and move the air mix damper control cable towards the heater housing to obtain maximum lever travel.
13. Fill the cooling system, connect the battery and start the engine. Make sure that there are no signs of leak development, evaluate the proper functioning of the heating system.
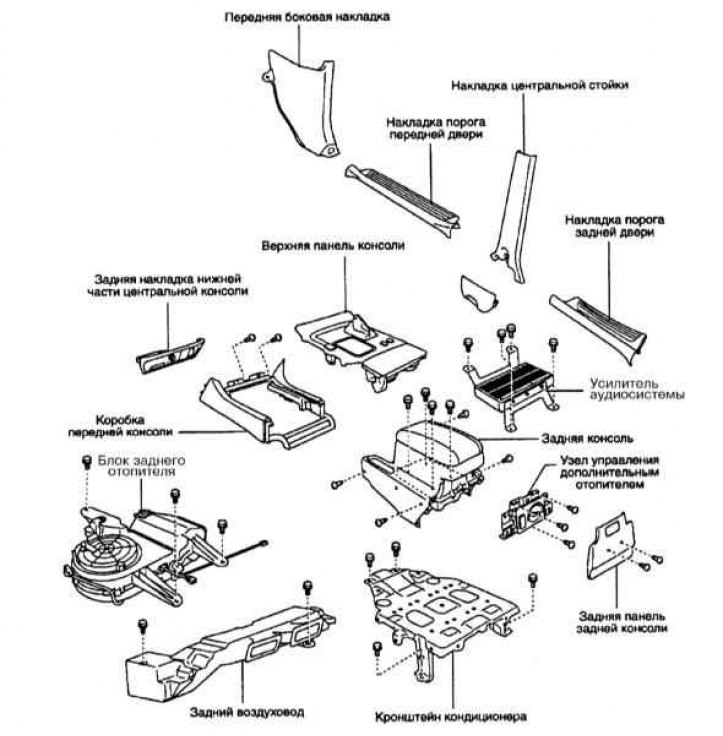
Rear heater
Assembling the rear heater
Rear heater installation details
1. Disconnect the hoses from the heater pipes (refer to illustration Assembling the rear heater).
2. Remove the front seats.
3. Remove the heater control unit (refer to illustration Rear heater installation details).
4. Remove the rear console and front console cover.
5. Remove the rear trim at the bottom of the center console.
6. Remove the front door sill trims, front side trims, rear door sill trims and center pillar trim.
7. Turn away a carpet and remove an arm of the conditioner.
8. Give a bolt and the screw then remove an air duct of a heater.
9. Disconnect the fan wiring connector.
10. Give bolts of fastening of the block of a heater and remove the block of a heater, trying not to spill a cooling liquid in salon.
11. Remove the fasteners and remove the heater heat exchanger from the block (refer to accompanying illustration).
12. Installation - reverse procedure. Put the heater hoses on the fittings up to the second annular protrusion.