
Company Honda Company Ford Company Skoda Company Kia Company Mazda Company Mercedes Company Renault
English Русский
Български
Беларускі
Український
Српски
Hrvatski
Română
Polski
Slovenský
Magyar
Bookmark Articles Sitemap Contacts
ToyotaMan.ru


Camry Corolla Corona Carina Land Cruiser Highlander 4Runner RAV4 Others
Cruiser 100 (1998-2007) Cruiser 60/80 (1980-1997, petrol) Cruiser 70 (1985-1996, diesel)

Steering knuckle — removal and installation [Toyota Land Cruiser J60]

  • Main
  • Land Cruiser
  • J60 (1980-1997)
  • Chassis, running gear
  • Steering
  • Steering knuckle — removal and installation
0
Contents: Removal ↓ Installation ↓

Steering knuckle parts
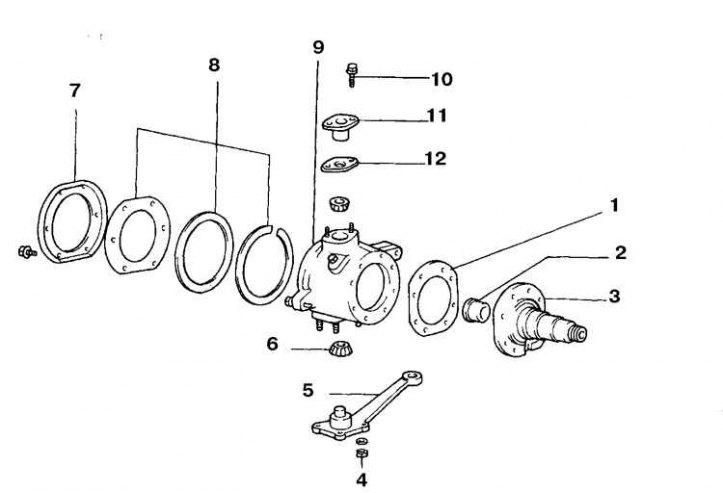


1. Gasket; 2. Bushing; 3. Trunnion; 4. Nut; 5. Lever; 6. Bearing; 7. Seal housing cover; 8. Thrust ring of the seal housing; 9. Fist; 10. Bolt; 11. Bearing cover; 12. Remote laying


Removal


1. Raise the front of the car.

2. Disconnect the steering rods from the knuckle.

3. Remove the brake components.

4. Remove the axle shaft.
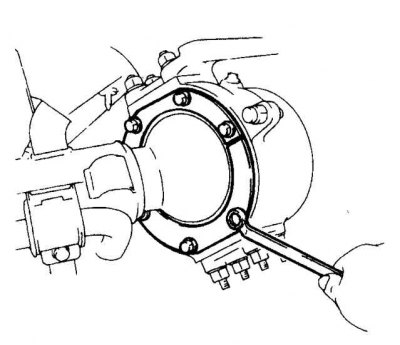


5. Loosen the oil seal housing bolts.
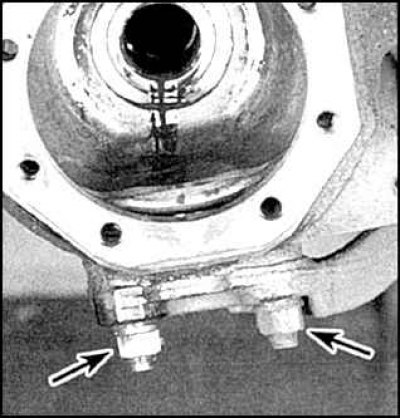


6. Loosen the lever nuts and remove the conical washers (indicated by arrows).
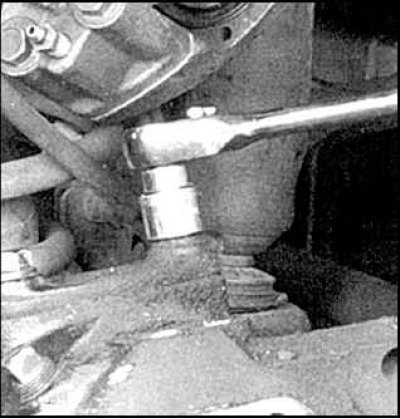


7. Remove the upper bearing cap and spacer.

8. Remove the bearings and label them ("upper right", "lower right", etc.).

9. Remove any remaining old grease from the bearings, fork and knuckle by rinsing with solvent.

10. Check the condition of the bearings, the presence of cracks, chipping and signs of wear on the rollers. Check the condition of the bearing rings in the forks. Replace worn bearings by removing the rings by striking a brass mandrel. The rings and roller housings are replaced as a set.

Installation
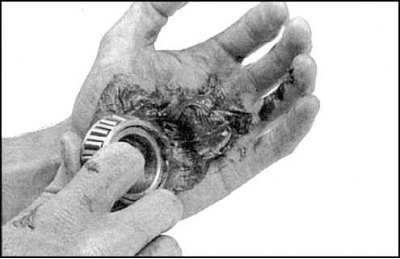


1. Apply high-melting grease to the bearing races by pressing hard on the bearing so that the grease enters the race separators.

2. Apply a thin layer of grease to the guide.

3. Install a new seal.


4. Install the upper bearing into the fork, insert the lower bearing.

5. While holding the lower bearing, place the knuckle on the axle fork and install the gasket and top cover. Tighten the bolts.

6. Install the lever, conical washers, tighten the nuts. Tighten the nuts and bolts of the upper and lower bearing caps to the specified torque.
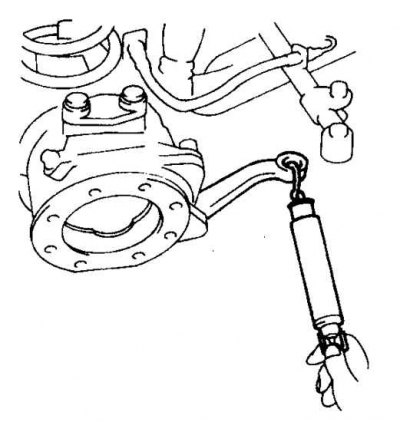


7. Check the preload in the bearings. If the torque differs from the normal value, adjust the thickness of the spacers by removing some of the spacers or installing new ones.

Attention! Increasing the thickness of the linings reduces the preload in the bearings, decreasing the thickness leads to an increase in the preload.


8. Then assembly is carried out in reverse order.
This article is available at: russian, bulgarian, belarusian, ukrainian, serbian, croatian, romanian, polish, slovak, hungarian
The article material has been checked: Evdokimov Evgeniy
Share information:
◀ Previous
Cruiser 60/80: Steering
Next ▶

 
Steering wheel — removal and installation
Steering rods — removal, inspection and installation
Gearbox — removal and installation
Power steering pump — removal and installation
Bleeding the Power Steering
Similar articles on other Toyota models

➥ Steering knuckle and hub — removal and installation Toyota Camry XV20 (1996-2001)
➥ Removal the steering knuckle with the hub Toyota Corona T190 (1992-1997)
➥ Removal the steering knuckle with the front axle hub Toyota Carina T190 (1992-1996)
➥ Steering knuckle and hub — removal and installation Toyota Highlander 1 (2000-2007, petrol)
➥ Steering knuckle — removal and installation Toyota 4Runner N120 (1989-1995)
➥ Steering knuckle and front wheel hub Toyota RAV 4 XA10 (1994-2000)
Link in different formats to this article
Comments and feedback from visitors
No comments yet


Add two numbers 40 + 33


Cruiser 100 (1998-2007) 
  • General information
  • Introduction to the guide
  • Controls and instruments
  • Maintenance
  • Power unit
  • Petrol engines
  • Diesel engines
  • Cooling and heating
  • Power and exhaust systems
  • Engine electrical equipment
  • Engine management systems
  • Transmission
  • Automatic gearbox
  • Transmission line
  • Chassis, running gear
  • Brake system
  • Car suspension
  • Steering
  • Body and interior
  • Exterior (external elements)
  • Interior (internal elements)
  • Doors, locks and windows
  • Electrical equipment
  • Equipment and devices
  • Electrical circuits
Cruiser 60/80 (1980-1997, petrol) 
  • General information
  • User manual
  • Maintenance
  • Power unit
  • Petrol engines 2F and 3F-E
  • Petrol engines 1FZ-FE
  • Engine overhaul
  • Engine electrical equipment
  • Cooling and heating
  • Fuel system (carburetor)
  • Fuel system (injector)
  • Toxicity reduction system
  • Transmission
  • Car gearbox
  • Clutch
  • Transfer case
  • Drive shafts and axles
  • Chassis, running gear
  • Brake system
  • Car suspension
  • Steering
  • Body and interior
  • Exterior and interior
  • Doors, locks and windows
  • Electrical equipment
  • Equipment and devices
  • Electrical circuits
Cruiser 70 (1985-1996, diesel) 
  • General information
  • User manual
  • Maintenance
  • Power unit
  • Engine adjustment
  • Engine repair
  • Fuel system
  • Control system
  • Turbocharging system
  • Cooling and lubrication system
  • Charge and start system
  • Transmission
  • Clutch
  • Mechanical gearbox
  • Automatic gearbox
  • Transfer case
  • Chassis, running gear
  • Car suspension
  • Brake system
  • Steering
  • Body and interior
  • Body elements
  • Heating and air conditioning
  • Electrical equipment
  • Equipment and devices
  • Electrical circuits
ToyotaMan.ru © 2018–2026 • Mobile version • Interesting about Toyota • Administration • Sitemap: EN BG BY UA RS HR RO PL SK HU • Search system • Bookmark
Camry Vista-V40 • Camry XV10 • Camry XV20 • Camry XV30 • Corolla Verso-AR10 • Corolla E80 • Corona T190 • Carina T170 • Carina T190 • Land Cruiser J70 (diesel) • Land Cruiser J60 (petrol) • Land Cruiser J100 • Highlander XU20 (petrol) • 4Runner N120 • RAV4 XA10 • RAV4 XA20 • Duet M100 • Dyna Y50 •
We require cookies to enable some interactive features. Is that ok with you?