Contents: Steering wheel play ↓ Working fluid level ↓ Replacement of working fluid ↓ Pumping the system ↓ Checking fluid pressure ↓ Checking the steering wheel effort ↓ ↓
Steering wheel play
1. Check the steering wheel play.
a) Set the wheels to the straight-ahead position of the vehicle.
b) Measure the play of the steering wheel on the rim; the wheels do not turn when the steering wheel is slightly turned in both directions.
Maximum clearance - 40 mm
c) If the play exceeds the maximum value, adjust or repair the steering gear.
2. Set the wheels to the straight-ahead position.
3. Adjusting the steering mechanism
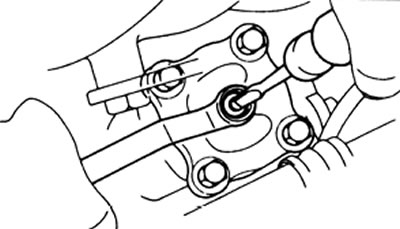
a) Loosen the locknut.
b) Turn the adjusting screw clockwise to decrease the play.
Note: Turn the adjusting screw a small angle and check the play after each turn of the screw.
4. Checking for steering gear sticking.
a) Turn the steering wheel half way in both directions.
b) Check the amount of play, smoothness of steering wheel rotation and absence of sticking.
5. While holding the adjusting screw, tighten the lock nut.
Working fluid level
1. Place the vehicle on a level surface.
2. With the engine stopped, check the working fluid level in the reservoir. Add if necessary.
Attention: if the working fluid is heated, measure the level on the "HOT" scale; if it is cold, measure the level on the "COLD" scale.
3. Start the engine at idle speed.
4. Turn the steering wheel from lock to lock several times to warm up the working fluid to a temperature of 80°C.
5. Check for foam and turbidity of the liquid in the tank. If necessary, bleed the system.
6. With the engine running, measure the working fluid level.
7. Stop the engine and check the difference in fluid levels in the reservoir with the engine running and stopped. If the fluid level has changed significantly, the system should be bled.
Maximum level increase - 5 mm
Replacement of working fluid
1. Raise the front wheels of the car.
2. Disconnect the return hose and drain the working fluid into a suitable container.
Note: Turn the steering wheel from lock to lock to drain the fluid.
3. Fill the reservoir with fresh fluid. Working fluid: DEXRONII
4. Start the engine at idle speed. After 1-2 seconds, the liquid will start to flow from the return hose. At this point, immediately stop the engine.
Note: Please ensure that there is some liquid left in the tank.
5. Repeat steps 3-4 several times to remove air from the liquid.
6. Connect the return hose and bleed the system.
Pumping the system
1. Check the fluid level in the reservoir, add if necessary
2. Start the engine and turn the steering wheel from lock to lock several times.
3. With the engine running at no more than 1000 rpm, turn the steering wheel all the way to the right or left and hold it in this position for 2-3 seconds, then turn the steering wheel in the opposite direction, again holding it in this position for 2-3 seconds.
4. Check for foam or cloudiness of the liquid in the tank.
5. Make sure that the working fluid level does not rise above the maximum level when the engine is stopped.
6. Stop the engine and check the difference in fluid levels in the reservoir with the engine running and stopped.
Maximum level increase - 5 mm
7. If foaming or turbidity of the liquid is observed, or the increase in the working fluid level exceeds 5 mm, then repeat the operations according to points 1-3.
Checking fluid pressure
1. Connecting the pressure gauge.
a) Disconnect the discharge line nipple.
b) Connect the input of the test pressure gauge adapter to the power steering pump and the output (after the valve) - to the discharge line.
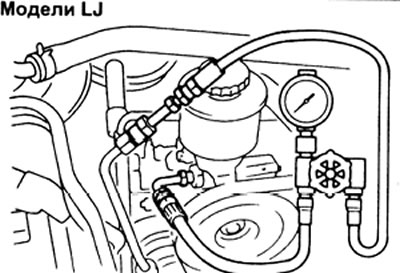
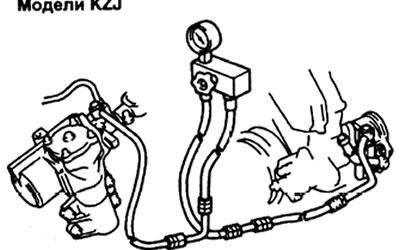
c) Bleed the system. Start the engine and turn the steering wheel from lock to lock 2 or 3 times,
d) Check the fluid level.
2. Check that the working fluid temperature is at least 80°C.
3. Start the engine at idle speed.
4. Check the working fluid pressure with the pressure gauge valve closed and, if the pressure is low, repair or replace the pump.
Minimum pressure:
- lJ models - 75 kgf/cm² (7.355 kPa)
- kZJ models — 85 - 90 kgf/cm²(8.336 - 8.826 kPa)
Note:
- The pressure gauge valve should not remain closed for more than 10 seconds.
- Do not allow the working fluid temperature to rise excessively.
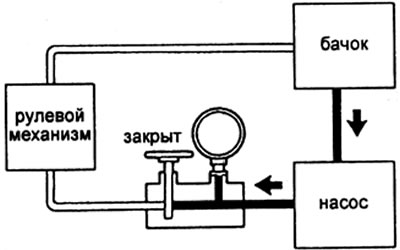
5. Check the working fluid pressure with the pressure gauge valve open when the engine is running at 1000 rpm and 3000 rpm.
If the difference between the readings at 1000 rpm and 3000 rpm is greater than the maximum allowable, repair or replace the pump valve or power steering pump.
Maximum difference is 5 kgf/cm² (490 kPa)
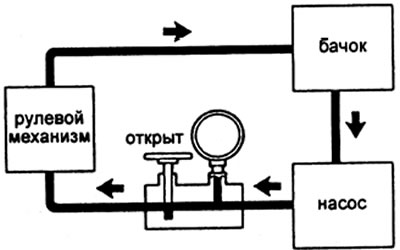
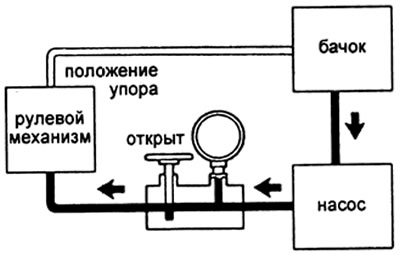
6. Check the pressure when turning the steering wheel all the way.
a) With the engine idling, fully open the pressure gauge valve and turn the steering wheel all the way to the left or right. Measure the pressure.
Minimum pressure:
lJ models - 75 kgf/cm² (7.355 kPa)
kZJ models — 85-90 kgf/cm²(8.336 - 8.826 kPa)
b) If the pressure is low, there is a leak in the steering gear and it must be repaired or replaced.
Checking the steering wheel effort
Note: Before performing the inspection, check the tire pressure, tire type and contact surface.
1. Stop the vehicle on a level surface and set the steering wheel to the center position.
2. Start the engine at idle speed.
3. Using a dynamometer, measure the steering wheel force in both directions.
Maximum permissible force - 39 N
4. If the steering wheel force exceeds the maximum permissible value, repair the steering gear.
Checking the Pump Drive Belt Tension (LJ Models)
1. Press the drive belt with a force of 98 N (10 kgf) at the point shown in the figure and measure the belt deflection.
Drive belt deflection:
new 8-12 mm
located
in operation 10-15 mm
Note: A belt that has been in operation on the engine for less than 5 minutes is considered new.
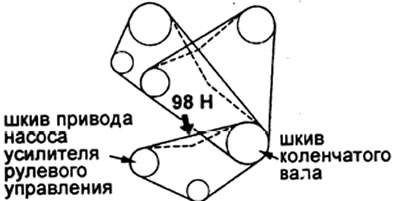
2. Using a special tool, check the drive belt tension. Drive belt tension:
- new - 45 - 55 kgf
- in operation - 20 - 35 kgf