



Contents: EJ Series ↓ KZ series ↓
EJ Series
Removal
1. Relieve residual fuel pressure.
2. Disconnect the cable from the negative terminal of the battery.
3. Remove the throttle body.
4. Disconnect the main fuel hose and fuel return hose.
Note: To prevent fuel splashing, place a rag under the hose joint.
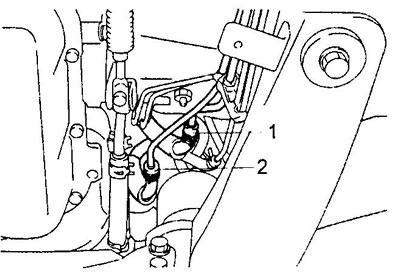
1 - main fuel hose,
2 - fuel return hose.
5. Unscrew the fuel manifold mounting bolts and remove the fuel manifold with injectors.
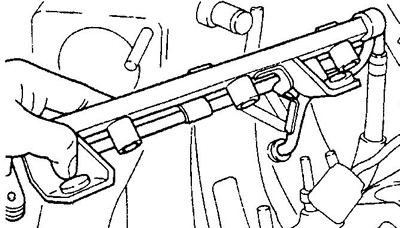
6. Disconnect the fuel pressure regulator and fuel manifold from the hoses.
Checking the injectors
1. Check the resistance between the terminals of the injector connector.
- Nominal resistance - 12.5 Ohm
If the resistance value differs significantly from the specified value, replace the injector.
2. Check the injection volume.
Note: The test should be carried out in a well-ventilated area away from sources of fire.
a) Remove the hose between the fuel inlet pipe and the fuel pipe.
b) Connect the injector being tested to the removed hose.
c) Using a special device, short-circuit the terminals "FC2" - "E1" ("27" - "15") diagnostic connector, turn on the ignition. The fuel pump should start working.
d) Connect the special device to the battery for 15 s and measure the injection volume in a measuring vessel. Repeat the test 2-3 times for each injector.
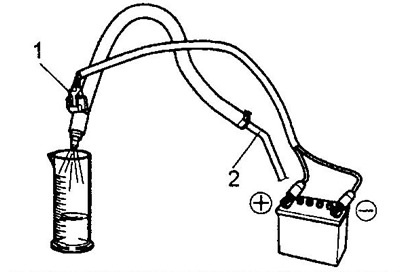
1 - nozzle,
2 - fuel pipe.
- Injection volume - 35 - 43 cm³
Note: If the value is outside the specified range, replace the injector.
3. Check for leaks.
After completing the previous check, disconnect the wires from the battery and check for fuel leakage through the injector.
- Nominal value - less than 1 drop per 1 minute
Installation
1. Install the fuel pressure regulator on the fuel rail.
Note: Apply gasoline to the O-rings.
2. Install the injectors on the fuel manifold.
Note:
- Apply gasoline to the O-rings.
- Make sure that the injectors rotate easily in their seats after installation.
- If the injector is difficult to turn, replace the O-ring or injector insulator.
3. Install the throttle body.
4. Connect the wire to the negative terminal of the battery.
5. Start the engine and check for fuel leaks.
KZ series
Removal
1. Relieve residual fuel pressure.
2. Disconnect the cable from the negative terminal of the battery.
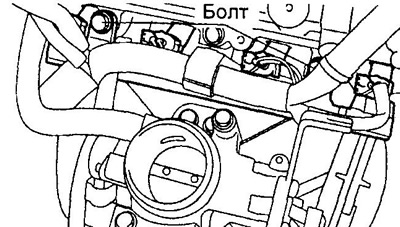
3. Remove the air filter.
4. Remove the engine wiring harness retainer.
5. Disconnect the fuel hose from the fuel rail.
Note: To prevent fuel splashing, place a rag under the hose joint.
6. Remove the fuel manifold by unscrewing the bolts and remove the injectors from it.
The material was taken from a resource www.ToyotaMAN.ru
Checking the injectors
1. Check the resistance between the terminals of the injector connector.
- Nominal resistance: 13.8 Ohm
If the resistance value differs significantly from the specified value, replace the injector.
2. Check the injection volume.
Note: The test should be carried out in a well-ventilated area away from sources of fire.
a) Remove the hose between the fuel inlet pipe and the fuel pipe.
b) Using a special device, short-circuit the terminals "FC1" - "E1" ("2" - "23") (models without the "Key Free" system) or "FC2" - "E1" ("30" - "23") (models with the "Key Free" system) diagnostic connector, turn on the ignition. The fuel pump should start working.
d) Connect the special device to the battery for 15 s and measure the injection volume in a measuring vessel. Repeat the test 2-3 times for each injector.
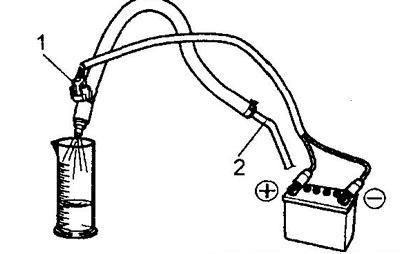
1 - nozzle,
2 - fuel pipe.
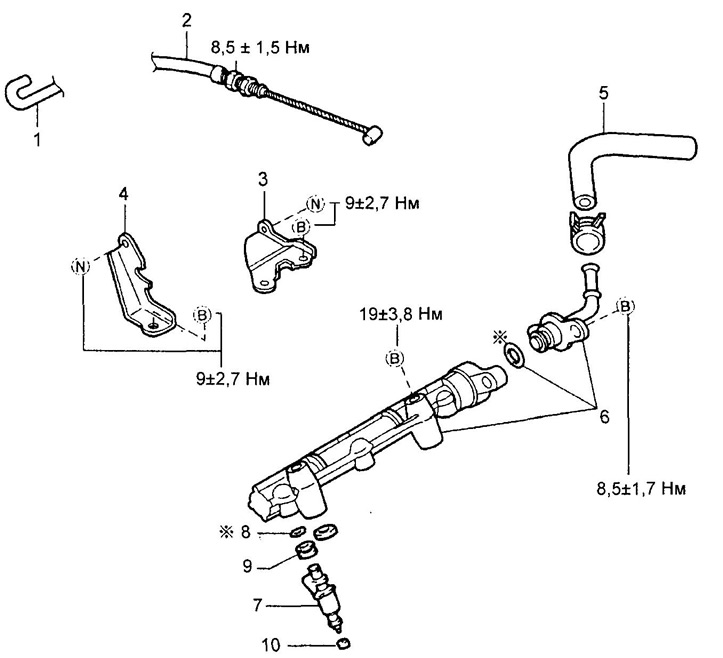
Removal and installation of injectors (EJ series).
1 - ventilation hose,
2 - accelerator cable,
3 - bracket No.1,
4 - bracket No.2,
5 - main fuel hose,
6 - fuel manifold,
7 - fuel injector,
8 - O-ring seal,
9 - seal,
10 - insulator.
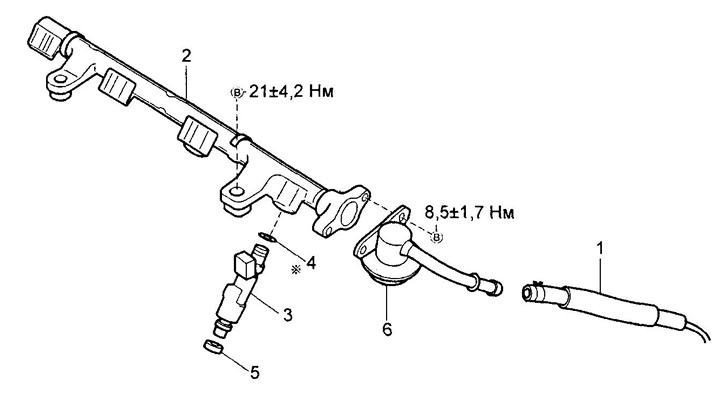
Removal and installation of injectors and fuel pressure regulator (KZ series).
1 - main fuel hose,
2 - fuel manifold,
3 - nozzle,
4 - O-ring seal,
5 - insulator,
6 - fuel pressure pulsation damper.
Injection volume:
- K3-VE — 35-52 cm³
- K3-VE2 — 35-46 cm³
Note: If the value is outside the specified range, replace the injector.
3. Check for leaks.
After completing the previous check, disconnect the wires from the battery and check for fuel leakage through the injector.
- Nominal value - less than 1 drop per 1 minute
Installation
1. Install the injector insulators and injectors onto the cylinder head.
2. Install the fuel manifold.
Note:
- When installing the fuel rail, do not reuse the injector O-rings.
- Do not damage the O-rings and injector insulators during installation.
- Make sure that the injectors rotate easily in their seats after installation.
- If the injector is difficult to turn, replace the O-ring or injector insulator.
3. Install the engine wiring harness retainer.
4. Install the air filter housing.
5. Connect the cable to the negative terminal of the battery.
6. Start the engine and check for fuel leaks.