Unscrew the three screws of the generator cover, then use a screwdriver to separate the cover and remove it together with the generator rotor.
Warning: Do not press on the stator winding.
2. Remove the pulley and generator fan.
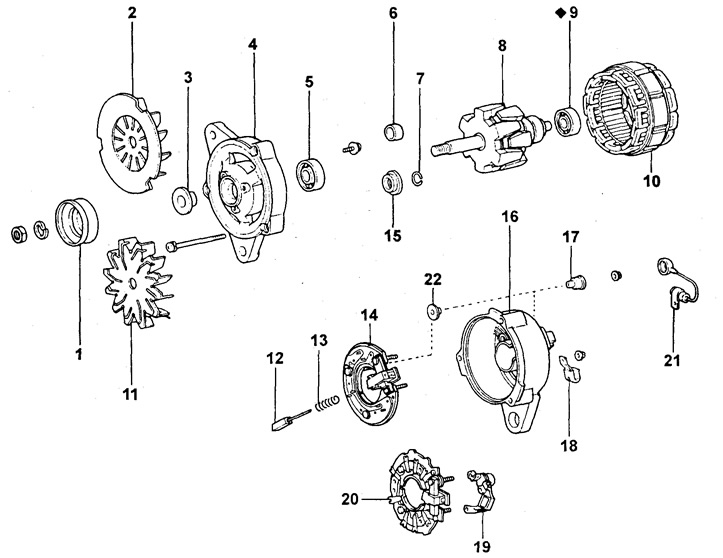
Generator (standard equipment):
1 - generator pulley,
2 - generator fan (models 50A, 55A),
3 - remote bushing,
4 - generator cover from the drive side,
5 - front bearing,
6 - remote bushing (models 50A, 55A),
7 - retaining ring,
8 - rotor,
9 - rear bearing,
10 - stator,
11 - generator fan (models 40A, 45A),
12 - brush,
13 - brush spring,
14 - rectifier block (generator with mechanical voltage regulator),
15 - remote bushing (models 40A, 45A),
16 - generator cover from the side of the rectifier unit,
17 - electrical connector insulator,
18 - wire holder,
19 - electronic voltage regulator,
20 - rectifier block (generator with electronic voltage regulator),
21 - capacitor,
22 - insulating washer,
♦ - parts that are not subject to reuse.
Clamp the rotor in a soft jaw vise. Loosen the pulley nut, remove the nut and spring washer (grower). Remove the pulley, alternator fan and spacer.
3. Remove the generator rotor.
Press the rotor out of the generator cover on the drive side. Then remove the spacer and circlip (for generator 40A, 45A) or just the spacer (for generator 50A, 55A).
4. Remove the generator cover from the rectifier side.
Remove the four nuts, remove the capacitor and the two generator lead insulators. Remove the generator cover from the rectifier side. Remove the two insulating washers from the rectifier block studs. Remove the insulating washer from the brush holder stud.
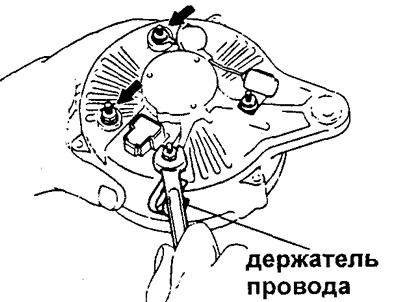
5. (For generator with electronic voltage regulator). Remove the electronic voltage regulator by first clamping the output of the voltage regulator with round nose pliers and unsoldering the contacts.

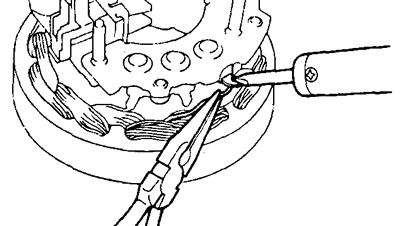
6. Remove the rectifier block, having previously clamped the terminal of the block with round-nose pliers and unsoldered the wires from the rectifier block.
Warning: Keep the rectifier valves away from heat.