
Company Honda Company Ford Company Skoda Company Kia Company Mazda Company Mercedes Company Renault
English Русский
Български
Беларускі
Український
Српски
Hrvatski
Română
Polski
Slovenský
Magyar
Bookmark Articles Sitemap Contacts
ToyotaMan.ru


Camry Corolla Corona Carina Land Cruiser Highlander 4Runner RAV4 Others
Carina T190 (1992-1996) Carina T170 (1988-1992)

Removal and installation of a manual gearbox [Toyota Carina T170]

  • Main
  • Carina
  • T170 (1988-1992)
  • Transmission
  • Car gearbox
  • Removal and installation of a manual gearbox
0
The CARINA-II vehicles are equipped with a five-speed gearbox. Depending on the engine installed, gearboxes of different types are installed. The most important difference between the gearboxes is the lubricant, the "S50" type gearbox is filled with fluid used in automatic gearboxes, and other gearboxes are filled with regular gearbox oil. Therefore, you should first make sure which gearbox is installed on the vehicle. The gear ratios of the three engines described in this book, i.e. the 1.6L, 2.0L and diesel engines, are different.

Removal and installation the gearbox


Removal and installation of all types of gearboxes are carried out in the same way.
  • Disconnect the ground cable from the battery.
  • Open the tap and drain the coolant until the fluid level drops below the upper water hose.
  • Remove the air filter together with the air intake hose (injection engine).
  • Disconnect the wire from the reverse light switch.
  • Disconnect the speedometer shaft. To do this, unscrew the knurled nut.
  • Disconnect the gear shift cable as shown in Fig. 169. To do this, remove the spring clip and washer and pull the spring clip out of the mount
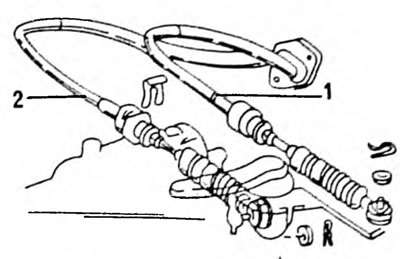


Fig. 169. Method of fastening the gear selection cable (1) and the shift cable (2).


  • Remove the coolant intake. It is secured with a bolt and nut.
  • With the S50 type gearbox installed, pull out the spring clip connecting the clutch cylinder hose and the tube and unscrew the gearbox mount. With the C52 type gearbox installed, you can unscrew the clutch slave cylinder from the gearbox and carefully move it to the side without disconnecting the tube. Thanks to this, it is not necessary to bleed the hydraulic clutch system after installing the gearbox.
  • Unscrew the lower beam covers (left and right).
  • Remove the front and rear transmission suspensions. If a protective cover is installed, remove it first. Then unscrew the bolts on the sides shown in Figure 170 and remove the suspension.
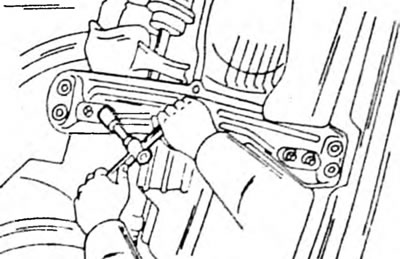


Fig. 170. Loosen the front and rear gearbox mounts in the indicated locations.

  • Remove the engine mount center beam (Fig. 171). The beam is attached on the outside and in the middle.
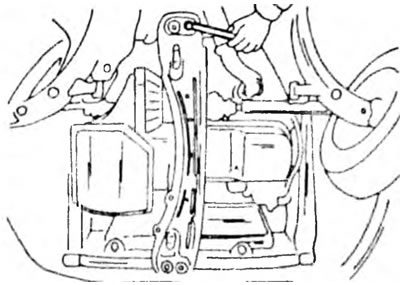


Fig. 171. The center beam of the engine mount is attached from the outside and in the middle


  • Disconnect the drive shafts from the gearbox as described in Chapter 11.1. The shafts are bolted to the drive flanges of the differential axles, or inserted into the differential gears.
  • Disconnect the wires from the starter and remove the starter.
  • Disconnect the ground wire.
  • On all boxes except S50, unscrew the plate from the rear of the engine.
  • Raise the gearbox with a jack (place a wooden spacer between the jack and the box) and remove the left engine mount.
  • Remove the bolts connecting the gearbox to the engine, lower the left side of the engine and slowly lower the gearbox on the jack.

The gearbox is installed in the reverse order, taking into account the following points:
  • Jack up the gearbox to the engine and engage the splined portion of the crankshaft with the hub of the driven clutch disc. Tighten the 12 mm diameter gearbox-to-engine connection bolts to a torque of 65 Nm, 10 mm diameter on the S50 gearbox to 40 Nm, and all other bolts to a torque of 47 Nm.
  • Install the left engine mount. Tighten the bolts to 53 Nm.
  • Tighten the starter mounting bolts to 40 Nm.
  • If the drive shafts are attached to the gearbox with bolts, tighten the bolts to 37 Nm.
  • Install the center engine mount beam with a bolt tightening torque of 40 Nm.
  • Install the front and rear engine mounts with a bolt tightening torque of 40 Nm.
  • Pour oil into the gearbox. In the S50 gearbox, pour 2.6 liters of liquid; pour 2.6 liters of SAE 75V 90 or 80W-90 oil into the C52 box.
This article is available at: russian, bulgarian, belarusian, ukrainian, serbian, croatian, romanian, polish, slovak, hungarian
The article material has been checked: Kondratyeva Ulyana
Share information:
◀ Previous
Carina T170: Car gearbox
Next ▶

 
Repair of manual transmission
Automatic transmission
Automatic transmission — removal and installation
Automatic Transmission — Checking Fluid Level
Size and adjustment tables — manual and automatic transmissions
Similar articles on other Toyota models

➥ Removal and installation of a manual gearbox Toyota Camry XV20 (1996-2001)
➥ Manual transmission — «mechanical» gearbox Toyota RAV 4 XA20 (2000-2005)
➥ Driving with a manual transmission Toyota Corolla E80 (1983-1990)
➥ Checking and replacing oil in manual transmission and… Toyota Corona T190 (1992-1997)
➥ Introduction to the Operation and Repair Manual Toyota Cruiser 60/80 (1980-1997, petrol)
➥ Gearbox Speed Sensors — Replacement Toyota Highlander 1 (2000-2007, petrol)
Link in different formats to this article
Comments and feedback from visitors
No comments yet


Add two numbers 30 + 31


Carina T190 (1992-1996) 
  • General information
  • User manual
  • Maintenance
  • Power unit
  • Engines 4A-FE, 5A-FE, 7A-FE
  • Engines 3S-FE, 4S-FE
  • Diesel engines 2C
  • Engine repair
  • Cooling system
  • Lubrication system
  • Fuel system
  • Control system (diesel)
  • Fuel injection system
  • Engine electrical equipment
  • Transmission
  • Clutch
  • Mechanical gearbox
  • Automatic gearbox
  • Drive shafts
  • Chassis, running gear
  • Car suspension
  • Steering
  • Brake system
  • Body and interior
  • Exterior (external elements)
  • Interior (internal elements)
  • Air conditioning and heater
  • Electrical equipment
  • Equipment and devices
  • Headlights and lighting
  • Breakers and switches
  • Electrical circuits
Carina T170 (1988-1992) 
  • General information
  • Introduction to the manual
  • Power unit
  • Gasoline engines
  • Diesel engines
  • Lubrication system
  • Cooling system
  • Fuel system (carburetor)
  • Fuel system (injector)
  • Ignition system
  • Transmission
  • Clutch
  • Car gearbox
  • Drive shafts
  • Chassis, running gear
  • Front suspension
  • Rear suspension
  • Steering
  • Brake system
  • Electrical equipment
  • Power devices
  • Electrical circuits
ToyotaMan.ru © 2018–2026 • Mobile version • Interesting about Toyota • Administration • Sitemap: EN BG BY UA RS HR RO PL SK HU • Search system • Bookmark
Camry Vista-V40 • Camry XV10 • Camry XV20 • Camry XV30 • Corolla Verso-AR10 • Corolla E80 • Corona T190 • Carina T170 • Carina T190 • Land Cruiser J70 (diesel) • Land Cruiser J60 (petrol) • Land Cruiser J100 • Highlander XU20 (petrol) • 4Runner N120 • RAV4 XA10 • RAV4 XA20 • Duet M100 • Dyna Y50 •
We require cookies to enable some interactive features. Is that ok with you?