
Removal and installation
Note. The hood panel has a decent weight, so you should enlist the support of an assistant.
1. Open the hood, then cover the fenders with special pads or just old blankets to protect them from damage during the dismantling of the panel.
2. Disconnect all cables and wires that interfere with the removal of the hood. Also disconnect the windshield washer fluid supply pipes connected to the nozzles fixed in the hood.
3. Circle the hinge strips with a marker or scriber to ensure that the hood is properly fastened during assembly.
4. Ask the assistant to hold a cowl and give bolts of fastening of loop levels.
5. Installation is carried out in the reverse order. When replacing the old hood, make sure that the hinge strips are installed taking into account the marks made during the dismantling process (see paragraph 3). If the hood is replaced, it is necessary to adjust its position (see below).
Adjustment
Note. After adjusting the hood, its cone bolts that were given out must be replaced with new ones.
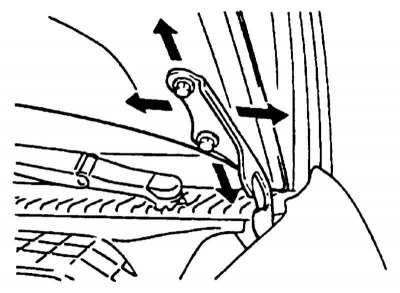
1. The position of the hood in the opening of the engine compartment is adjusted by shifting the hinge bars to the appropriate side after loosening their fasteners (refer to accompanying illustration).
Note. If self-centering bolts are used at the factory to fasten the strips, which do not allow for the possibility of such adjustment, such fasteners should be replaced with standard type bolts, remembering to equip them with flat washers and lock washers.
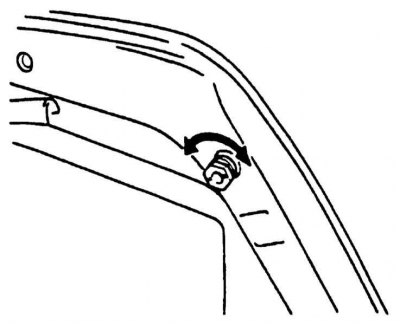
2. The height of the front edge of the hood is adjusted by turning the rubber supports in or out so that the edge of the hood is flush with the wings (refer to accompanying illustration).
3. The height of the rear edge of the hood is adjusted by loosening the four screws securing the hinges to the bulkhead of the engine compartment.
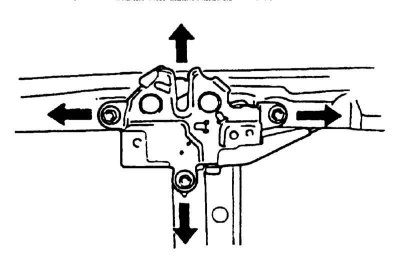
4. If necessary, the position of the hood lock latch assembly on the radiator base plate can be adjusted (in vertical and horizontal planes), the hood must close tightly and fall flush with the surfaces of the wings (refer to accompanying illustration). To adjust the lock, circle the heads of the latch assembly mounting bolts with a marker or scriber, then loosen the bolts and move the latch in the desired direction. After completing the adjustment, firmly tighten the fixing bolts.
5. Assembling the hood lock latch should periodically (simultaneously with loops, see Section Servicing car hinges and locks) be treated with a lithium-based lubricant to prevent jamming and premature wear of components.