Company Honda Company Ford Company Skoda Company Kia Company Mazda Company Mercedes Company Renault
English Русский
Български
Беларускі
Український
Српски
Hrvatski
Română
Polski
Slovenský
Magyar
Bookmark Articles Sitemap Contacts
ToyotaMan.ru


Camry Corolla Corona Carina Land Cruiser Highlander 4Runner RAV4 Others
Cruiser 100 (1998-2007) Cruiser 60/80 (1980-1997, petrol) Cruiser 70 (1985-1996, diesel)

Front disc brakes [Toyota Land Cruiser J70]

  • Main
  • Land Cruiser
  • J70 (1985-1996)
  • Chassis, running gear
  • Brake system
  • Front disc brakes
0
Contents: Replacing brake pads ↓ Removal the caliper assembly ↓ Checking and repair ↓


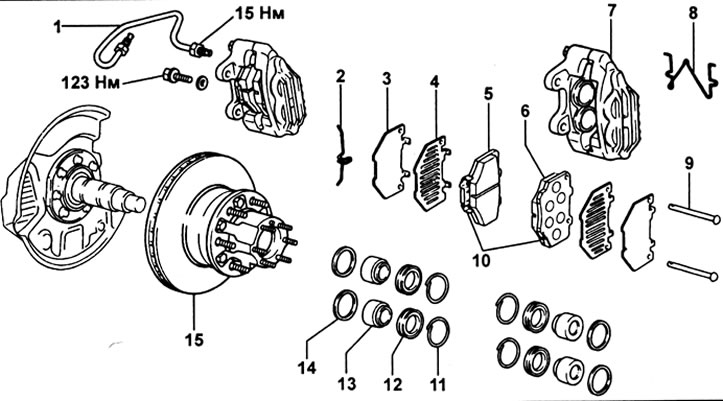
Front disc brakes. 1 - brake pipe, 2 - spring retainer, 3 - gasket (prevents brake squealing), 4 - inner gasket (prevents brake squealing), 5 - inner shoe, 6 - outer shoe, 7 - caliper assembly, 8 - spring (anti-rattle), 9 - pin, 10 - lining wear indicator, 11 - installation ring, 12 - cuff, 13 - piston, 14 - piston seal, 15 - hub assembly with brake disc.


Replacing brake pads


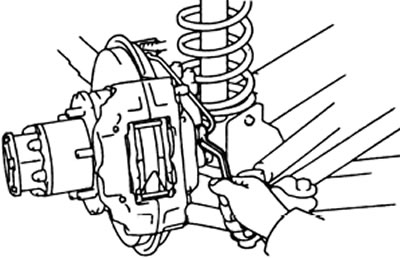
Note: The brake pads are equipped with wear indicators in such a way that when driving, when the thickness of the linings is minimal, the wear indicator touches the brake disc and the brakes make an unpleasant sound ("squeal").


1. Remove the front wheel.

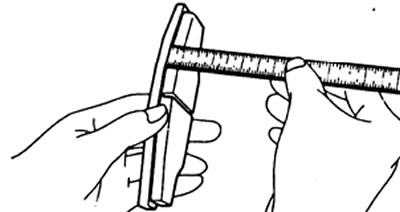
2. Check the thickness of the brake pads. If it is not within the norm, replace the brake pads.

Standard thickness - 9 mm

Maximum thickness - 1 mm
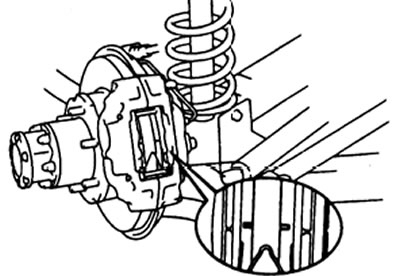


3. Remove the parts listed below.


a) Spring lock.

b) Two pins.

c) A spring to prevent rattling.

d) Two pads.

d) Four gaskets to prevent brake squealing.

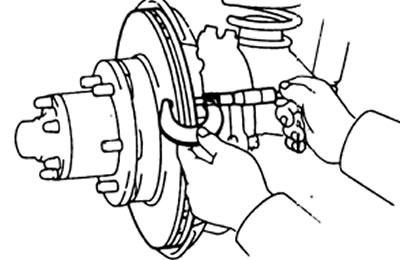
4. Check the thickness of the brake disc.

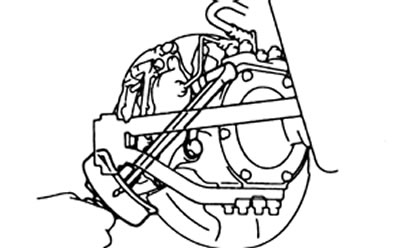
5. Check the brake disc runout.

6. Installing new pads.

a) Pump out a small amount of brake fluid from the reservoir.

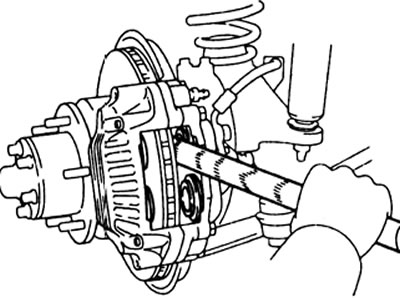
b) Use a hammer handle or similar object to force the pistons apart.

Note: Always replace the pads on one wheel only, as there is a risk of the piston on the opposite wheel coming out.


c) Install four shims to prevent brake squealing.

d) Install two pads into the cylinder.

Note: Do not allow oil or grease to come into contact with the friction surfaces of the brake disc.


7. Install anti-rattle springs.

8. Install two pins.

9. Install the spring clip.

Removal the caliper assembly


1. Remove the front wheel.

2. Disconnect the brake hose. Drain the brake fluid into the reservoir.

3. Loosen the two mounting bolts and remove the caliper assembly.

4. Remove the following parts.

a) Spring lock.

b) Two pins.

c) A spring to prevent rattling.

d) Two pads.

d) Four spacers to prevent brake squeal.

Checking and repair


1. Measure the brake pad thickness. Replace the pads if the pad thickness is less than the limit or if the wear is uneven.


(The official source is on the portal: ToyotaMan.ru)

Maximum thickness - 1 mm


2. Measure the thickness of the brake disc. If the disc is worn or scored, or its thickness is less than the minimum value, the disc needs to be repaired or replaced.

Minimum thickness:
  • normal - 11.5 mm
  • ventilated - 18.0 mm

Standard thickness:
  • normal - 12.5 mm
  • ventilated - 20.0 mm


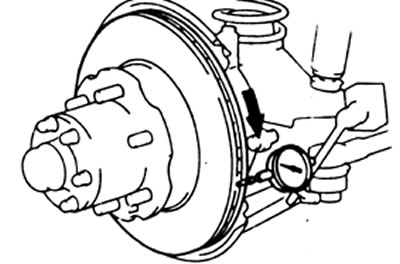
3. Measure the runout of the brake disc at a distance of 10 mm from the outer edge. If the runout exceeds the maximum value, replace the brake disc.

Maximum runout - 0.15 mm

Note: Before measuring the brake disc runout, make sure that the front wheel bearing runout is within the normal range.


4. Replace the brake disc if necessary.


a) Remove the front wheel hub.

b) Loosen the bolts and remove the disc from the wheel hub.

c) Install the new disc on the hub and tighten the mounting bolts.
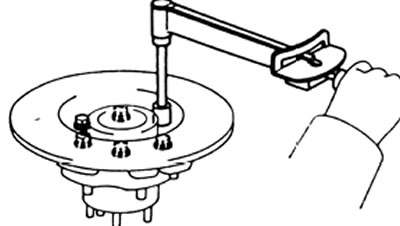


d) Install the hub and adjust the bearing preload.

Installing the caliper assembly

1. Install the caliper assembly and tighten the two mounting bolts.

Tightening torque - 123 Nm


2. Install four squealing spacers, two pads, and a spring (anti-rattle) and two pins. Then install the spring clip.

3. Connect the brake pipe.

Tightening torque: 23 Nm


4. Fill the brake reservoir with brake fluid and bleed the brake system.


5. Check the brake system for fluid leaks.

6. Install the front wheel.
This article is available at: russian, bulgarian, belarusian, ukrainian, serbian, croatian, romanian, polish, slovak, hungarian
The article material has been checked: Mitrofanova Elena
Share information:
◀ Previous
Cruiser 70: Brake system
Next ▶

Vacuum pump
Vacuum brake booster
Master brake cylinder
Checking and adjusting
Precautionary measures
Rear drum brakes
Rear disc brakes
Parking brake (rear disc brakes)
Brake force redistribution valve
Similar articles on other Toyota models

➥ Disc brakes on the front wheels Toyota Camry XV30 (2001-2006)
➥ Front wheel brakes — device Toyota Corolla E80 (1983-1990)
➥ Rear Disc Brakes — Design Description Toyota Corona T190 (1992-1997)
➥ Parking brake device for rear disc brakes Toyota Carina T190 (1992-1996)
➥ Front brakes Toyota Duet (1998-2004)
➥ Front and rear of the car Toyota Highlander 1 (2000-2007, petrol)
Link in different formats to this article
Comments and feedback from visitors
No comments yet


Add two numbers 50 + 47


Cruiser 100 (1998-2007) 
  • General information
  • Introduction to the guide
  • Controls and instruments
  • Maintenance
  • Power unit
  • Petrol engines
  • Diesel engines
  • Cooling and heating
  • Power and exhaust systems
  • Engine electrical equipment
  • Engine management systems
  • Transmission
  • Automatic gearbox
  • Transmission line
  • Chassis, running gear
  • Brake system
  • Car suspension
  • Steering
  • Body and interior
  • Exterior (external elements)
  • Interior (internal elements)
  • Doors, locks and windows
  • Electrical equipment
  • Equipment and devices
  • Electrical circuits
Cruiser 60/80 (1980-1997, petrol) 
  • General information
  • User manual
  • Maintenance
  • Power unit
  • Petrol engines 2F and 3F-E
  • Petrol engines 1FZ-FE
  • Engine overhaul
  • Engine electrical equipment
  • Cooling and heating
  • Fuel system (carburetor)
  • Fuel system (injector)
  • Toxicity reduction system
  • Transmission
  • Car gearbox
  • Clutch
  • Transfer case
  • Drive shafts and axles
  • Chassis, running gear
  • Brake system
  • Car suspension
  • Steering
  • Body and interior
  • Exterior and interior
  • Doors, locks and windows
  • Electrical equipment
  • Equipment and devices
  • Electrical circuits
Cruiser 70 (1985-1996, diesel) 
  • General information
  • User manual
  • Maintenance
  • Power unit
  • Engine adjustment
  • Engine repair
  • Fuel system
  • Control system
  • Turbocharging system
  • Cooling and lubrication system
  • Charge and start system
  • Transmission
  • Clutch
  • Mechanical gearbox
  • Automatic gearbox
  • Transfer case
  • Chassis, running gear
  • Car suspension
  • Brake system
  • Steering
  • Body and interior
  • Body elements
  • Heating and air conditioning
  • Electrical equipment
  • Equipment and devices
  • Electrical circuits
ToyotaMan.ru © 2018–2026 • Mobile version • Interesting about Toyota • Administration • Sitemap: EN BG BY UA RS HR RO PL SK HU • Search system • Bookmark
Camry Vista-V40 • Camry XV10 • Camry XV20 • Camry XV30 • Corolla Verso-AR10 • Corolla E80 • Corona T190 • Carina T170 • Carina T190 • Land Cruiser J70 (diesel) • Land Cruiser J60 (petrol) • Land Cruiser J100 • Highlander XU20 (petrol) • 4Runner N120 • RAV4 XA10 • RAV4 XA20 • Duet M100 • Dyna Y50 •
We require cookies to enable some interactive features. Is that ok with you?