Checking and adjusting the brake pedal stroke
1. Check the height of the brake pedal from the floor surface.
Pedal height - 161 -171 mm
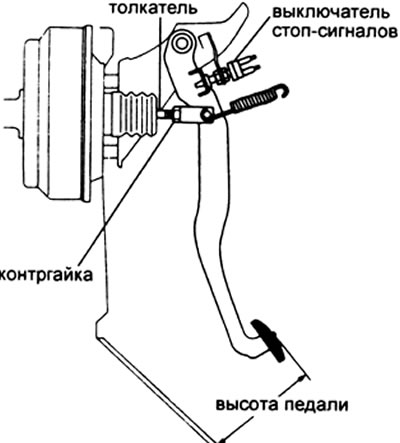
2. Pedal height adjustment (if necessary).
A) Loosen the brake light switch nut.
b) Loosen the locknut.
V) Adjust the pedal height by rotating the pushrod.
G) Tighten the brake light switch until its body makes light contact with the pedal travel stop.
d) After adjusting the pedal height, check and adjust the pedal free play.
e) Tighten locknut.
Tightening torque - 37 N.m
3. Check pedal free play.
A) Stop the engine and press the pedal several times until there is no more vacuum left in the amplifier.
b) Press the pedal with your hand until you feel a secondary increase in resistance to its movement and measure this pedal travel.
Pedal free play - 3-6 mm
4. Pedal free play adjustment (if necessary).
A) If the amount of free play is out of specification, adjust it by rotating the pusher.
b) Start the engine and check that the pedal has free play.
V) After adjusting the free play, check the pedal height.
5. Checking the full travel of the pedal.
A) Tighten the parking brake lever.
b) With the engine running, depress the pedal with a force of 490 N and measure the full pedal travel from the body floor.
Full pedal travel:
front disc brakes - at least 68 mm
front drum brakes - at least 105 mm
V) If the full travel is not within specifications, check the brake system.
Checking the operation of the vacuum brake booster
Note: If the amplifier is leaking, repair it before testing.
1. Performance check.
A) Depress the brake pedal several times with the engine off and check that the pedal travel does not change.
b) Press the brake pedal and start the engine. If the brake pedal smoothly goes down, the vacuum booster is operational.
2. Leak test.
A) Start the engine and stop after one to two minutes of operation. Slowly press the brake pedal several times. If the pedal goes lower on the first press than on the second and third, then the vacuum booster is tight.
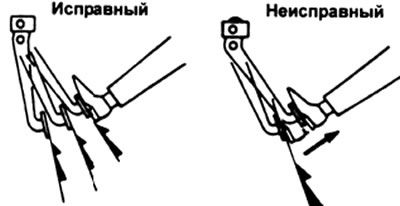
b) Depress the brake pedal with the engine running and stop it with the pedal depressed. If the distance between the floor and the depressed pedal does not change within thirty seconds, then the vacuum booster is sealed.
Bleeding the brake system
Note:
- Bleeding the brake system is necessary after any work has been done on the brake system or if air has entered the system.
- Do not allow brake fluid to come into contact with painted body surfaces. Wash it off your body immediately.
1. After bleeding the brakes of each wheel, check the brake fluid level in the reservoir. Add brake fluid to it if necessary.
Brake fluid type - SAEJ1703 or FMVSS #116 DOT3
2. Bleeding the master cylinder.
Note: bleeding of the main brake cylinder is carried out after its dismantling or if the tank was empty.
A) Disconnect the brake pipe from the master brake cylinder. Drain the brake fluid into the reservoir.
b) Slowly depress the brake pedal and hold it in this position.
V) Close the brake master cylinder outlets with your fingers and release the pedal.
G) Repeat operations (b) And (V) three or four times.
3. Pull one end of the vinyl tube onto the wheel brake cylinder bleeder, and lower the other end into a transparent container half filled with brake fluid.
Note: Start bleeding the brakes on the wheel with the longest brake line.
4. Bleeding the brake line.
A) Slowly press the brake pedal several times.
b) While the assistant keeps the pedal depressed, slightly open the bleed valve, and liquid with air bubbles will begin to exit into the container. When the pedal fails, tighten the bleeder screw, then release the pedal.
V) Repeat this procedure until all air is removed from the brake fluid.
The moment of an inhaling of the union — 11 N-m
5. Repeat these operations for each of the vehicle's wheels.
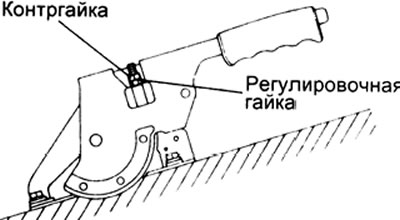
Checking and adjusting the parking brake
1. Pull the parking brake lever all the way and check that the number of clicks is correct.
Full travel - 7 - 9 clicks (with a force of 196 N)
2. If the movement of the lever does not correspond to the norm, then make an adjustment.
Note: before adjusting the parking brake, the gap between the brake linings and the brake drum must be adjusted.
A) Remove the parking brake lever cover.
b) Loosen the locknut and turn the adjusting nut until the correct amount of lever travel is set.
V) Tighten locknut.
G) Reinstall the parking brake lever cover.