



a) Install a new cylinder head gasket, taking into account the position of the guides on the block.
b) Lower the cylinder head onto the gasket.
Note: Apply a light coat of engine oil to bolt threads and under bolt heads before installation.
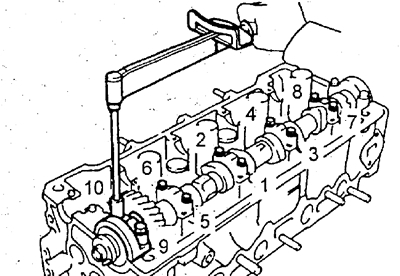
c) Using a suitable device, install and tighten gradually in several passes (not less than 3) 10 cylinder head mounting bolts in the sequence shown in the figure.
- Tightening torque - 29 Nm
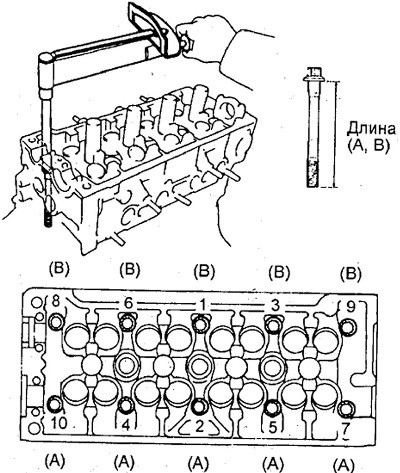
If the bolt is not tightened to the specified torque, replace the bolt.
Note: The cylinder head mounting bolts have different lengths: 90 mm and 108 mm. Be careful not to mix them up when installing.
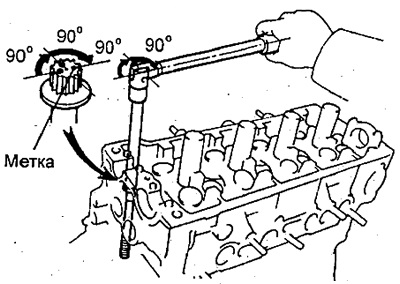
d) Mark the edge of the bolt facing the front of the engine (side opposite to the power take-off) paint as shown in the picture.
d) Tighten all bolts in the sequence noted above, turning them by 90°.
e) Retighten all bolts in the above sequence by another 90°.
g) Ensure that all bolt marks are oriented 180° from the original position.
2. (4A-FE, 5A-FE) Lower the engine with a hoist.
3. Assemble the intake camshaft.
a) Secure the camshaft in a vice, clamping it by the hexagonal section.
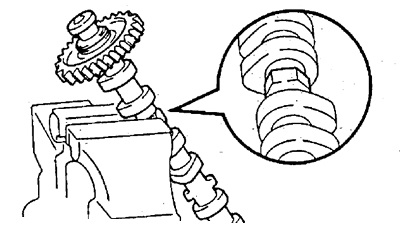
Note: Be careful not to damage the camshaft.
b) Install the following parts:
(1) camshaft gear spring,
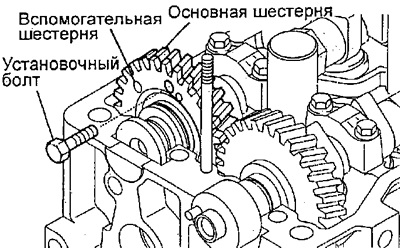
(2) auxiliary gear,
(3) wave washer.
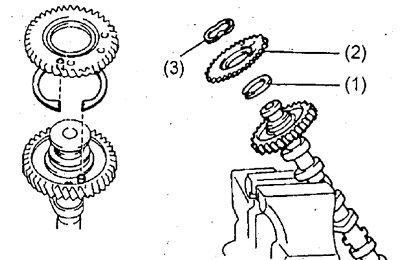
c) Use pliers to install the retaining ring.
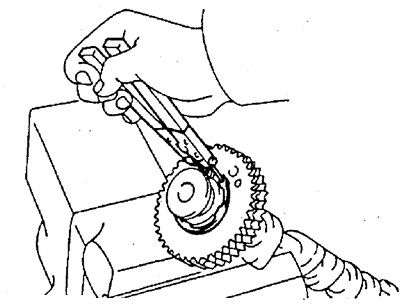
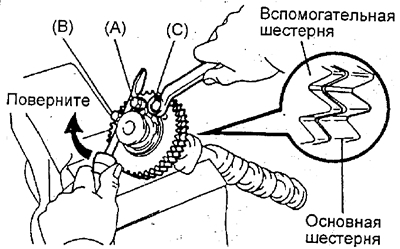
d) Insert the technological bolts (A) and (B) into the installation hole of the camshaft auxiliary gear.
d) Using a screwdriver, turn the camshaft auxiliary gear clockwise and align the holes of the camshaft driven gear and the auxiliary gear, then install the service bolt (C).
Note: Be careful not to damage the camshaft.
4. Install the intake and exhaust camshafts.
Attention: when installing the camshafts, it is necessary to take into account that the value of the axial clearance is very small, therefore the shafts must be placed in the bearing beds strictly horizontally, without distortions, in order to avoid jamming and/or damage to the shafts.
A. Install the exhaust camshaft.
a) Apply consistent grease to the end surfaces of the camshaft.
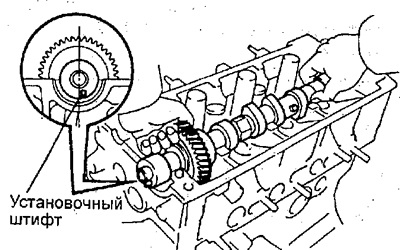
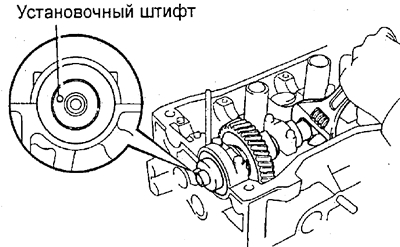
b) Place the exhaust camshaft in the cylinder head so that the dowel pin is positioned slightly to the right of the vertical axis of the camshaft, as shown in the figure. In this position, the cams of the 1st and 3rd cylinders press equally on the tappets of the corresponding valves.
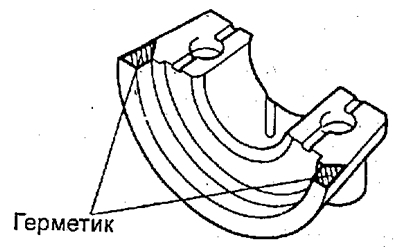
c) Remove any remaining old sealant.
d) Apply sealant to camshaft bearing cap No.1 as shown in the figure.
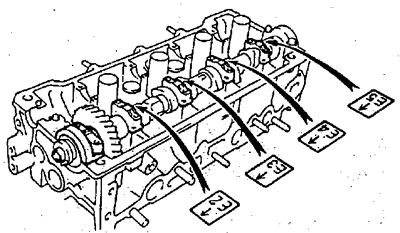
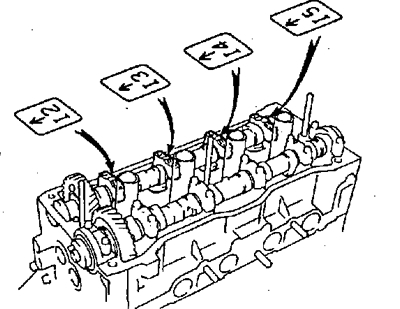
d) Install the camshaft bearing caps on the corresponding journals in accordance with the numbers stamped on them, as shown in the figure; the arrows on the bearing caps must point towards the front of the engine (in the direction opposite to the power take-off).
e) Apply engine oil to the threads and back of the bolt heads.
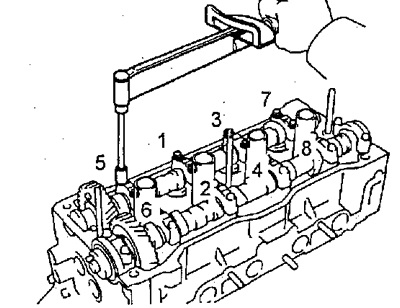
g) Install and tighten the bearing cap bolts evenly in several passes, in the order shown in the figure.
- Tightening torque - 13 Nm
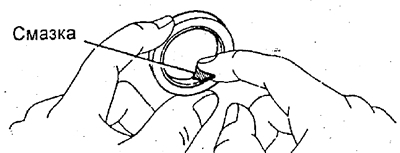
c) Apply grease to the working lip of the oil seal.
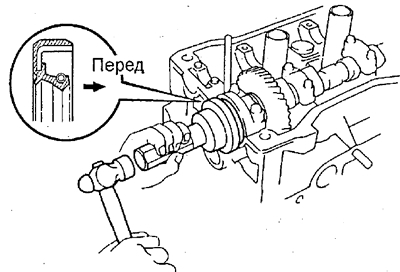
g) Using a suitable drift, install the camshaft oil seal.
Note:
- - The seal must be installed as shown in the figure.
- - The seal is installed into the cylinder head bore until it stops.
B. Install the intake camshaft.
a) Install the exhaust camshaft pilot pin so that it is located just above the edge of the cylinder head, as shown in the figure.
b) Apply consistent grease to the thrust (end) surfaces of the camshaft.
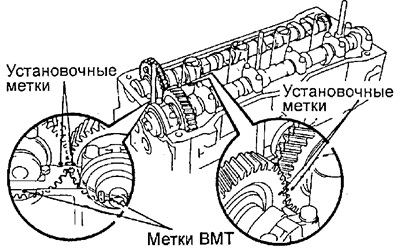
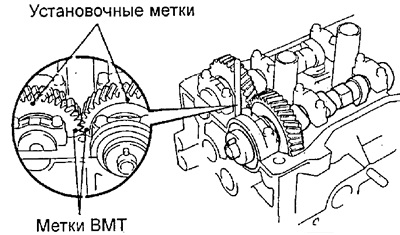
c) Engage the gears of the intake and exhaust camshafts, aligning the timing marks on these gears with each other.
Note: The camshaft gears also have "timing marks" or TDC marks; do not confuse them with the alignment marks.
d) Keeping the gears engaged, place the intake camshaft in the bearing beds. In this position, the cams of the 1st and 3rd cylinders press evenly on the tappets of the corresponding valves, which facilitates the installation of the camshaft.
d) Install the camshaft bearing caps on the corresponding journals in accordance with the numbers stamped on them, as shown in the figure; the arrows on the bearing caps must point towards the front of the engine (in the direction opposite to the power take-off).
e) Apply engine oil to the threads and back of the camshaft bearing cap bolt heads.
g) Tighten the bearing cap bolts evenly in several passes, in the order shown in the figure.
- Tightening torque - 13 Nm
c) Remove the technological bolt connecting the auxiliary and main gears of the intake camshaft.
i) Install the 1st bearing cap of the intake camshaft with the arrow facing forward (towards the timing drive).
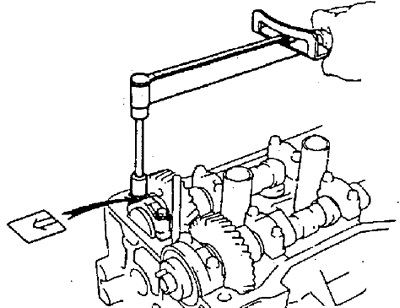
Note: If the 1st bearing cap does not fit into place, use a screwdriver to move the camshaft back and forth along its axis.
k) Tighten the bearing cap bolts evenly in several passes.
- Tightening torque - 13 Nm
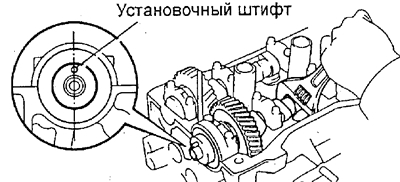
l) Turn the exhaust camshaft clockwise by its hexagonal part by 1 revolution (from TDC to BDC) so that the locating pin is in the position shown in the figure.
m) Make sure that the timing marks of the exhaust and intake camshaft gears are in the extreme upper position, and the TDC marks ("valve timing marks") coincide with each other, as shown in the figure.
5. Check and adjust the valve clearances (see the section "Checking and adjusting the valve clearances").
6. Install the exhaust manifold stand.
Tightening torque:
- 4A-FE, 5A-FE — 40 Nm
7A-FE:
- bolt A - 40 Nm
- bolt B - 44 Nm
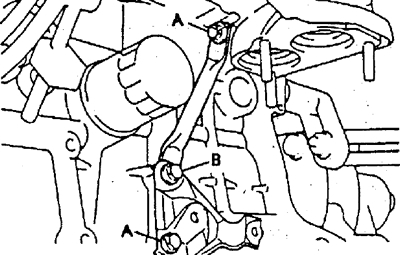
7. (4A-FE, 5A-FE) Install the exhaust pipe by tightening the mounting nuts.
- Tightening torque - 63 Nm
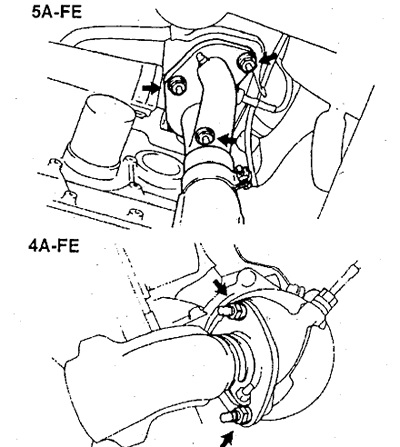
8. (4A-FE, 5A-FE) Install the exhaust downpipe bracket.
- Tightening torque - 13 Nm
9. (7A-FE) Install the exhaust pipe.
a) Install the exhaust pipe bracket and tighten the 2 bolts and 2 nuts.
- Tightening torque - 63 Nm
b) Install the lower bracket of the intake pipe by tightening the 2 mounting nuts.
- Tightening torque - 33 Nm
10. Install the generator.
11. Connect the coolant inlet pipe No.2 by tightening the 2 nuts.
- Tightening torque - 15 Nm
12. (7A-FE) Connect the connectors of the electropneumatic valve of the fuel vapor capture system, the valve of the idling speed control system, the throttle position sensor, the coolant temperature sensor, and the integrated ignition unit.
12. Install the wiring harness protector.
13. Install the oil dipstick assembly with the guide.
a) Install a new O-ring onto the dipstick guide using a small amount of soapy water.
c) Install the oil dipstick assembly with the guide and secure it with the bolt.
- Tightening torque - 10 Nm
14. Install the power steering pump.
a) Install the pump by tightening the 2 mounting bolts.
- Tightening torque - 19 Nm
b) Tighten the adjusting bolt.
15. Connect the fuel inlet hose and fuel return hose by tightening the bypass bolt.
- Tightening torque - 30 Nm
16. Install the intake manifold stand.
Tightening torque:
- intake manifold mounting bolt - 19 Nm
- cylinder block mounting bolt - 40 Nm
17. Connect the heater hose and coolant hose.
18. Connect the radiator inlet and outlet hoses.
19. Connect the crankshaft position sensor connector.
20. Install the air filter cover with the air duct.
21. (4A-FE, 5A-FE) Connect the air hose of the air conditioning system solenoid valve.
22. Connect the fuel vapor canister vacuum hose.
23. Connect the brake booster vacuum hose.
24. Connect the manifold absolute pressure sensor vacuum hose.
25. Connect the power steering air bleed hose.
26. Connect the vacuum receiver hose.
27. Connect the throttle valve control cable (automatic transmission).
28. Connect the accelerator cable.
29. Install the combined ignition unit or distributor.
30. Install the timing belt.
31. Fill with coolant.